Hot Dog Buns / Hamburger Buns

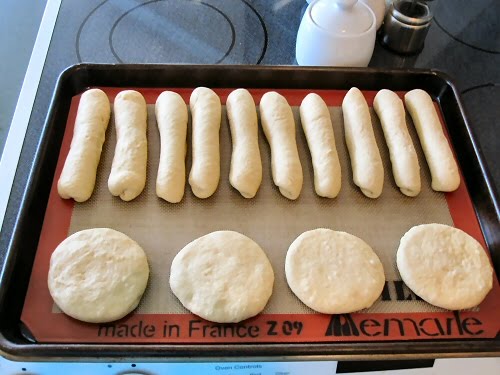
This was originally a recipe for bread sticks. If that is what you want, just roll them a little skinnier and shorten the cooking time by 2-3 minutes.  For hamburger buns, roll them into small baseballs and press them flat to about 1/2 inch thickness – they will rise and thicken.  I frequently roll them into a sheet about 3/4 inch thick, and use a 3 inch biscuit cutter to make the buns.  They end up being about 3.5 inches in diameter.

bunsINGREDIENTS

  • 1 package (or 1 TBL) active dry yeast
  • 2 TBL sugar (split in half for use at two different times)
  • 1/4 C warm water – very warm to the touch, but not hot
  • Three-quarter C milk
  • 1/4 C dried (instant) milk powder
  • 1 tsp Xanthan gum
  • 2 tsp salt
  • 1/4 C soft shortening or lard (bacon grease)
  • 3 C sifted all-purpose flour
  • 1 C spelt or whole wheat flour
  • 1 egg, beaten
  • (optional) 1/4 C sour dough starter

STEP BY STEP

  1. ACTIVATE YOUR YEAST
    Mix your yeast, water, and half your sugar in a small glass bowl
    Stir to mix
    Set aside
  2. SCALD YOUR MILK
    Put into microwave for a minute
    Set aside to let it cool
    Put your lard, salt and the rest of your sugar into the milk
  3. PREPARE HALF OF YOUR FLOUR
    In a large mixing bowl…
    Add your sourdough starter if you are using it
    Add the milk mixture and 1/2 cup flour.
    Add the yeast mixture, dried milk, xanthan gum and everything else
    Mix in bread maker at medium speed until smooth, scraping the bowl occasionally. 100 strokes if by hand.
  4. FINISH YOUR DOUGH
    Add more flour, a little at a time, until dough leaves the sides of the bowl, and surface of dough springs back when pressed.  Dough should not be sticky.
    You may not use all of your flour (or you may need more)
    Turn dough onto lightly floured board.
    Knead until smooth and elastic: 4-8 minutes.
    Place in lightly oiled bowl.
    Turn dough over to oil the top also.
    Cover and refrigerate overnight for a more complex flavor
    When ready to make the buns, cover and let rise in warm place for about 30 minutes.
  5. SHAPE YOUR BUNS
    Form your buns on a greased baking sheet, keeping in mind that they will increase in size by about 125%
    Let them rise for about an hour in the (not turned on) oven
  6. BAKE YOUR BUNS
    Pull the trays of buns out of the cold oven and turn oven to 350º
    Brush the tops of your buns with melted butter
    Sprinkle with sesame seeds or lightly with coarse sea salt if you wish
    Bake at 350º for about 10-12 minutes or until browned
    Let cool 10 minutes before removing from tray

Tips: Around the Kitchen

Kitchen Tools and Gadgets

  • A thermometer helps you repeat success and avoid repeating failures. I have two from Thermoworks:
    >   An immersible/insertable thermometer: Good to take the core temperature of meats
    >   An infrared thermometer: Great for everything from preheating your griddle to acting as a candy thermometer.
  • Use tongs to help squeeze limes or lemons.  Gives you leverage.

Cooking tips

  • When cooking pasta, reserve a cup of pasta water for thinning your pasta sauce. Put at least a ladel back into the sauce to make it stick to your pasta better.  Also, you can use the water with a bit of cheese to make a nice creamy sauce.  Also, don’t rinse your pasta after cooking.
  • Use screaming high heat for searing meat, preferably in a cast iron pan.
  • Select the pan which is best suited for your recipe.  (eg) Don’t use an aluminum pan with anything cooked with acidic ingredients.  Cook pancakes in a non-stick pan, but don’t use metal utinsels.
  • Blanche and shock fresh vegetables (boiling water, then ice water) to make them greener and set the flavor.  If doing two, start with the lighter vegetable and work onto the darker vegetables.
  • Let your oven completely preheat before putting your food in.  You will get uneven heating, and even incomplete chemical reactions.

Kitchen Design

  • When replacing your counter consider ceramic tile or porcelain stone tile. Lay with a thin grout line.

Keeping it Clean

  • Stain Removal: Voted best overall was Oxi-Clean. Very inexpensive, very effective. Soak for about an hour. Removed blueberry, mustard, chili, chocolate, red wine, beets and coffee.
  • CAMEO was voted best Aluminum and Stainless Steel cleaner
  • Never ever put cast iron in the dishwasher, or clean it with soap.
  • Barkeepers friend is good for cleaning steel pans
  • The five second rule is bogus unless the item is totally hard and dry.  If it is the least bit moist, you are probably putting feces into your food or mouth.  Yech.

Preserving Food

  • To freeze fresh berries spread out on cookie sheet and freeze 4 hours. Put into freezer zip locks.
  • Store vegetable oils and most seed oils in a cool dark place to minimize spoilage

Safe Kitchen Tips

  • When cutting cherry tomatoes put them between two cottage cheese lids and slice a bunch of them in half at the same time.
  • Use water bottle with a sports top as your barbecue sauce dispenser
  • Don’t pour bacon grease down the sink.  Instead, pour into a can and let it solidify, then just throw it away.

Entertaining

  • When you are preparing a menu for an important event, always test the recipe before the day of your event. Never use your guests as guinea pigs.


Mexican Dinner Salads – Two Recipes

Mexican Chicken Salad

Chicken
onion
avocado
salsa
cheese
cilantro
scallions
oregano
bell pepper
radish
sour cream
cabbage

Instructions
1. Cook bowls 350 degree for 10 minutes.
2. Roll chicken in 1 egg, 1/4 cu milk and flour. Cook in olive oil.
3. Saute onions in olive oil
4. Layer plate with cabbage
5. Base, oregano, bell pepper, onions, radish, sour cream
6. Topping, chicken, avocado, cilantro, scallions, salsa, cheese.

Mexican Carne Molida Salad
1 lb hamburger
1 onion (diced)
1 can stewed tomatoes
2 small cans tomato sauce
1 can chili w/out beans
1 can mushrooms
2 tsp worchestershire sauce
½ tsp garlic salt

Instructions
1. Brown hamburger with onion.
2. Add all ingredients to cooked hamburger.
3. Cook and simmer 1 hour.
4. Serve over tossed salad topped with Fritos and grated cheese.

Mediterranian Salad

1/4 CU tomato
1/4 CU kalamata olives
1/4 CU red onions (diced)
1/8 CU roasted peppers
1/8 CU mint leaves
1/4 CU yellow tomatoes
1/8 CU feta cheese
1 cucumber
some fresh basil leaves

Instructions
1. Tear romaine lettuce and arrange on plate
2. Arrange other ingredients on top topping with sliced cucumber and feta
3. Drizzle top with lemon juice and olive oil
4. Top with thinly cut basil leaves

Rub pita bread with olive oil and grill (see recipe for Pita Chips)

######

Variations Handwritten notes to this recipe are scanned in PDF document at
http://www.xml3.com/family/Recipes/03.pdf
Several other Greek recipes are in this document as well.

Meat Strudel

Goat cheese
Steamed asparagus tips
Red bell (shredded)
Shredded meat

Instructions
1. Use strudel pastry (keep moist).
2. Brush w/ butter, lay down row of filling, fold ends, roll tightly, brush w/ butter @ end finish rolling.
3. Brush outside w/ butter.
4. Bake till golden brown. Cut ends off to sit flat, then cut center on bias.

Serve with basil sauce

Meat Skillet

Ingredients:

1 stalk celery (chopped)
1 carrot (chopped)
1 onion (chopped)
2 TBL butter
————
1 potato diced small
1 bay leaf
1 tsp thyme
1 tsp poultry seasoning
salt and pepper to taste
————-
2 TBL flour
2 TBL EVOO or butter
————-
1 CU good white wine
1 tsp grated ginger
————-
1 liter chicken stock or broth
1 LB chicken or other meat (cooked)
1 tsp tarragon
1 sm can peas
1/2 CU asparagus (chopped)

Instructions

  1. Add first four ingredients and saute for about 10 minutes
  2. Add potato, bay, thyme, etc. and saute for 5 more minutes
  3. Add 2 TBL flour and butter/EVOO and stir until combined
  4. Add next ingredients including wine and heat to scrape and deglaze pan
  5. Add chicken stock or broth and bring up to a simmer.
  6. Add 1 LB cooked chicken or other meat
  7. Add tarragon and peas, then simmer 20 more minutes
  8. Add asparagus as it starts to thicken, and cook 10 more minutes

McDonald’s Breakfast Burrito (copy cat)

1 tsp onion (minced)
1 tsp red bell pepper (minced)
1 tsp green bell pepper (minced)
1 TBL Velveta cheese
1 egg
1 flour tortilla
scant oil

Instructions
1. Lightly saute onion and bell peppers in oil
2. Meanwhile, spread cheese onto tortilla
3. Add egg to skillet with other ingredients
4. Microwave tortilla for 15 seconds
5. Cook egg until no longer runny, but still soft
6. Pour into tortilla and fold (see special steps)

Special Steps
Folding a tortilla into a burrito
1. After filling with desired ingredients fold one side of tortilla in so that edge of tortilla is about 1 inch toward center.
2. Perpendicular to first fold, start folding about 1 inch pieces until you have rolled the ingredients into the tortilla/

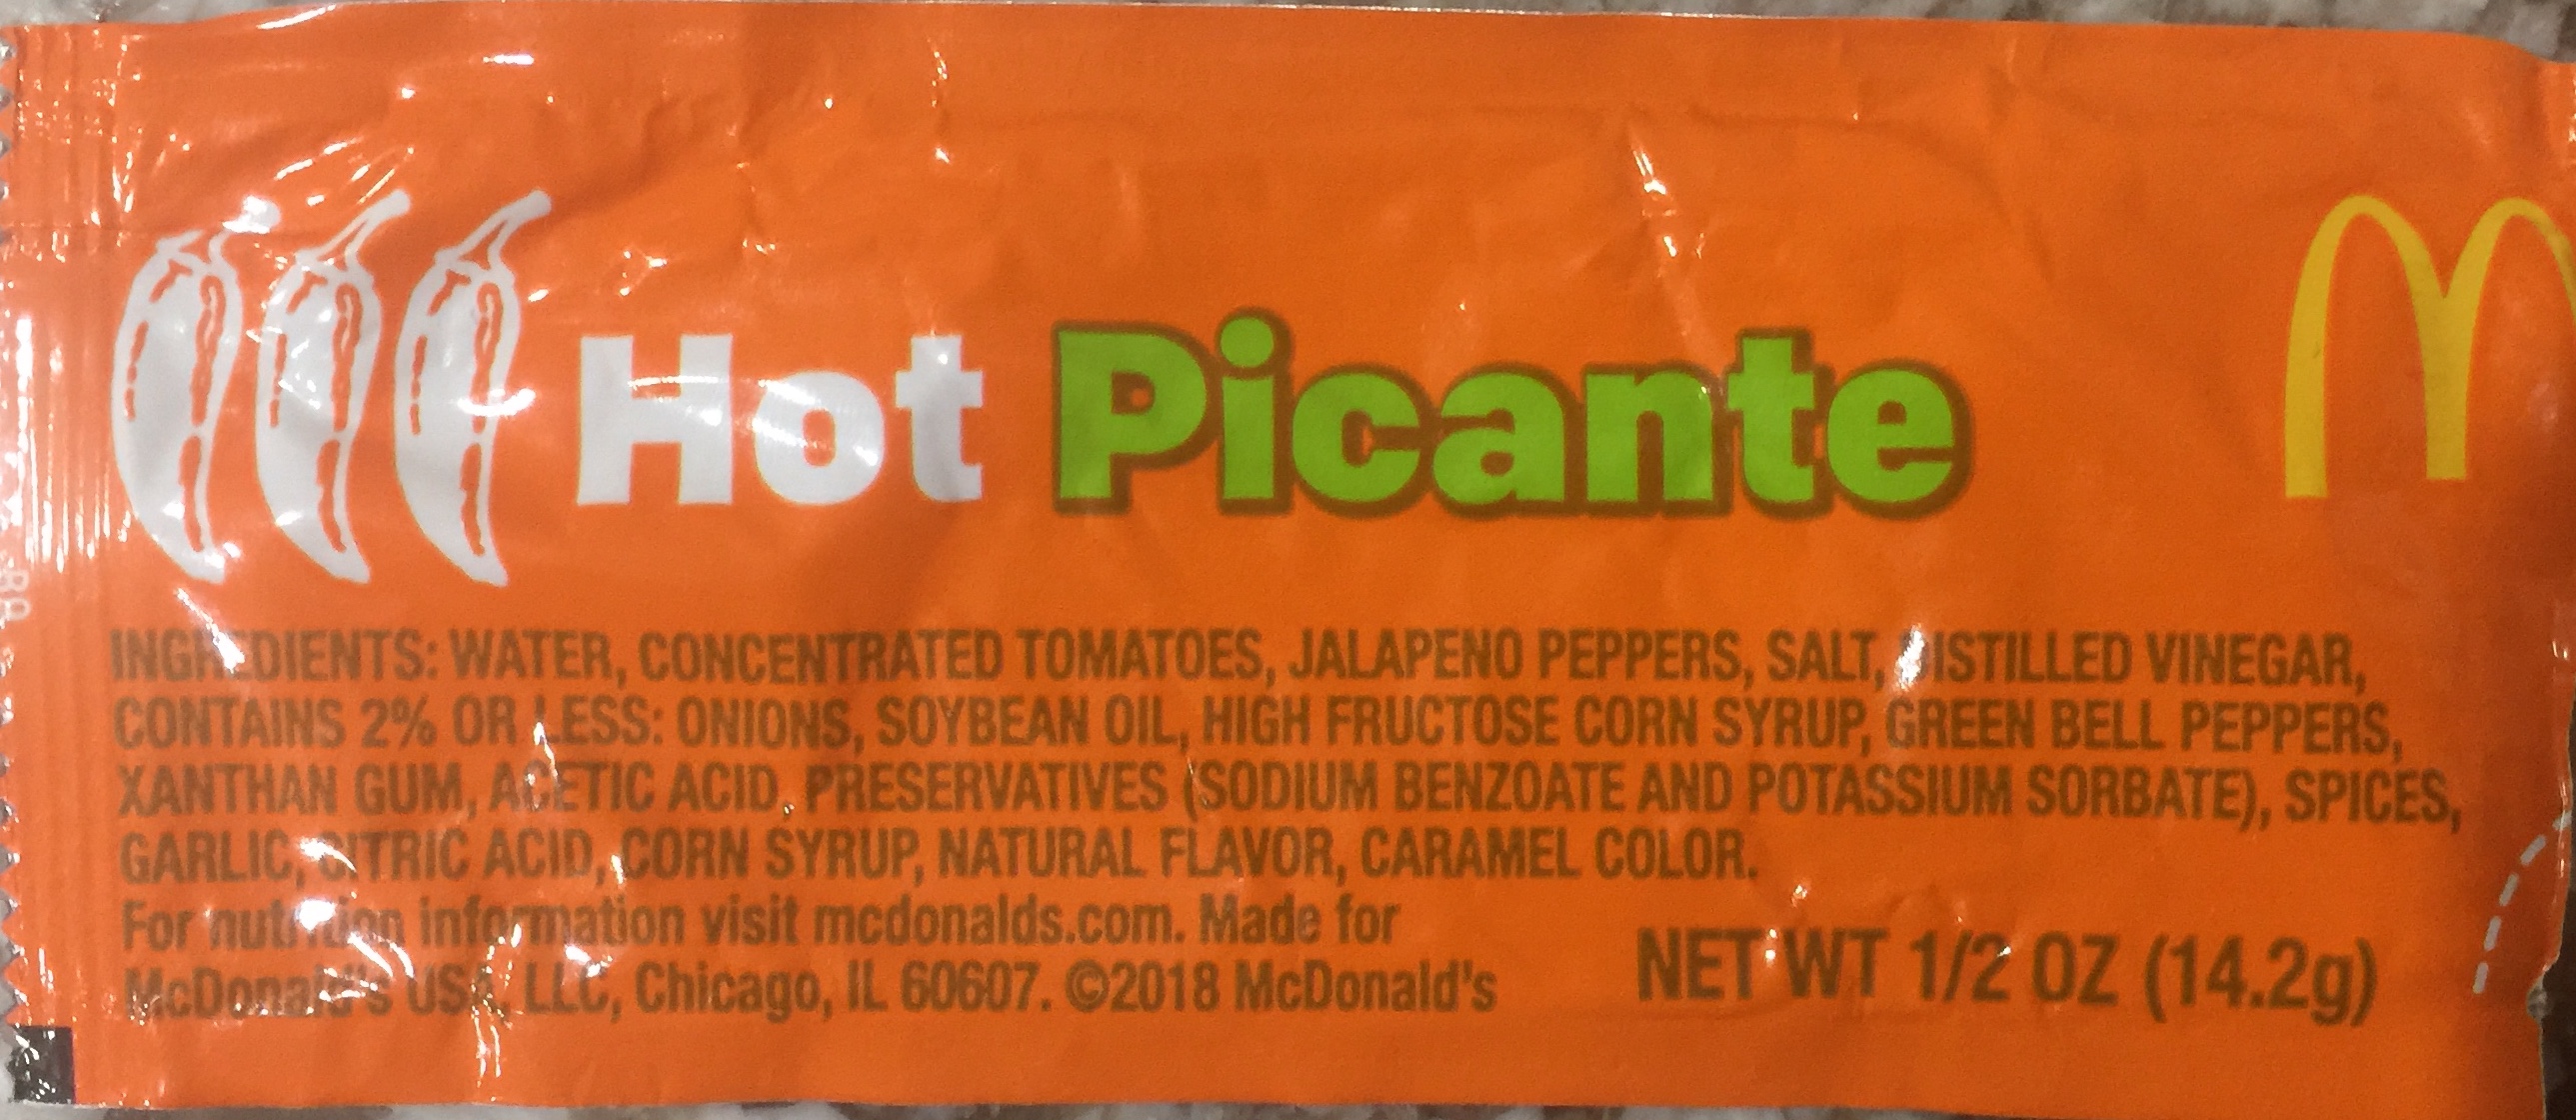
McDonalds (copy cat) Picante sauce

15 OZ can tomato sauce
8 OZ water
6 OZ tomato paste
2 tomato with seeds removed (grated)
1/2 onion (grated)
4 cloves garlic (grated)
2 TBL jalapeno (minced)
2 TBL white vinegar
1 TBL sugar or 2 TBL Karo Syrup
1 TBL lime
1 tsp salt

Instructions
1. Put tomato sauce, water and tomato paste in sauce pan under medium heat.
2. Mince tomato, garlic, jalapeno, vinegar, sugar, lime, salt and onion in food processor
3. Add minced ingredients to pan and simmer 10 minutes.
4. Cool to serve.

Notes I tried adding Cayenne pepper to this and (while I am a Cayenne FANATIC) it detracted VERY MUCH from the overall flavor. This is best when prepared just as shown above.

CLICK TO ENLARGE

Payday Peanut-Marshmallow Bars

Peanut Chewy Payday Bars

Prep Time: 15 minutes
Cook Time: 15 minutes
Total Time: 30 minutes
Yield: One 8-by-8 inch pan, 9 generous squares

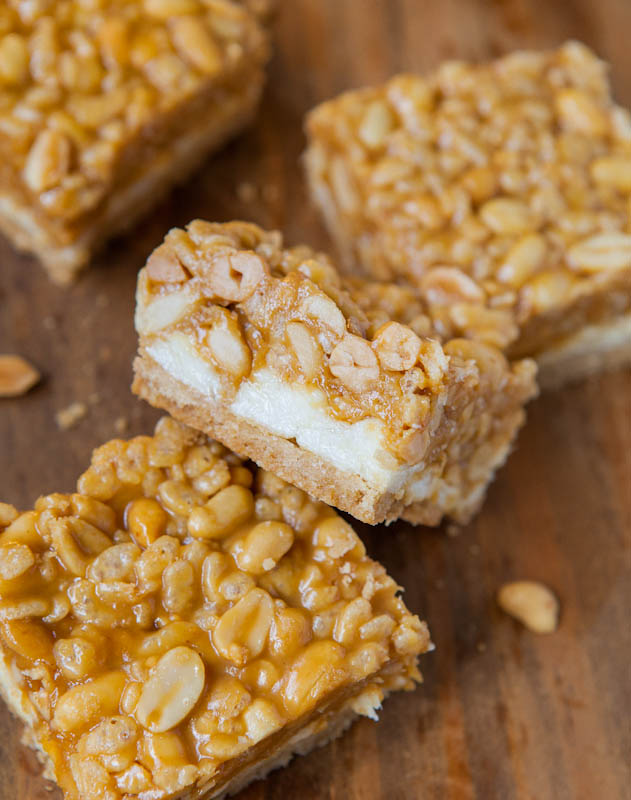
A three-layered bar full of that resembles a Payday candy bar, but better – thanks to the gooey marshmallows that are sandwiched in the middle layer. The melted marshmallows are flanked by a buttery shortbread-style crust and topped with a mixture of peanut butter, peanuts, and crispy rice cereal. Sweet and gooey meets salty and crunchy with an abundance of peanut butter, peanuts, and plenty of chewy texture. Although there are three layers, the bars can be made from start to finish in a half hour, and can be kept both vegan and gluten-free.

Ingredients:

For the Crust

  • 6 tablespoons unsalted butter, softened (three-quarters of one stick)
  • 3/4 cup all-purpose flour
  • 1/4 cup light brown sugar, packed

For the Filling

  • 3 cups miniature marshmallows
  • For the Topping
  • 1 heaping cup creamy peanut butter
  • 1/3 light corn syrup (light in color rather than dark)
  • 1/4 cup unsalted butter (4 tablespoons, half of one stick)
  • 1 1/2 teaspoons vanilla extract
  • 1 1/2 cups peanuts (I use Oh Nuts Roasted Salted Peanuts, honey roasted or similar may be substituted)
  • 1 1/2 cups Rice Krispies cereal (or vegan and gluten-free cereal)

Directions:

Preheat oven to 350F. Line an 8-by-8-inch baking pan with aluminum foil leaving overhang (you must line your pan), spray with cooking spray; set aside.

For the Crust – In a medium bowl, combine all ingredients and stir to combine. Keep working the butter into the flour and brown sugar and transfer the sandy and crumbly mixture into the prepared pan. Press mixture down firmly with fingertips, and then pack it down with the bottom of a drinking glass or back of a spoon. Bake for 10-12 minutes, or just until crust has set and pale in color; don’t worry if it’s a bit underbaked as pan will be going back into the oven in the next step.

For the Filling – Evenly sprinkle the marshmallows over the crust and bake for about 5 minutes or until they have begun to melt and before they start browning (we aren’t making s’mores); set pan aside.

For the Topping- In a large microwave-safe bowl, combine peanut butter, corn syrup, butter and heat on high power to melt, about 1 minute; stir to combine. Add the vanilla and stir to combine. Add the peanuts and cereal and stir to combine. Pour mixture over the marshmallows, smoothing it lightly with a spatula to create an even flat layer. Set pan aside to cool for at least 4 hours before slicing, or overnight; refrigerating the bars can be used to expedite the cooling process. Slice bars by lifting them out using the foil overhang and transfer to a cutting board. Bars will keep in an airtight container at room temperature for up to one week, or in the freezer for up to 3 months.

Recipe may be kept vegan by replacing the butter with margarine or Earth Balance, by using vegan marshmallows, and using a vegan cereal.Recipe may be kept gluten-free by using a gluten free flour blend for the crust and and using gluten free cereal of your choice. Take care all ingredients used are suitable for your dietary needs.

From allfreecopycatrecipes.com

Make the crust by combining six tablespoons of softened butter with flour and brown sugar and stir to incorporate the butter. The softer the butter is, the easier this will be. Don’t be alarmed if the mixture looks quite crumbly, sandy, and dry.

Transfer it to a foil-lined baking pan, and absolutely line the pan to make your life much easier. Press the crumbs down with your fingertips and then really pack it down using the back of a spoon or press down on it with the bottom of a drinking glass, helping it get nice and smooth.

Bake the crust for about ten to twelve minutes, or just until it has barely set and still pale and golden. If it’s slightly under-baked, that’s fine because the pan is going back into the oven.

Sprinkle three cups of marshmallows over the buttery crust and return the pan to the oven for about five minutes, or just long enough to soften and begin to melt the marshmallows. Keep a watchful eye on the marshmallows and remove the pan from the oven before the marshmallows start toasting and browning because these aren’t s’mores.

The final layer is a mixture of melted peanut butter, butter, and corn syrup, that’s stirred together before adding a splash of vanilla and one-and-a-half cups of both crispy rice cereal and roasted salted peanuts. Stir the cereal and peanuts into the warm and sticky peanut buttery broth and then pour it over the marshmallows.

These bars need to set up for at least four to six hours before slicing them. I made them at night and sliced into them the next morning and you could probably speed up the process by putting the pan into the refrigerator.

I love the diverse layers and flavors going on, from sweet and gooey to salty and crunchy. Each is notable and distinct. The buttery crust resembles a shortbread crust, crispy and firm without being dry or too sweet.

The marshmallow filling is the perfect squishy and sweet complement to the crust, providing plenty of oozing, cloud-like softness. Too often marshmallows get lost in layered bars because they are squished and flattened by the weight of the subsequent layers. I planned around that unfortunate phenomenon and used an ample amount of marshmallows so this layer would really stand out and be thick, puffy, and voluptuous.

The final layer is for peanut and peanut butter fanatics, and reminds me of a Payday candy bar. The melted peanut butter, butter, and corn syrup creates a beautiful brown sauce that’s both sweet with a touch of savory. The salty peanuts and crispy rice cereal added help soak up saucy peanut butter mixture and after the bars set up, there’s an abundance of crunchy and crispy texture, along with chewy and gooey.

I got over my issue with nuts in desserts as I sank my teeth into one of these babies.
 

Chocolate Saltine Toffee

(with vegan and gluten free options)

  • 30 to 40 saltine crackers (I have seen recipes call for 40 but I used about 32 crackers)
  • 1 c butter (2 sticks)
  • 1 c brown sugar, packed (I used half light and half dark because that’s what I had on hand and open)
  • 1/2 tsp vanilla extract (some recipes I have seen do not call for it, but I recommend it)
  • 1.5 to 2 c chocolate chips (I used one 12-ounce bag of TJ’s semi sweet morsels, also see optional note below)

Directions:

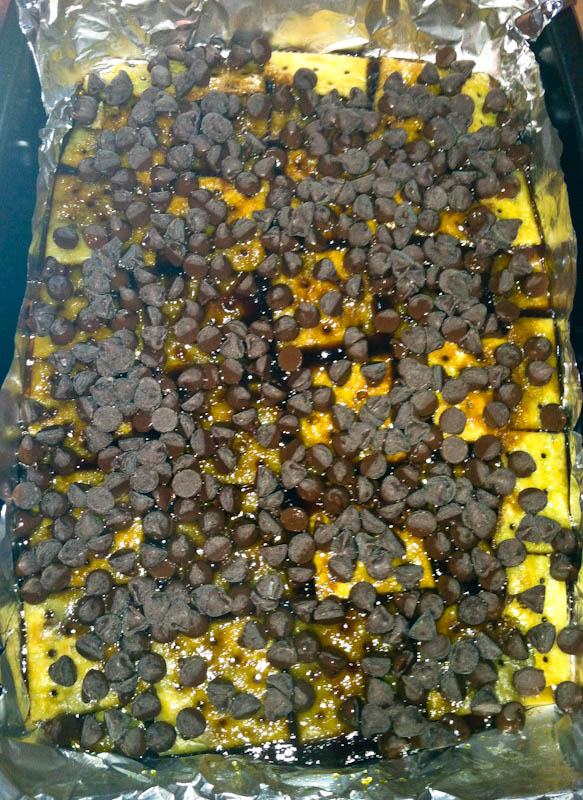
Preheat the oven to 350F.  Line a 9 x 11 pan or similar with aluminum foil and spray it very well with cooking spray.  (Do not try to make this without using foil; you will hate yourself).  Place saltine crackers in a single layer on the bottom of the pan.  (Some recipes suggest using a jelly roll pan which may allow for a slightly bigger batch, i.e. 40 crackers, but it’s a bit too shallow for my comfort zone and didn’t want any bubble-overs)

In a saucepan on the stovetop, combine butter and sugar and bring to a boil while stirring constantly.  Once a boil is reached, reduce the heat and simmer, uncovered, for 3 to 5 minutes or until mixture has thickened some.  Take care not that your simmer is not too fast/too high because it will be prone to bubbling over or scorching.  Stir mixture frequently while it simmers to avoid bubbling over or scorching (The taste of burnt butter and sugar is awful so do not burn it)

After mixture has thickened a bit, remove it from the heat, wait 30 seconds, add the vanilla extract and stir.

Pour mixture over the prepared pan with the saltine crackers.  Bake this in the preheated 350F oven for 5- 7 minutes, or until toffee/liquid becomes bubbly.

After removing the pan from the oven, let it sit for 3-5 minutes.

Sprinkle on the chocolate chips and wait for 3-5 minutes, letting them soften and melt a bit, and then spread and smooth them into an even layer with a spatula.

Optional:  After smoothing the chocolate, add nuts, seeds, graham cracker crumbs, toffee bits, dried fruit, candy bits, or swirl in some peanut butter or other nut butter.

Optional: Use other types of chips, such as butterscotch, white, peanut butter, etc. either in addition to or in a half-and-half  combination with the dark chocolate chips for your top layer.

Let cool very well and if desired for expediting purposes, refrigerate or freeze until hardened.  Break into pieces the size of your choice.

Store in an airtight container on the countertop.  Or, for longer term storage, freeze it.  I freeze all my desserts regardless and have been eating this straight out of the freezer.

To keep gluten free, use GF crackers or make your own GF saltine crackers

To keep vegan, use margarine/Earth Balance and use a vegan cracker


Alternate from MrFood.com

Brickle Crunch

Serves: 25
Chilling Time: 30 min
Cooking Time: 10 min

What You’ll Need:
  • 35 saltine crackers (about 1 sleeve from a 16-ounce box)
  • 1 cup (2 sticks) butter
  • 1 cup sugar
  • 1 cup (1 six-ounce package) semisweet chocolate chips
  • 1 cup peanut butter chips
What To Do:
  1. Preheat oven to 400 degrees F.
  2. Line a 10- x 15- inch cookie sheet with aluminum foil. Lay out crackers on cookie sheet, packing tightly.
  3. In a medium-sized saucepan, melt butter, then add sugar and boil, stirring frequently, 2 to 3 minutes, until sugar is completely dissolved.
  4. Immediately pour mixture over crackers and bake 7 minutes.
  5. Remove from oven and immediately sprinkle chocolate and peanut butter morsels over crackers, spreading evenly as they melt.
  6. Refrigerate at least 30 minutes, then break into pieces. Serve immediately or refrigerate until ready to serve.
Notes

This is great topped with chopped nuts or flaked coconut – just sprinkle either on top before refrigerating. It’s best not to substitute margarine for butter in this recipe.


Alternate Similar Recipe from Mr. Food – www.mrfood.com

Homemade Cracker Candy

Homemade Cracker CandyWatch Video

It’s hard to believe that this chocolatey Cracker Candy  is made with such an unusual ingredient! But our Test Kitchen guarantees that once you try ’em, you will make this one again and again!

Serves: 10

Cooking Time: 8 min

What You’ll Need:
  • About 24 round buttery crackers
  • 3/4 cup butter (1-1/2 sticks)
  • 3/4 cup packed brown sugar
  • 2 cups semisweet chocolate chips
  • 1/2 cup chopped pecans
What To Do:
  1. Preheat oven to 350 degrees F. Line a 9- x 13-inch pan with aluminum foil; lightly coat foil with cooking spray. Arrange crackers in a layer in pan.
  2. In a medium saucepan, bring butter and brown sugar to a boil; cook 3 minutes, stirring constantly. Pour mixture over crackers.
  3. Bake 5 minutes; turn off oven. Sprinkle crackers with chocolate chips and let stand in oven 3 minutes, or until chocolate is melted. Spread  chocolate evenly over crackers. Sprinkle pecans over chocolate. Let cool, then break into pieces. Store in an airtight container in refrigerator.


Basic Gumbo

Gumbo is kind of like saying Casserole. It varies drastically. Use this as a base, then expand to your preferences.

Ingredients
1 large onion (chopped)
4 stalks celery (chopped)
1 large bell pepper (chopped)
2 bay leaves
2 TBL cayenne pepper
2 TBL garlic
1 TBL thyme or oregano
1 TBL Worcestershire
1 tsp each salt and black pepper
——-
2 TBL Emeril’s Essence
1 LB some kind of meat

Instructions
1. After finishing cooking for Basic Roux (see recipe)
2. Add all ingredients up to first line and cook 10 minutes
3. Add 2 CU seafood or chicken stock slowly while stirring
– If roux is hot add cold stock, if roux is cold then heat stock first then add roux
4. Simmer 1 hour while proceeding to Step 5
5. Cook meat pieces (unless fish) in whatever manner you desire, and set aside
6. After simmer of 1 hour, add cooked meat or raw fish (Halibut, Cod, Shrimp or Oyster)
7. Add 2 TBL Emeril’s Essence (see recipe)
8. Ladle into bowls and top with parsley or chives

Gumbo should be the consistency of a hearty chicken soup and should always be served with a couple tablespoons of cooked rice.

Bananas Jamaican

Ingredients
For each TWO bananas, use…
1 tsp EACH of alspice, curry, nutmeg, cinnamon, and vanilla
1 TBL EACH of corn starch and soft butter
2 TBL EACH of brown sugar and spiced rum
OPTIONAL 1 tsp chopped nuts

Instructions
1. Halve bananas and place in baking dish
2. Mix together all other ingredients (except nuts) over low heat
3. Pour over banana
4. Bake @ 350 degrees for 20-30 minutes
5. Plate banana and top with carmel leavings from bottom of baking dish
6. Sprinkle with chopped nuts

Special Steps

Variations Serve with a scoop of hard ice cream. Double ingredients (except bananas) and pour half of carmel leavings over ice cream.

Claudette’s Fried Eggplant

Ingredients
Eggplant
Egg
Flour
Milk
Bread crumbs
Salt and pepper
Mozzarella cheese

Instructions
Since I prefer the exterior crisp, my usual preparation is to

1. Slice it lengthwise, leave skin
2. Dip slices in flour, then egg/milk mixture, then dip into breadcrumbs
3. Salt & pepper each then fry in olive oil

Special Steps
Variations Sometimes I put mozzarella cheese and marinara gravy on top and place under broiler till cheese melts. Mangiare!

Cilantro Soup

Ingredients
Kelp or seaweed
Bonita Shavings
1 tsp Soy
1/2 CU Saki
1/4 CU Cilantro

Instructions
1. Bringe water to a boil
2. Simmer Kelp, Soi and Bonita Shavings 30 minutes
3. Strain liquid, discarding all except the broth
4. Add chopped cilantro and saki
5. Simmer additional 10 minutes
6. Serve

Cilantro Rice

FROM SCRATCH

General ratio is 2 parts water to 1 part rice

Ingredients

  • EVOO
  • A bunch of Cilantro stems
  • 1 diced onion
  • 1 C white or brown rice
  • 2 C chicken stock

Step by Step

  1. Saute onion in EVOO
  2. Add rice to the onions and stir 60 seconds
  3. Add diced cilantro stems
  4. Immediately add chicken stock
  5. Bring to a boil
  6. Reduce heat to a low simmer
  7. Stir one last time, cover and leave unattended for 20 minutes
  8. Toss rice with 1 TBL softened butter and serve

USING PRECOOKED RICE

Ingredients

  • 1 CU left-over white or brown rice
  • 3 limes per cup of brown rice
  • 1/2 bunch cilantro per cup of brown rice
  • salt to taste

Step by Step

  1. Prepare brown (or white) rice per whatever directions you desire; or use left-over rice
  2. Chop cilantro leaves
  3. Squeeze juice from limes and mix into cilantro
  4. Mix salt, cilantro and lime into rice
  5. Let set at least 1/2 hour before serving

Chilled Avocado and Buttermilk Soup

CLICK HERE for Avocado Tips and Tricks.  


Ingredients
2 Avocados
2 TBL lemon juice
1/2 CU vegetable stock ( plus extra for consistency )
1/4 CU white wine
1/4 CU buttermilk
1 TBL EVOO
3 chives (chopped)
1/2 tsp white pepper
1/2 tsp kosher salt
a few shakes Tobasco
fresh cilantro

Set aside for garnish:
Optional: Cooked shrimp
1 TBL per person chopped tomato

Instructions
1. Put lemon and wine into blender
2. Peel avocado and add to blender
3. Blend to coat avocado
4. Add MOST of cilantro ( but not all ) and vegetable stock
5. Blend to chop
6. Add everything else except remaining cilantro and the green chives
7. Blend to mix
8. Pour into bowls and garnish with shrimp and tomato
9. Garnish additional with cilantro and chives

Chile Relleno Omlette

Ingredients
1 egg
1 carton (2 egg) egg-beaters
½ CU shredded Monterey Jack
¼ CU sharp cheddar
2 tsp (lite) sour cream
scant salt
whole roasted/peeled green chilis

Instructions
1. Beat egg, combine with egg beaters, separate into two small bowls
2. Mix one tsp sour cream into each bowl of egg mixture
3. Mix in optional dash of salt
4. Heat butter in omelet pan or crepe pan
5. Empty one bowl of egg mixture into pan
6. Spread evenly – make sure cooked mixture stays free of sticking
7. When eggs are set, but not dry, sprinkle Monterey Jack onto the eggs
8. Lay green chilis over top of cheese perpendicular to the handle
9. Sprinkle tops of chilis with a bit of the cheese
10. With a spatula, fold over 1/3 of the omelet (closest to the handle)
11. Fold over opposite third of the omelet
12. Cook briefly, then flip so that folded edges are on the bottom.
13. Cook briefly, then slide onto the serving plate
14. Apply cheddar cheese and garnish as desired

GARNISH OPTIONS:
– Avocado
– Chives
– Sour Cream
– Diced tomato
– Mushrooms
– Cilantro

Chile Relleno – TWO RECIPES

Briefly, Chile Rellenos begin with Poblano Peppers (CLICK FOR IMAGE) which is often (incorrectly) sold under the name of a Pasilla Pepper. The pepper is prepared (see below) and then stuffed with picadillo (CLICK FOR IMAGE) and/or cheese, and then then dipped in an egg-based batter and deep fried, or baked at a high heat. They are served with several sauces. CLICK HERE if you don’t know what a poblano pepper is.

Preparing the Poblano Pepper

  1. Over a gas flame, or under an electric broiler, heat the Poblano until the skin is black and charred (CLICK FOR IMAGE) Do not remove the stems.
  2. IMPORTANT NOTE: If you are doing this inside, turn on all the vent fans in the house, cause your smoke alarm is likely to go off.
  3. NOTE: You can use Yellow Bell Peppers if one of your diners does not like any spice to their meal. Prepare these in the exact same way.
  4. When the pepper is well charred, and still hot, put it into a plastic ziplock bag for 2-5 minutes. This will allow the steam to separate from the flesh of the pepper.
  5. Wearing plastic gloves remove the blackened skin.
  6. DO NOT rinse them under water, this will remove much of the flavor. You may find a paper towel useful in sloughing off the skin.
  7. Examine the pepper for a pre-existing slice or hole, and use that as your starting point for the next step.
  8. Make a small slit in the pepper to remove most of the seeds, which can be tough and bitter. Leave the membrane for hotter rellenos, remove the membrane if you prefer not as much heat.
  9. Pack the pepper with Picadillo, but be careful not to overfill the pepper and split the pepper.
  10. Allow for overlap for closing and securing with a toothpick
  11. AT THIS POINT YOU CAN SET IT ASIDE WHILE YOU DO OTHER MEAL PREPARATION
  12. When you are ready to eat, roll in flour, then dip in the relleno batter, and place in baking dish or pan
  13. Top with shredded Asadero cheese and put into the oven for 20 minutes at 350 degrees.
  14. While it is cooking, prepare your refried beans, which make a great side for this recipe.
  15. Alternate Cheeses: , Queso Quesadilla, Queso Chihuahua, Queso Oaxaca, Monterey Jack


CHILE RELLENO BATTER

Ingredients:

  • 4 eggs, separated
  • 1 tablespoon of flour, plus extra for dredging the chiles
  • ½ teaspoon salt

How to Make the Batter

  1. Combine the flour and salt in a separate bowl
  2. Preheat a pot of vegetable oil to 375 degrees or your oven to 450 degrees.
  3. In an electric mixer whip the egg whites to stiff peaks.
  4. Mix in the yolks one at a time.
  5. Finally mix in the flour and salt.

Bringing it all Together to Cook

  1. Stuff Picadillo into Poblano, firmly but not too firmly that it splits the wall of the Poblano
  2. NOTE: If you will be cooking these open faced with Chili Tomato Sauce and Cheese on top, fill it up all the way, if you will be battering and frying these, leave room for the edges to overlap and afix with a toothpick.
  3. If frying: Roll in flour and then dip in batter. Place immediately in hot oil (360 degrees) until bubbles stop, then pick up with spider strainer and place on newspaper NOT paper towels
  4. If baking: Roll in flour and then dip in batter. Place on sheet pan and bake at 450 degrees for 20 minutes or until browned.
  5. If open faced: Top with Chili Sauce and grated Asadero cheese – Bake at 350 degrees for 20 minutes

Alt topping

Green Pipian Sauce:
1 1/4 cup green pumpkin seeds ( pepitas)
1 pound tomatillos, husked and rinsed
1 serrano chile, stemmed
1/2 medium white onion, roughly chopped
1 1/2 cups chicken broth, preferably organic, warmed
1/4 cup loosely packed fresh cilantro leaves
1 teaspoon sugar
Salt and freshly ground black pepper

========================================

Ingredients
2 egg whites
4 large green Poblano chilies
5 “fingers” of asadero, manchego or tierno cheese
1/4 CU milk
1/4 CU white flour
1/2 tsp salt
scant pepper
1 tsp oregano
Vegetable oil

Instructions
1. Put chilies under broiler four over other high heat until they start to blacken
2. Put into plastic bag 10-15 minutes to sweat
3. Remove from bag and carefully peel off skin
DO NOT RINSE UNDER WATER
4. Slit one side carefully and remove seeds or cut tip and insert cheese
5. Stuff chilies with cheese. Dice fifth finger and set aside for step #7
6. Beat egg whites until they form peaks
7. Mix together yolks, milk, flour, salt, pepper, extra cheese and oregano
8. Gently combine mixture with egg whites
9. Heat 1″ vegetable oil in frying pan
10. Dip each chili into batter, then fry until light brown OR put into baking disk and bake at 350 degrees for 15 minutes
11. Serve with garnish

GARNISH OPTIONS:
– Avocado
– Chives
– Grated cheese
– Sour Cream
– Diced tomato
– Mushrooms
– Cilantro

ALTERNATE STUFFING IDEAS

Canned tuna

Jalapeño Chili Sauce

Also referred to as Grandpa’s Jalapeño Puree

Before we begin…

  • You can grow your own jalapeños if you life in a warm climate
  • If you don’t, you can buy some at any Mexican grocery or even on Amazon.
  • Any time you are blending the peppers, it will create a toxic gas cloud, so make sure you are in a well-ventilated environment

Ingredients to feed 4 people

A whole bunch of jalapeños – red, green, it doesn’t matter Have some Thai chilies, throw them in there too; as well as your serranos and habañeros if you wish hotter sauce.  If you want a milder Chili Sauce, use Poblano, Anaheim, Bell or Banana peppers. You will also need water, white vinegar, sugar, cumin, tomato paste, garlic powder, onion powder and salt.

Step by Step
2016-03-02 12.29.45

  1. Fill quart mason jars with minced jalapeños
  2. Remove seeds before mincing for milder sauce, leave them in for hotter sauce
  3. Put into mason jar filling about one inch from the top
  4. Place in mixing cup 1/2 C water, 1 C vinegar
  5. Microwave about 2 minutes
  6. Add 1 TBL salt
  7. Add 1 tsp cumin
  8. Mix all mixing cup ingredients to incorporate and dissolve
  9. Pour liquid into mason jars covering peppers
  10. Put the lid on and place jar on counter for a month or two or three – mine just finished eight months

AFTER IT HAS CURED
jal-chi-sauce

  1. Puree in blender – watch out for vapors they are TOXIC
  2. Push pulp through a strainer using a spatula into jars – discard solids
  3. Add tomato paste, garlic powder, onion powder and sugar
  4. Using standard canning procedures, cold pack and hot water batch for 20 minutes

Oh, one more thing…

  • My niece uses this full strength.  That is a bit too hot for me.  This is hotter than Tabasco, and has a lot more flavor.  You don’t need to use too much.
  • My preferred use for this sauce is to make my Jalapeño Ketchup.
  • If you are not good with doing things to taste, for each quart jar that you are aging and processing, Once you have pushed the pulp through a strainer, add 1 tsp salt, garlic powder and onion powder and 1/4 C tomato paste.
  • If you don’t know how to can things, here is a ketchup canning site.  Just follow the same procedure for your chili sauce

Shortcut Chili Sauce

1/2 CU Heintz Ketchup
1/2 CU diced jalapenos (from can)
2 TBL cayenne sauce (Frank’s Red Hot or Durkee)
1 TBL rice vinegar
1 tsp garlic powder
1 tsp onion powder
1 TBL sesame oil
1 tsp cumin
1 tsp oregano
1 tsp salt

1. Blend all ingredients until somewhat smooth.
2. Press through a sieve
3. Store in something like an old Tabasco bottle
4. Refrigerate


This is a recipe that has been created or modified by Robert (Grandpa) Andrews.
CLICK HERE for a free sample copies of Grandpa's Cookbooks. © 2016, 2017, 2018.

Orange Chicken

Ingredients

4 bone-in skinless breasts
3 cu orange juice
½ cu red wine or balsamic vinegar
¼ cu molasses

Instructions

1. Orange Glaze – 3 cu orange juice in skillet, turn on high heat.
2. ½ cu red wine or balsamic vinegar, ¼ cu molasses, bring up to boil, reduce to about ½ cu total (10-15 min).
3. Set ½ aside, brush ½ over chicken breast.
4. Brush chicken breasts with orange glaze on top. Bake @ 400° for 35 min (baste 2-3 times).
5. Move to plate and drizzle w/ reserved glaze.

Move to plate and drizzle w/ reserved glaze.

Move to plate and drizzle w/ reserved glaze.


HTML Snippets Powered By : XYZScripts.com