A Very Basic Pickle Overview

There are two types of pickles.  Fermented and Infused.

Fermented refers to things like Kimchi, Kosher Dill Pickles and Sauerkraut.  It depends on the action of bacteria to create lactic acid.

Infused pickles depend on adding an acid to the pickling liquid.

CLICK HERE FOR PICKLE COLLECTION INDEX

The basic ingredients are vinegar, sugar, salt.  The amounts and flavoring ingredients vary depending on they type of pickle you are making.

I prefer apple cider vinegar

  • Heat to simmer and pour over items to be pickled
  • Double ingredients if necessary.
  • Cucumbers should be firm, green, still have a bit of the stem and not much yellow
INGREDIENT SWEET PICKLES SOUR PICKLES DILL PICKLES
cucumber or other vegetable 5 5 10
water 1 C 1 C to cover
apple cider vinegar 1 C 1 C none
rice wine vinegar none 1/2 C none
Vidalia onion sliced thin 1/2 1/2 none
sugar 1 1/2 C 1/2 C none
pickling salt * pinch 2-3 TBL 5-6 oz
whole yellow mustard seed 1/2 tsp 1 tsp none
turmeric, celery seed, pickling spice 1/2 tsp each 1 tsp none
garlic – crushed none 4 cloves 2 cloves
dill none none 1 tp
dill fronds none none 1 bunch
crushed red pepper none none 1 TBL
black pepper none none 1 TBL

* Although pickling salt is chemically identical to Kosher salt, pickling salt is much finer than Kosher salt.  It will dissolve readily in warm water, while Kosher salt will generally require a higher heat.  Also pickling salt is denser, so 1 tsp pickling salt is about the same as 1 1/2 tsp Kosher salt.  For larger amounts, 6 TBL Kosher salt is the same as 4 TBL pickling salt.

STEP BY STEP for sweet and sour pickles

  1. Collect vegetables that you want to pickle.
  2. Cut veggies into similarly sized pieces
  3. Bring to simmer over medium heat :: water, sugar, and vinegar
  4. Rinse veggies very well with massive amounts of water
  5. Place in canning jar
  6. Cover with hot vinegar mixture.
  7. Let set overnight on the kitchen counter.  Move to refrigerator next day.
  8. If whole, let cure for five days.  Slices or chips will be ready in just one full day.
  9. Keep in fridge for up to 2-3 months.  Can if you want them to last until next growing season.

STEP BY STEP for kosher dill pickles

  1. Dissolve salt in water, then mix in other dry spices
  2. Stack pickles up on end in a crock
  3. Top with water mixture until they start to float – then add another 1-2 C water
  4. Place a couple clean stones on top to keep them submerged
  5. Cover loosely, and let rest on counter at 68-72º (max75º) for 72 hours
  6. After three days, skim off scum and any white fuzz or material that may appear.  Add water if necessary to keep them submerged.
  7. Wipe off rim, clean cover, and then replace.
  8. In 10 days, pickles will be “mostly” done.
  9. Refrigerate for three days, scraping off any scum that appears
    YOU NOW HAVE A POLISH DILL PICKLE
  10. Put into a new clean glass jar and strain all solids, then cover again with the liquid.  After 3-4 weeks you will have KOSHER DILLS
  11. These will keep for about 2 months


Tips: Oranges

Three main types

  1. Hamlin – juicing oranges, but lots of seeds
  2. Naval – easy to peel and few seeds
  3. Sour or Seville – high in pectin and good for marmalade

To zest an orange, put your microplane on the table, and draw the orange across the plane, rather than dragging the plane across the orange.

If you need larger pieces or orange zest, use a peeler, then scrape off the pith using a paring knife.

Sugar Temperature Chart

230 – 235º :: Soft thread :: syrup

When you drop a little of this syrup into cold water to cool, it forms a liquid thread that will not ball up.  This temperature is used for making syrups, liqueurs, jelly, etc.

Between 232º and 236º do not agitate, you may form crystals which will make your candy grainy.  If this happens though, add water and remelt the sugar, then bring it back up to temperature.

235 – 245º :: Soft ball :: fudge, fondant or praline

Some say that this temperature maxes out at 240º, at which temperature Firm Ball is attained.  Use your own judgement.

At this temperature, sugar syrup dropped into cold water will form a soft, flexible ball. If you remove the ball from water, it will flatten like a pancake after a few moments in your hand.

You will use Soft Ball for fudge, fondant, pralines, butter creams, and meringues.

245 – 250º :: Firm ball :: caramels

Drop a little of this syrup in cold water and it will form a firm ball, one that won’t flatten when you take it out of the water, but remains malleable and will flatten when squeezed.

Creamy caramel candies use this temperature.

250 – 265º :: Hard ball :: divinity, gummy bears

At this stage, the syrup will form thick rope threads as it drips from the spoon. The sugar concentration is rather high now, which means there’s less and less moisture in the sugar syrup. A little of this syrup dropped into cold water will form a hard ball. If you take the ball out of the water, it won’t flatten. The ball will be hard, but you can still change its shape by squashing it.

Hard ball is used for marshmallows, divinity, toffee, nougat, rock candy and gummy candy.

270 – 290º :: Firm thread – aka Soft Crack :: taffy and butterscotch

As the syrup reached soft-crack stage, the bubbles on top will become smaller, thicker, and closer together. At this stage, the moisture content is low. When you drop a bit of this syrup into cold water, it will solidify into threads that, when removed from the water, are flexible, not brittle. They will bend slightly before breaking.

The soft crack is used for butterscotch, taffy and candy apples.

300 – 310º :: Hard crack :: toffee, brittle, lollipop, hardtack

The hard-crack stage is the highest temperature you are likely to see specified in a candy recipe. At these temperatures, there is almost no water left in the syrup. Drop a little of the molten syrup in cold water and it will form hard, brittle threads that break when bent. CAUTION: To avoid burns, allow the syrup to cool in the cold water for a few moments before touching it!

If making hard tack after dumping the sugar mixture onto a marble slab and adding your flavor components, use a bench scraper to fold it all together – not your hands.  Cut it with a scissor before it becomes brittle.

320 – 350º :: Light Caramel

Caramelizing Sugar

If you heat a sugar syrup to temperatures higher than any of the candy stages, you will be on your way to creating caramelized sugar (the brown liquid stage)—a rich addition to many desserts.


As the sugar warms into the candy light caramel stage, it will develop a light golden brown hue. When dropped into cold water, the sugar will form a solid chunk that requires some effort to snap.

Light caramel stage (about 340º)  is the temperature you need for flan.

Clear-Liquid Stage
320° F
sugar concentration: 100%

At this temperature all the water has boiled away. The remaining sugar is liquid and light amber in color.

Brown-Liquid Stage
338° F
sugar concentration: 100%

Now the liquefied sugar turns brown in color due to carmelization. The sugar is beginning to break down and form many complex compounds that contribute to a richer flavor.

Caramelized sugar is used for dessert decorations and can also be used to give a candy coating to nuts.

Burnt-Sugar Stage
350° F
sugar concentration: 100%

Watch out! Above about 350° F, the sugar begins to burn and develops a bitter, burnt taste.

365 – 375º :: Dark Caramel

One source sets this temperature at 340º.  Experience will be your best guide.

Light Caramel will turn to Dark Caramel, the firm chunk that forms in cool water will turn a dark amber color. The sugar should be removed from the heat at this stage or it will be prone to burning.

Dark Caramel is excellent for making caramel sauce and treacle, often used in Britain.

Dark Caramel vs Light Caramel

The difference between light caramel and dark caramel is mainly in color and flavor. Dark caramel will have a dark amber color with a reddish hue and a slightly more bitter taste than light caramel.


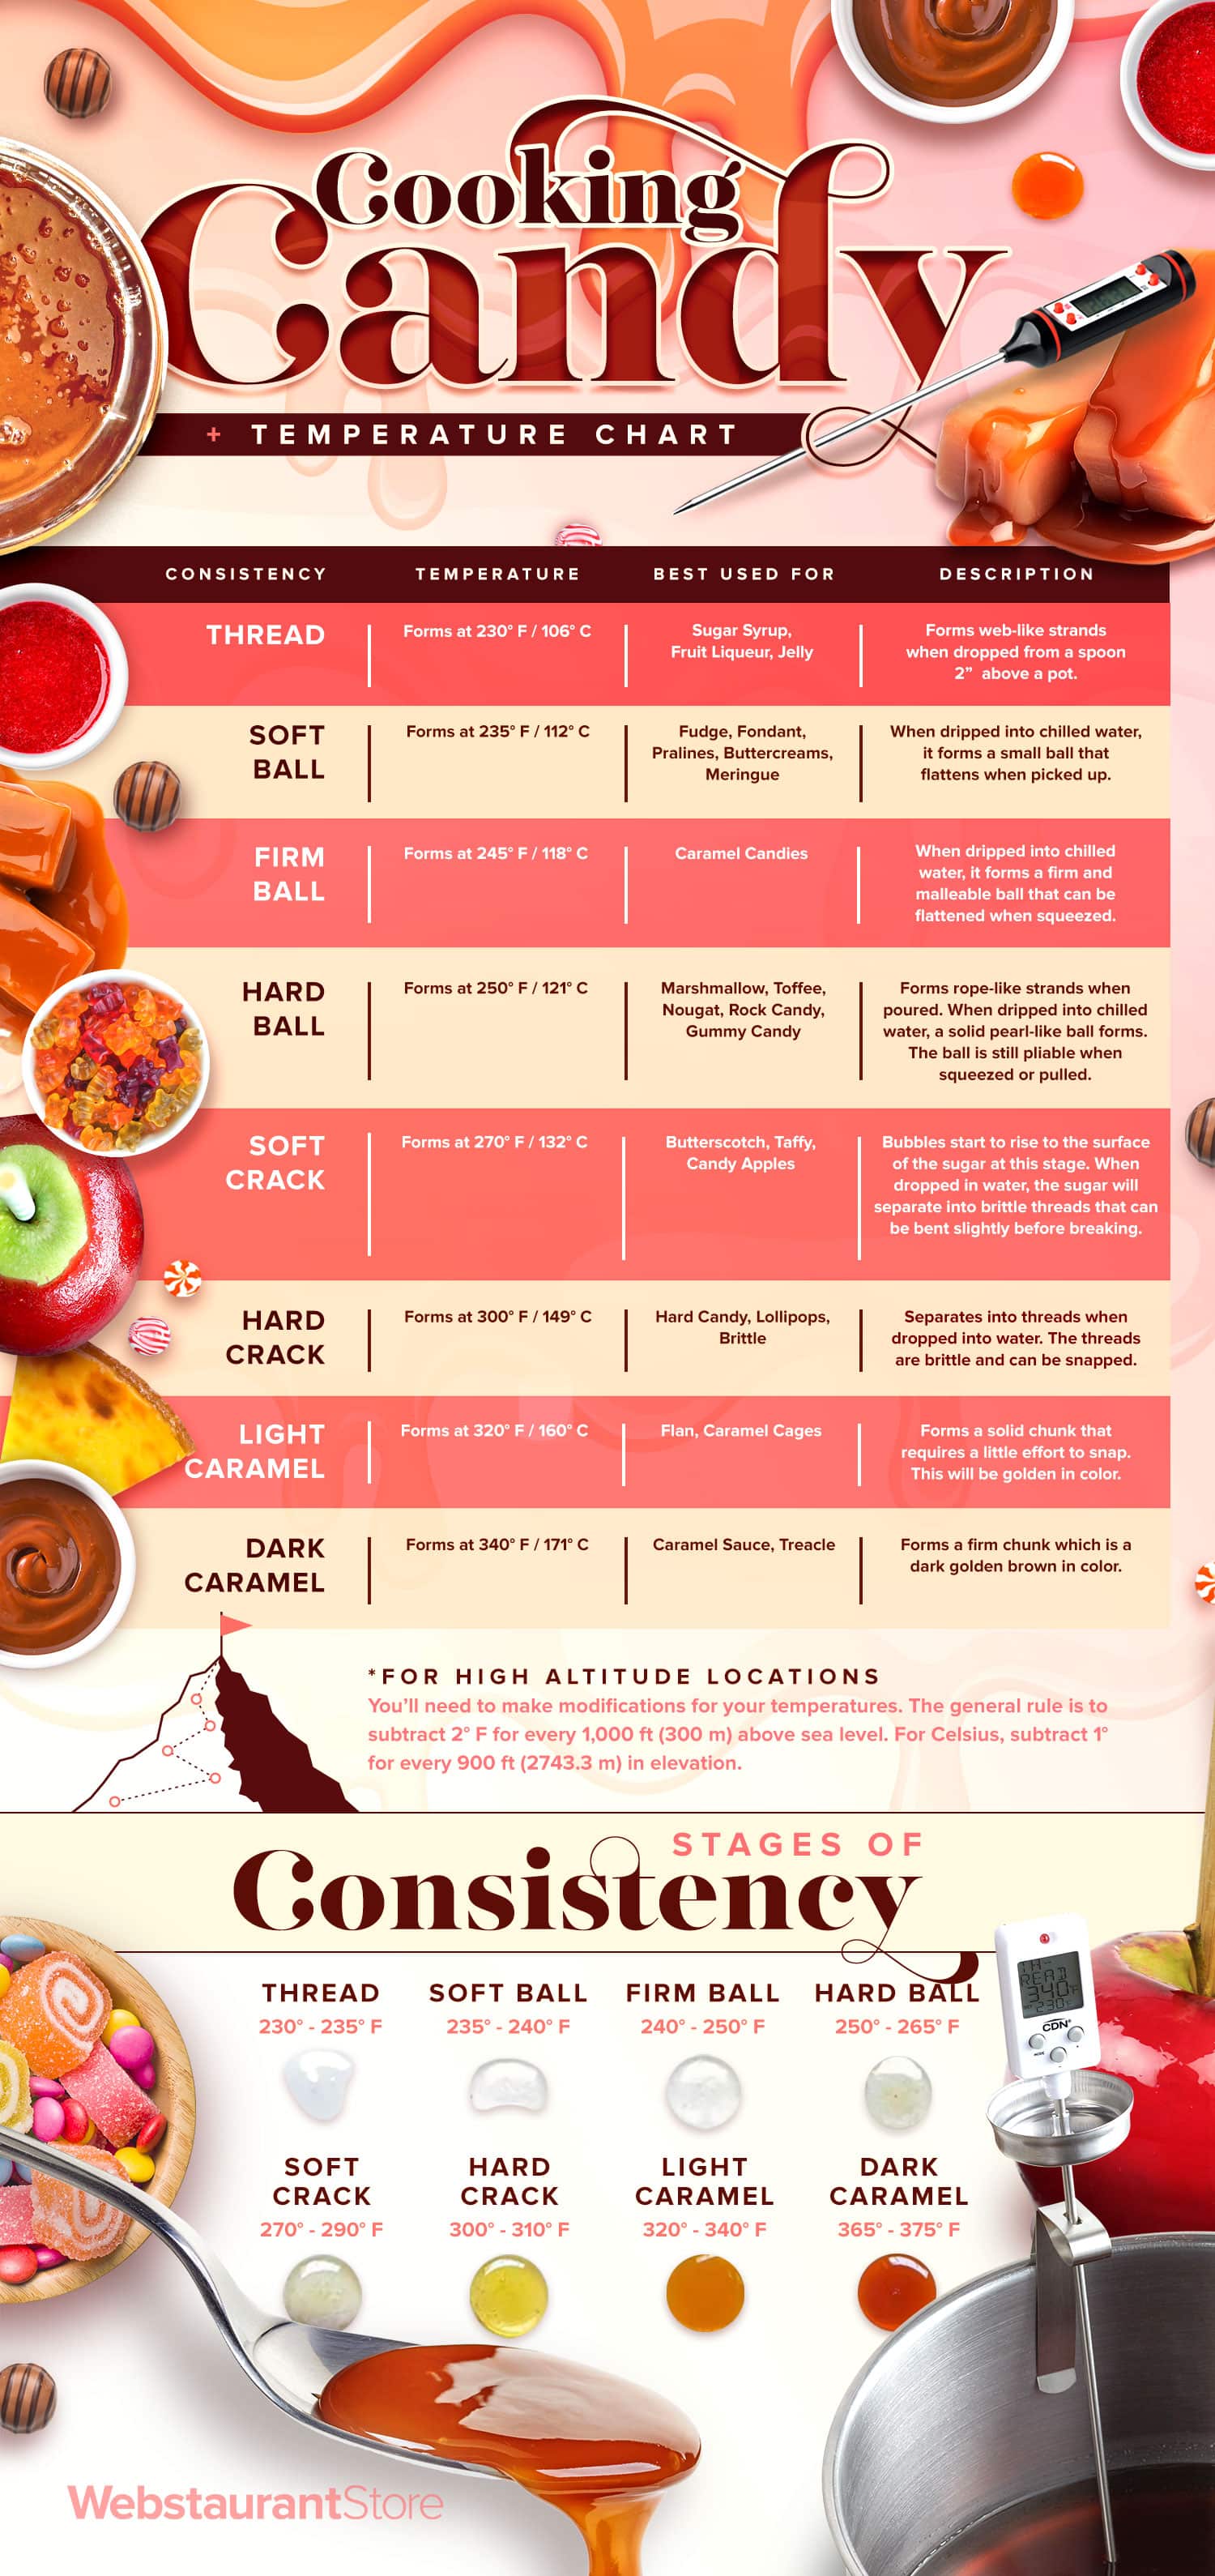
Candy Temperatures Chart

From webstaurantstore.com

Candy Temperatures Printable Chart

Testing Your Candy Thermometer

To ensure that you achieve the desired results with your candy sugar, you’ll want to make sure that it is reaching the appropriate temperature. Use the following steps to learn how to test your candy thermometer with the boiling water test:

  1. Insert your candy thermometer in a pot of water so it does not touch the sides or bottom if the pot.
  2. Bring the water to a boil.
  3. Leave the thermometer in the boiling water for 5 minutes.
  4. Check the temperature, the thermometer should read 212 degrees Fahrenheit (100 degrees Celcius). Water starts boiling at this temperature if your location is at sea level.
  5. If your thermometer is accurate, you can begin your candy-making process.
  6. If the reading is higher than 212 degrees Fahrenheit, you’ll want to adjust the temperatures in the recipe to reflect the discrepancy.

High Altitude Candy Making

Because of the lower atmospheric pressure at 3,500 feet above sea level, bakers and confectioners are required to make certain adjustments for high altitude cooking.   The boiling temperature of the water will be lower at higher altitudes, so you can either use the five-minute boiling water test listed above or make a few calculations.

To adjust your candy-making temperature for high altitude, subtract 2 degrees Fahrenheit for every 1,000 ft (300 m) above sea level. For Celsius, subtract 1 degree for every 900 ft (2743.3 m) in elevation.

Falafel

INGREDIENTS

  • 1 can chickpeas – drained and rinsed
  • 1/2 tsp cayenne pepper
  • 1/2 tsp black pepper
  • 1 tsp baking powder
  • 2 cloves garlic
  • 2 TBL parsley
  • 4 chopped scallions or chives
  • 1 tsp EVOO
  • 1 tsp ground cumin
  • 1 tsp ground coriander
  • 2 tsp salt
  1. Blend all together, then shape into small egg shaped ovals
  2. Fry in 2 C peanut oil at 350º for about 5-7 minutes each
  3. Do not overcrowd pan – about 5 at a time
  4. Spread on a paper towel and sprinkle with salt
  5. Cool before eating


Growing Vidalia Onions

Vidalia onions are from Georgia where the soil has a low sulfur content.  If you plant a Vidalia anywhere else, it will eventually morph into a regular onion – which is caused cause the higher sulfur content will turn to a higher sulfuric acid content.

Vidalias are 12.5% sugar, whereas standard onions are about 7% sugar.

The F1 Granix Hybrid was created from a Vidalia. (READ THIS)

Try a Mayan Sweet or Peruvian Gold.  Alternates are also Walla Walla, Maui Sweet and Texas 1015 onions.

Try planting this in soil amended to a low sulfur content (READ THIS)

Pease Porridge

Read about it here.

Ingredients

  • 1/2 pound whole dried peas (split dried green peas may be substituted)
  • 5 ounces slab bacon, cut in 1/2-inch cubes
  • 1 medium-size carrot, scraped and diced
  • 1 medium-size onion, peeled and chopped
  • 1 small white turnip, peeled and diced
  • 1 tsp dried sage
  • 1 tsp butter
  • 1 tsp oil
  • Salt and freshly ground black pepper to taste
  • 1/4 cup light cream or half-and-half, optional
  • Minced fresh mint or savory for garnish

Step by Step

  1. Rinse peas under running water
  2. Place peas in a bowl and cover with water to a depth of 2 inches above the peas and remove any stones or debris.  Remove “floaters” as well.
  3. Set aside to steep six hours or overnight.
  4. Drain peas and place in a soup kettle.
  5. Add bacon, carrots, onions and turnips and stir to mix well.
  6. Cover with water to a depth of 1 inch above the mixture.
  7. Add sage.
  8. Place over medium-low heat and bring to a boil.
  9. Reduce heat until soup is barely simmering, cover and simmer 2 to 3 hours or until peas lose their shape and start to become creamy.
  10. Add a little boiling water from time to time if necessary.
    You should have a thick soup, but not what we think of today as porridge.
  11. When soup is done, remove bacon chunks.
  12. Saute bacon in butter until brown on all sides.
  13. Add salt and pepper.
  14. Soup may be put through a sieve and 2-3 tsp butter may be added if desired to make it a bit richer.
  15. Serve garnished with the fried bacon chunks, sippets (triangles of thin crustless bread lightly fried in butter or bacon fat) and a little minced mint.

Pearl Tapioca

Ingredients

  • 3 1/2 oz pearl tapioca
  • 1 PT cold water
    Soak overnight on the counter – not in the fridge
  • Put drained tapioca into sauce pan
  • Add 2 1/2 C whole milk (not low fat)
  • Add 1/2 C heavy cream and a pinch of salt
  1. Turn the heat on the absolutely lowest temperature you can possibly attain
  2. Let cook for 2 hours – it should get hot, but not even simmer
  3. Mix 1 egg yolk with 1/3 C sugar
  4. Temper hot liquid into your eggs, then back into the pot
  5. Mix in the zest and juice from one lemon
  6. Cook uncovered for 15 more minutes
  7. Cool on counter for 1 hour and serve warm
  8. If planning to cool, cover surface with plastic and refrigerate

Lavosh

Unleavened flat bread

Ingredients

  • 1 teaspoon salt
  • 1/2 tsp sugar
  • 14.5 oz AP flour (about 2.5 C)
    MIX ON A TABLE, THEN CREATE A WELL IN THE CENTER, THEN ADD
  • 1 egg plus 2 egg whites, beaten
  • 2 TBL butter, melted
  • 2/3 cup water
  1. Combine wet into the dry and mix until well combined
  2. Cut dough into eight pieces
  3. Butter bottom
  4. Roll until very flat – as thin as possible
  5. Transfer to ungreased baking sheet
  6. Brush with egg white and sprinkle with sesame seeds
  7. OR butter top and sprinkle with seeds
  8. Bake at 375º for 10-15 minutes

2 tablespoons sesame seeds


Old Timey Graham Crackers

Ingredients

  • 1/8 tsp cinnamon
  • 1/2 tsp baking soda
  • 1/2 tsp kosher salt
  • 3/4 tsp (aluminum-free) baking powder
  • 1 7/8 oz AP flour
  • 3 oz dark brown sugar
  • 8 3/8 oz graham flour
    PULSE IN FOOD PROCESSOR, THEN ADD
  • 3 oz cold butter (pieced)
    AND PULSE UNTIL YOU GET COARSE MEAL, THEN ADD
  • 2 1/4 oz molasses
  • 1 1/2 oz whole milk
  • 1/2 tsp vanilla extract
  1. Pulse until you have a smooth dough
  2. Flatten into 1/2 strip, wrap in plastic, then refrigerate 30 minutes
  3. Roll out dough to 1/8 inch thick on parchment paper
  4. Dot (dock) the crackers
  5. Put onto a baking sheet and bake 350º for 25 minutes
  6. Allow to cool in the pan before removing


Rib Eye Cap Steak

A note from Grandpa:

This is an expensive cut, so it is worth the extra effort to make it truly special.  It is practically Wagyu quality.  You can butterfly it, and then spread a bit of butter of the surface and roll it up (roulade) and tie it into a tube.  Cut this into disks of 1 1/2 to 2 inches, and cook in the oven at 550º until internal temperature is 125º (about 7-10 minutes)  Remove to a plate and tent with foil for 5-10 minutes.  Drizzle with melted butter infused with garlic, shallot, rosemary, and thyme.

From Snake River Farms

  • Grade: USDA Choice or higher
  • Weight: approx. 18 oz.
  • English cross origin
  • Wet-aged 21+ days for improved flavor and texture
  • Hand cut by a master butcher
  • Individually wrapped
  • Product ships frozen and will arrive frozen or partially thawed
  • Cost: approx $85 each

This rare cut is considered to be the single most delectable and flavorful steak available. Also known as the ribeye cap, deckle steak, calotte or spinalis dorsi, it is highly prized by top chefs, beef aficionados, and butchers alike. Surprisingly, a cut this spectacular is not universally known by its name, however anyone who has cut that small morsel of cap from a ribeye has realized there’s something special going on. If you look at a ribeye steak, you’ll see the large eye of meat that’s the center of the cut. Surrounding this center is the spinalis dorsi, or cap of ribeye. We carefully remove this from the entire ribeye roll to produce a beautiful cut that has the tenderness of a filet mignon, the rich marbling of a rib steak, and a mouthwatering flavor and texture all its own. The cap of ribeye is hard to find and is only available in limited quantities. Each steak is approximately 18 oz. and serves about 4 people.

“…Hands down, Double R Ranch is the best beef in the country.” ~ Eric Helner, Executive Chef, The Metropolitan Grill, Seattle, WA

Steak Temperature Guide

Here are the magic numbers you’ll need to determine when your steak is cooked to the degree of doneness you most prefer. The internal temp is when the steak should be removed from the heat. The steak will continue to cook so the temperature will rise during the rest period.

Preference Description Internal Temp
Rare Red center, very cool 110°F
Medium Rare Red, warm center 120°F
Medium Pink throughout 130°F
Medium Well Pink center 140°F
Well No pink Not recommended

*Consuming raw or undercooked meats may increase your risk of foodborne illness. The USDA recommends an internal temp of 145°F and resting for at least 3 minutes.

FEEDBACK

Best Cut Around

I received a rib cap from SRF as a gift. I seasoned with SPG, cut it in 4″ strips, rolled and tied each strip. I cooked over an open flame on my fire pit, using lump charcoal and oak. After an hour of cooking, I pulled the meat off with an IT of 125 degrees F. It was the most tender and flavorful steak I have ever had. Definitely buying this again.

SUPERB FLAVOR AND TEXTURE

The ribeye cap is my favorite cut of steak for special occasions. This is the fourth time I have ordered this piece. The flavor is superb, it has a very deep “beefy” flavor, and, if prepared correctly, exhibits melt-in-your-mouth tenderness. I cut this huge hunk of meat into two pieces, and cook them separately, one takes less time, as the cut tapers from very thick at one end to thin at the other. I reverse sear this cut, and I believe that is the only way to properly grill this hunk of meat. It ends up moist and tender on the inside, and beautifully charred on the outside.


Elote Corn

A version of this recipe was shown by Jeff Smedstad on YourFamily A-Z.  A few adaptations were made for my recipe.  Click here for the original recipe.

INGREDIENTS

  • 2-3 ears of corn on the cob with the husk still on
  • 3 TBL crumbled Cotija cheese
  • 1 TBL fresh chopped cilantro
  • 2 TBL diced red onion
  • 1 TBL chopped chives
  •  SAUCE
    • 2 TBL mayonnaise
    • 2 TBL sour cream
    • 1 TBL butter
    • 1 tsp Grandpa’s Jalapeño Chili Sauce or Choloula
    • 1 tsp sugar
    • 1/4 tsp each salt and black pepper
    • 2 TBL chicken stock
    • Juice and zest from one lime

STEP BY STEP

  1. Cut off both ends of the corn, then strip off husk until you can see corn kernels through the remaining husk, but leaving at least one layer of husk to protect the corn – grill or broil till starts to char getting color on all sides
  2. Strip off the husk, and set aside to cool while you prepare the other ingredients
  3. Heat all sauce ingredients over medium heat just until steam starts to rise from the liquid.
  4. Meanwhile, cut corn kernels from the cob
  5. Mix corn and sauce
  6. Serve with chips or as a side to your meat dish
  7. Top with cilantro and crumbled Cotija and Thunder Powder
  8. Optional: serve a bit of pickled onion on the side


Cream Puff – Choux Pastry

  • 1 stick butter
  • 3/4 C water
  • just a pinch of salt
  • 2 TBL sugar
    • bring up to a boil
  • 3/4 C Bread flour (about 6 oz flour – about 180 gm)
  • 4 eggs plus two whites

See also Pate a Choux or Croquembouche

  1. Combine 1 stick butter, 3/4 C water and 2 TBL sugar
  2. Bring up to a boil
  3. Reduce heat to low, and stir in 3/4 C Bread flour all at once, while still hot, and stir quickly to combine
  4. Cook until the dough partly cooks – about 3-5 minutes
  5. Let cool until it is just warm, not hot
    • NOTE:  It freezes well at this point
  6. Put the mixture into a Kitchen Aid and add 3 whole eggs, one at a time letting each one completely incorporate
  7. Use an ice cream scoop to place balls (or pipes) on a baking pan lined with parchment
    • Pipe into a pile, or forth and back to make an even pipe
  8. Bake at 425º for 10 minutes
  9. Lower heat to 350 for 10 more minutes
  10. Cool and vent (by poking a hole in the top or sides)
  11. Fill by piping in pastry cream (see below)

Authentic Pastry Cream

  • 3/4 C whipping cream
  • 8 oz marscapone
  • 2 TBL powdered sugar (100 gm)
  • OPT: Fold in 1/2 C raspberry jam

Cooked Pastry Cream

  • 1 large eggs plus 1 yolk
  • 50 gm granulated sugar
  • 1 C whole milk
  • 15-20 gm butter
  • 15 gm cornstarch
  • 1/2 tsp vanilla
  • only a pinch of salt
  1. Combine sugar, eggs into a glass bowl
  2. Sift corn starch in, then set aside
  3. Bring milk and other ingredients to a simmer
  4. Temper into your egg mixture (about a quarter of it)
  5. Put eggs back into the milk, and return to heat
  6. Heat, but DO NOT simmer
  7. Will thicken quickly
  8. Strain and cool
  9. Pipe into your puff

Chocolate Topping

  1. 230 gm chopped chocolate
  2. 170 gm heavy cream
  3. 5 tsp coffee
  4. 1 pinch salt
  5. 1 TBL corn syrup
    • Heat over a double boiler
  6. Let cool to 90 degrees before putting on puff
  7. Chill briefly


Potato Bread

Ingredients

  • 1 large russet potato (about a 12 oz potato) Yukon gold works well too
  • 2 cups (475 ml) milk
  • 2 teaspoons salt
  • 1 teaspoon sugar
  • 2 Tbsp extra virgin olive oil
  • 1 packet instant yeast (2 1/4 teaspoons)
  • 5 cups (680g) all purpose flour

This is essentially white bread with potato worked into the dough.  The potato helps keep the bread moist and gives the bread a great texture.

  1. Peel your potato, then cut it into 1-2 inch pieces
  2. Boil for 10 minutes in salted water
  3. Let the potato cool a bit, then mash the potato
  4. Heat your milk for two minutes in the microwave
  5. Stir in the salt, sugar and olive oil
  6. Dump the liquid into a Kitchen Aid using the mixing paddle
  7. Add the mashed potato – and mix together
  8. Add the yeast and 2 cups of flour
  9. Mix on medium high for 4-5 minutes or until smooth
  10. Change to the dough hook, and add the remaining flour 1 C at a time
  11. Once all the flour is in, mix for 8-10 minutes
  12. Form the dough into a ball, and lightly oil all sides of the ball
  13. Put dough into a large oiled bowl
  14. Cover the bowl with a damp towel and let dough rise for two hours
  15. Punch down the dough, divide it, form it, and place in loaf pans, oil all over, cover with plastic wrap, and let rise in the refrigerator overnight in an oiled bread pan.
  16. The following morning, move the dough to a warm place and allow to rise 45-60 minutes
  17. Remove the plastic wrap from the loaf pans and gently place the loaf pans in the oven in the middle rack.
  18. Bake in preheated oven at 350°F for 35 minutes until the crust is golden brown and the internal temperature is about 190º
  19. Let bread pan cool on a rack for five minutes, then turn it out to cool on a rack removed from the pan.

Puff Pastry Croissants

I actually had a dream about this.  I did a bit of research, and here is what I found out.

  • Puff pastry dough differs from croissant dough chemically.
  • Puff pastry is simply flour, water and salt layered with butter
    • Croissant dough contains milk and yeast
  • Puff pastry will bake up crispy and flaky
    • Croissant dough should be fairly light and soft and tender on the inside

While you can get a passable croissant from puff pastry dough, it will absolutely not stand up to a side-by-side comparison.


Caramel Pie

Use a prepared graham cracker pie shell for this recipe

  • 8 oz butter
  • 1 C brown sugar
  • 1/4 C heavy cream

Heat and melt first three ingredients

  • Drizzle in 3 C whole milk and bring back up to heat
  • In separate bowl combine 2 egg yolks, 3 TBL corn starch, 1/2 tsp vanilla and 1 C whole milk
  • Temper 1 C of the hot mixture into the egg mixture
  • Drizzle tempered mixture back into the pot, whisking continually
  • Whisk until it thickens, then pour into your pie shell
  • Refrigerate for at least an hour
  • Meanwhile, beat 2 egg whites till they start to firm, then add 1/2 C confectioner sugar, scant salt, and 1 tsp vanilla
  • Continue to beat until stiff peaks form
  • Spread onto pie, making a bunch of little waves or peaks
  • Broil for a few minutes, or torch to brown
HTML Snippets Powered By : XYZScripts.com