You can change the size of your containers to meet your needs. Use a larger container to create a wine-chilling ICE bucket.
Author: Robert Andrews
New Cooking Terminology
Good Housekeeping has a great site for helping with new terminology. Use the link below to open their site in a new window. Just close that window to return to Grandpa Cooks.
Tips: Terminology
- Temperature
- Low heat: 225°F to 249° F – (107°C to 120°C)
– Boiling, simmering, poaching
– Unrefined canola oil - Medium low heat: 250°F to 324°F – (121°C to 162°C)
– Slow cooking, stews, stocks, reductions
– Unrefined corn oil - Medium heat: 325°F to 374° – (162°C to 190°C)
– Gentle cooking temperature, also for finishing food started at high heat
– Extra virgin olive oil and butter – Low temperature frying - Medium high heat: 375° to 449°F – (190°C to 232°C)
– Pan fry and quicker general cooking of foods
– Refined canola oil – High temperature frying - High heat: 450°to 650°F – (232°C to 343°C)
– Saute, sear, Wok stir fry
– Refined sunflower and peanut oil – Very high temperature quick frying
- Low heat: 225°F to 249° F – (107°C to 120°C)
- Braise
- Sauteé
- Sear
Good Housekeeping has quite a comprehensive dictionary of cooking terminology.
TERMINOLOGY
- TEMPER – If you combing your egss and hot liquid all at once, you will cook some of your eggs, resulting in lumps. To temper your eggs and liquid together means that you take just a little tiny bit of your hot liquid and whisk it into your eggs, then a bit more, then a bit more. Once they are combined, about 50/50 you can mix the entire thing together.
- CLARIFIED BUTTER – Melt butter slowly, and the milk solids will settle on the bottom. Pour off the clear oil, leaving (and discarding) the milk solids.
- ZEST – Use a microplane and shave off the colored part of an orange, lime or lemon. Try not to get the pith.
- MICROPLANE – Essentially the same as a file, but this is for food. You SHAVE off tiny pieces of citrus, nutmeg, etc and use it as part of your flavoring.
- PITH – The white part of citrus that is just under the colored skin. Usually very bitter.
Tips: Steaks (Beef)
See also Tips: Burgers and Tips: Steaks and Cow Parts
Buying your Meat
- Don’t skimp on buying a steak. You would spend $40 on a really good steak at a restaurant, consider spending nearly that much on a quality piece of meat with good marbling. See the chart below from Food Beast for price ranges of different cuts of meat.
- Buy an aged steak. More developed flavor. Better yet, buy a nice cut and dry age it yourself. Put on a rack and salt both sides. Put in the refrigerator for 48 hours uncovered.
- The ONLY time you should press down on your steak is when it is first put on the grill. Put the “serving side” onto the heat first, then press it down to get maximum contact. Don’t press down again after you flip it.
- Consider buying and cooking one thick steak (2 inches is a nice thickness) to serve multiple people. The overall quality will be better.
- Bone in cuts of meat will generally have a more complex flavor.
Prepping your Meat for Cooking
- Searing your Meat:
- Get a good sear on your meat. Sear means flavor and appearance will be enhanced.
- Tie your meat up with a string around the perimeter to hold and shape your meat.
- Steaks must come up to room temperature before you start to cook it (30-60 minutes)
- Salt your meat liberally.
- Salt it the night before, and refrigerate it overnight
- Dry Age Your Meat: Place on a wire cooling rack in the refrigerator for 24-36 hours before cooking. This will allow the moisture to be removed from the surface of the meat. If you are marinating your meat, just be sure to press it VERY dry before searing.
- Before searing, add pepper
- Sear at medium-high (about 400º) for about two minutes per side on a cast iron skillet. Sear the presentation side first. Sear even the sides of a thick steak.
Cooking your Meat
- GENERALLY SPEAKING thin cuts of meat will cook quickly over high heat, while thicker cuts will cook slowly over low or medium heat.
- When grilling a steak, consider a 2-3 inch thick Rib-eye on the bone steak. This will feed 4-6 people. Take bone off before serving. Cut against the grain in thick slices – about 3/4 inch.
- Cook all FOUR sides on the hot side of the grill, then move to the indirect side of the grill and cook until internal temperature is 125º
- Start over high heat.
- Try to get steak to medium rare throughout the entire steak. About 250º for six hours or until internal temp is about 120º
- Rest for ten minutes before cutting
- I consider two thermometers critical for any serious chef, even if they will remain an amateur chef for their entire life. I purchased both of mine at ThermoWorks.
- The first is an internal temperature Instant Read ThermaPen. It is about $80 but I have had mine for about ten years. It needs a new battery about every three years.
- This one is less expensive, but I find that I use it more than the internal probe. I usually use it for seeing if my skillet is up to heat, but it is also good to see if the blacktop will burn the paws of my dog. It’s also a lot of fun to play with at night. It is an Industrial Infrared Thermometer and is about $50.
- If you can only buy one, buy the Infrared Thermometer.
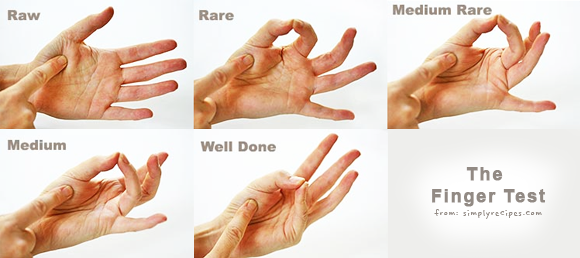
- If you ABSOLUTELY can’t afford to buy one, here is a way that you can test your meat reasonably well. Use the finger test. This wonderful photo is from WattaLyf.
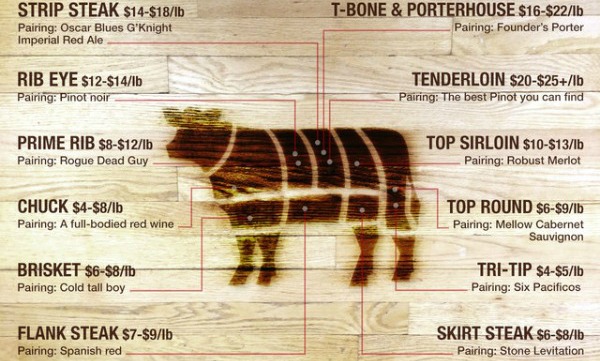
This graphic is from Food Beast
Click for an enlargement.
Notes about cuts of meat
- Boneless Rib Eye-more fat, more flavor
- Ribeye – more marbling and more flavor
- Filet Mignon – very tender, but not as much flavor
- Porterhouse-filet
- Del Moneo – no filet
- Tenderloin-most tender
- Sirloin-good for grill
- London Broil-top round
- Flank Steak-marinate 24 hrs & grill – Fairly lean and needs fat
- Brisket-first cut-slow cooker
- Brisket-second cut-fat-hamburger
- Top Round-good for oven roast @ 350
- Bottom Round-pot roast-slow cooker
- Skirt steak – outside chest toward ground – thougher
- Hanger steak – behind skirt steak – much more tender
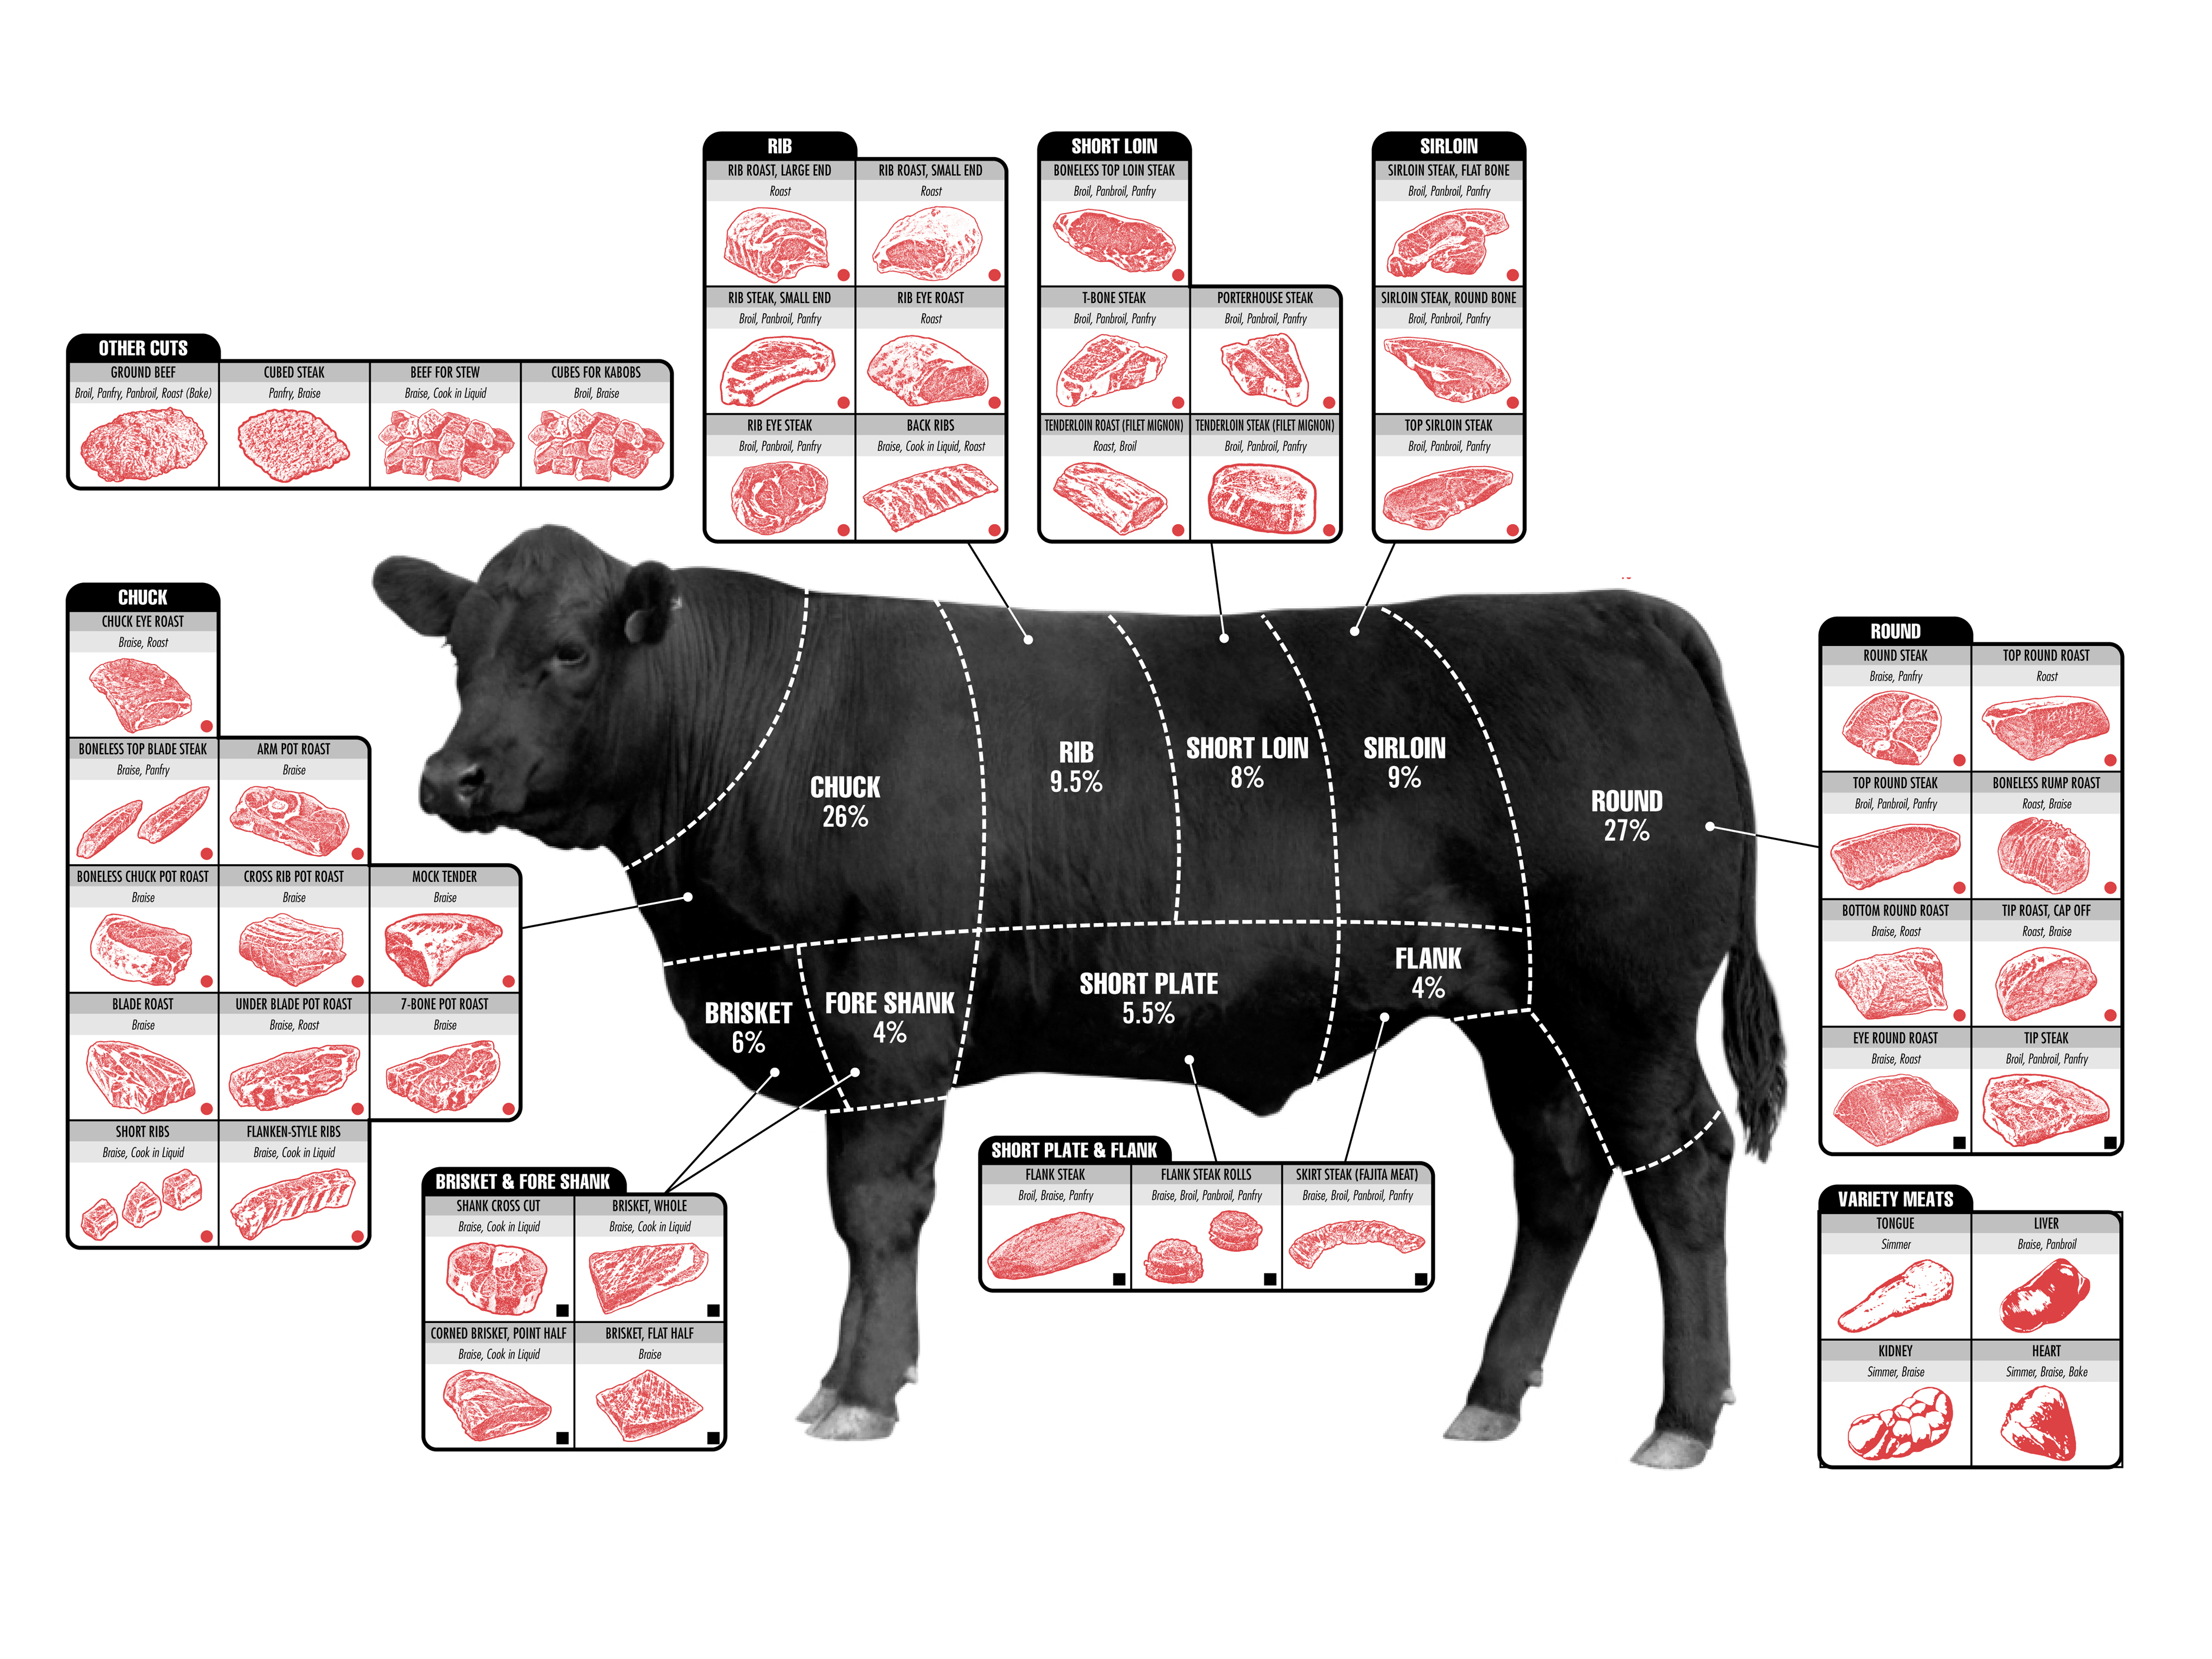
Here is another good chart. Click to read the details.
Pan Sauce for Chicken
INGREDIENTS
- Aeromatics
- Onion
- Ginger
- Garlic
- Liquids
- White wine
- Orange juice
- Water
- Chicken Stock
- Flavor Builders
- A sprig of rosemary (removed after cooking)
- A sprig of thyme (removed after cooking)
- Cilantro
- Capers
- Parsley
- Finish with Richness and Depth
- Butter
STEP BY STEP
- After you finish cooking your chicken, add some minced shallots and grated garlic.
- After they have softened, add a splash of wine to deglaze the pan.
- As soon as deglazed, add some flavor builders.
- Once the smell of them is filling the room, add 2 TBL of beef stock and capers
- Let it come up to a boil, then add 2 TBL of butter and parsley to bring everything together.
- This entire process should not take more than 4 minutes.
Tips: Avocado
Purchasing Your Avocado
- When selecting an avocado, if you are planning on eating it right away, get one from which the stem falls off easily, but is still somewhat green underneath. If the underneath has turned brown they are overripe. If the stem does not come off, it is good to sit on your counter for a few days until it ripens.
- If you can only find an unripe avocado you can have it ripe by tomorrow if you place it in a bag with a banana and let is rest for 24 hours. The gas produced by bananas ripen produce. Because of this, don’t store bananas with your fruit if you don’t want them ripened.
Peeling, Slicing and Dicing Your Avocado
- Halve the avocado. You may have seen people hack the seed with their knife. Be very careful if you do this, because it is very easy to get your finger too.
- I prefer to slightly squeeze the avocado, and the seed will nearly pop out.
- You can score the avocado right in the skin, then just scoop it out with a spoon. Here is a video by Expert Village.
 If you are making a lot of guacamole, after you halve the avocado, press it through a bread drying rack that has metal struts going both directions creating a grid. Just press the avocado through this into a bowl.
- You can also scrape an avocado against the side of a glass. Here is a video by Crazy Russian Hacker.
Misc Avocado Information
- I am from Ohio. Back east avocados are called mangoes. Bell peppers are also called mangoes. Here in Arizona mangoes are called mangoes, avocados and called avocados and bell peppers are called bell peppers.
Canyon Ranch Guacamole – Copy Cat
CLICK HERE for Avocado Tips and Tricks.
1/2 cup julienned spinach
1/3 cup frozen peas
1 ounce lite tofu
2 tablespoons lemon juice
Pinch salt
Pinch cumin
Pinch cayenne
Pinch chili powder
Dash Tabasco
6 tablespoons mashed avocado
3 tablespoons peeled and minced tomato
2 tablespoons pico de gallo (see recipe)
1 tablespoon minced cilantro
3 tablespoons minced white onions
2 teaspoons chopped scallions
1. Steam spinach until wilted. Remove from heat and squeeze out excess water.
2. Briefly steam peas and rinse under cold water to retain green color.
3. In blender container, combine spinach, peas, tofu, lemon juice, seasonings, and avocado and process until smooth
4. Fold in remaining ingredients and mix well.
Chipotle’s House Spicy Guacamole – Copy Cat
CLICK HERE for Avocado Tips and Tricks.
Ingredients
1/4 tsp sea salt (to taste)
1 tsp garlic (more or less to taste)
1/4 CU finely diced red onion or Valida
2 seeded habeñero, jalapeno or Serrano peppers (see Variations)
3 limes (approx 2 TBS lime juice)
1/2 tsp salt
Mix and let set 10 minutes
2 ripe avacados (soft, but not squishy)
1/2 CU diced cilantro or parsley
1 few mint leaves
1 diced tomato
1/2 finely minced onion
1 Tomato
1/4 CU Parsley
Instructions
1. Crush avocados
2. Mix in all other ingredients
Variations
1.Substitute seeded jalapenos for heat, but not too hot
2. Add diced tomatoes (cherry is best from my viewpoint)
3. Best to meld for 30 minutes, but impressive to mix at the table.
Ribs: Hawaiian Beef Ribs
Hawaiian Beef Ribs
Recipe Posted by RDJ – Recipe du Jour
Simply the BEST daily recipe E-zine on the Web! Delicious recipes delivered daily via email. Recipes, columns, and nostalgia. Send a blank email to rdj-subscribe@topica.com
6 to 8 beef back ribs (6 to 7 in. each, 3 1/4 to 4 lb. total), cut apart
1/2 cup prepared teriyaki sauce
1 tablespoon Chinese rice wine or dry sherry
1 tablespoon prepared hoisin or char sui sauce
1 tablespoon prepared barbecue sauce or catsup
1/4 cup canned crushed pineapple
3/4 teaspoon hot chili flakes
Rinse beef ribs and pat dry. In a 1-gallon heavy plastic food bag or a deep bowl, mix teriyaki sauce, rice wine, hoisin sauce, barbecue sauce, pineapple, and hot chili flakes. Add ribs; seal bag and turn to coat meat well, or turn ribs in bowl to coat and cover airtight. Chill at least 1 hour or up to 24 hours.
If using a charcoal grill, mound and ignite 70 charcoal briquets on the fire grate, with vents open. When coals are dotted with ash, in about 15 minutes, push equal portions to opposite sides of grate. Add 5 briquets to each mound of coals.
If using a gas grill, turn heat to high, cover, and heat for 10 minutes. Adjust gas burners for indirect heat (on each side of grill–none down center); keep heat on high.
Set barbecue grill in place. Lay meat on grill, not directly over heat (to avoid flare-ups). Cover barbecue; open vents for charcoal. Cook, basting ribs occasionally with marinade the first 20 minutes and turning as needed for even browning, until meat is rare (red in center of thickest part; cut to test), 20 to 25 minutes total, or medium (pink in center of thickest part; cut to test), 30 to 35 minutes total. If meat is not as brown as you like, move over direct heat and turn frequently.
Transfer ribs to a platter or plates. Makes 4 servings.
Nutritional Information
Amount per serving
Calories: 576
Calories from fat: 66%
Protein: 35g
Fat: 42g
Saturated fat: 17g
Carbohydrate: 11g
Fiber: 0.2g
Sodium: 1582mg
Cholesterol: 121mg
_______________________________________
Recipe du Jour is strictly an opt-in service. We do not sell, lease, loan, or give our subscribers‚ addresses to anyone for any reason. Our features are intended as entertainment only.
@@@@@@@@@@@@@@@@@@@@@@@@@@@@@@@@@@@@@@@@@@@@@
Ribs: Smoked Ribs
How to Smoke Ribs; Perfect Pork Ribs
From TheSmokerKing.com
For a bunch of grilling recipes and tips, visit Aaron’s site.
![]() You can’t beat a rack of perfectly smoked barbecue pork ribs. Whether you like them dry or wet, the trick is time and temperature. When you cook barbecue you cook to a temperature more and worry about less time. I cook ribs until the thickest part is 170-180 degrees F.
You can’t beat a rack of perfectly smoked barbecue pork ribs. Whether you like them dry or wet, the trick is time and temperature. When you cook barbecue you cook to a temperature more and worry about less time. I cook ribs until the thickest part is 170-180 degrees F.
Pork Ribs
Most of the ribs I smoke are dry, meaning no barbecue sauce is applied during the cooking process. I will usually have a sauce available for people who like barbecue sauce on their ribs, but I do not typically apply the sauce while I am cooking the ribs.
I do apply a mop when cooking the ribs to keep the ribs moist and add a little flavor. A great mop for ribs is to use 60% apple cider vinegar and 40% cooking oil. This type of mop can be applied with a small bottle sprayer found at your local grocery store.
To smoke a perfect rack of ribs, follow the simple process described below. You will have great results every time.
1. Choose a rack of ribs from your grocery store that is pink in color, and has not been frozen. I prefer St. Louis style ribs, which are pre-trimmed. Your local butcher may also be of assistance to you.
2. The night before you are going to smoke the ribs, remove the membrane off of the rack of ribs. The membrane is a thin, plastic like liner on the back side of the rack of ribs. If you leave the membrane on, the the ribs will not be as tender. To remove the membrane, use a sharp knife to separate the membrane from the ribs at the narrow end of the rack. When you have enough of the membrane separated, use your thumb and index finger to pull and separate the rest of the membrane from the ribs. I pull and cut with my knife at the same time to insure I remove all of the membrane. With a little practice, you will get the hang of it.
3. Apply a thin layer of mustard or olive oil to the ribs. This will help the rub stick to the ribs. I like to use mustard because it makes a great crust.
4. Apply a rub to the ribs. Rub recipes can be found on the left navigation menu.
5. Let the ribs sit in the refrigerator over night.
6. Remove the ribs from the refrigerator about 1 hour before you are going to smoke them. They will be closer to room temperature by cooking time.
7. Heat your smoker to 250 degrees F. I also use an oven thermometer, placed where the rack of ribs will lay, to insure that the temperature is 250 degrees at the cooking surface. Many thermometers built onto smokers will actually be hotter that the actual temperature at the level the ribs are smoking at.
I have found that 250 degrees F is the ideal temperature to smoke ribs at. I use a mixture of Kingsford charcoal and mesquite wood, but other types of wood may be used including hickory, apple, cherry, pecan, etc. It just depends on what flavor you are looking for. Using charcoal, and adding the wood will allow you to control how much smoke you are cooking with.
8. Smoke the ribs for about 5 hours, applying your mop about every 45 minutes. The thickest part of the rack of ribs should be about 170-180 degrees F if a constant temperature was maintained while smoking. During the last 30 minutes, I wrap the ribs in foil, apply my mop, and put them back on the smoker. This will make them very tender. Make sure your exhaust damper is wide open. You do not want to trap any of the smoke in the smoker. This can produce a very bitter taste.
And that is it. Enjoy your ribs.
If you have any questions, send an email to aaron@thesmokerking.com.
@@@@@@@@@@@@@@@@@@@@@@@@@@@@@@@@@@@@@@@@@@@@@
Ribs: Pork Ribs
INGREDIENTS
- 2 racks baby back ribs
DRY RUB - 1/2 C brown sugar
- 2 TBL Grandpa's Thunder Powder or Arghhh Powder
- 2 TBL salt
– Mix together and set asideBRAISING LIQUID
– Always contains an acid, salt and sugar - 1/4 CU white wine
- 1 TBL white wine vinegar
- 1 TBL Worcestershire Sauce
- 1 TBL honey
- 3 cloves garlic (smashed)
– Mix together and then microwave 1 minute – Stir and set aside
STEP BY STEP
- Pat ribs until they are very dry
- Lay ribs on foil with the fat meaty side on top
- Wipe lightly with EVOO
- Coat liberally with Dry Rub
– Wash your hands after this step - Make a “boat” with the foil, then add braising liquid
- Close foil and cook at 200 degrees for 6 hours
- Increase heat to 350º and cook for 40 minutes
- After cooking, lay ribs on a pan
- Snip a hole in the foil to let liquid escape
- Collect liquid in sauce pan and heat slowly to thicken.
reducing will make your glazing sauce (10-15 minutes) - Open ribs and brush with glazing sauce
- Broil (uncovered) until it starts to caramelize – THIS WILL NOT TAKE LONG
- Cut into two-rib sections and toss in the left-over sauce
Ribs: Short Ribs
Barbecue Short Ribs
3 to 4 pounds beef short ribs
 Use BBQ sauce of your choice. (Not dry rub) add 1/2 C vinegar and 1/2 C sugar in a large saucepan and simmer until mixture thickens to a syrupy consistency, about 10 to 15 minutes. Add ribs, simmering for 20 minutes. Allow ribs to cool on a dish lined with aluminum foil. After 15 minutes, wrap ribs in foil and refrigerate overnight.
Simmer the remaining liquid in the saucepan, reducing until it becomes thick enough to coat the back of a spoon. Cool and refrigerate. Reserve this sauce to baste the ribs while grilling.
The following day, grill ribs 30 to 40 minutes turning once or twice, and basting every 10 to 15 minutes with the reserved sauce.
NOTE: Get your meat from a butcher, not the supermarket.
These are good for quesadillas too. Refrigerate finished ribs overnight, then remove fat. Chop the meat into pieces against the grain and sear in a pan. Top tortilla with meat and Queso Oaxaca. Serve with salsa and guacamole.
@@@@@@@@@@@@@@@@@@@@@@@@@@@@@@@@@@@@@@@@@@@@@
Super Basic Short Ribs
Get beefy short ribs and cut them apart if not already.
Bring ribs up to room temperature then salt and pepper and sear in hot Dutch oven . Set aside to go into Dutch oven later.
Sear large pieces of carrots and onions or other vegetables in the pan drippings.
Sear only, do not over cook so that they fall apart
Mince carrot, onion, celery
Put in Dutch oven with remaining hot pan drippings
Use additional EVOO if necessary
Add rosemary, bay, sliced peppers, whole cloves, and garlic after the initial sauté
In three minutes, add 2 cups red wine and 2 cups beef stock
Put the pieces back in the pot with the liquid
Cover with aluminum foil
Bake at 325° for 2 1/2 – 3 hours .
Alternate: 300º for 4 hours
Put back in root vegetables for the last 10 minutes of cooking
Remove meat and vegetables and set aside for serving
After the remaining liquid cools, strain it and allow to cool further until the fat separates.
Use 2 tablespoons butter and 3 tablespoons flour to create a room
Then put 1 Cup strained drippings back into pan and cook at low simmer until it starts to thicken
Keep adding liquid a ladle at a time and continue to whisk
Served atop cook polenta
Garnish with root vegetables, chopped parsley, and maybe pomegranate, raspberries or blueberries
You can use leftover meat for hash or shredded sandwiches
@@@@@@@@@@@@@@@@@@@@@@@@@@@@@@@@@@@@@@@@@@@@@
Ingredients:
¼ cu chili puree
¼ cu tomato juice
¼ cu orange juice
¼ cu brown sugar
1 tbl ground espresso
2 tbl oregano
1 tbl garlilc
1 tbl onion
1 tsp cinnamon
1 tsp cumin
Instructions:
Stir all over med heat. Simmer.
Special Steps:
Cook ribs in over w/sauce
@@@@@@@@@@@@@@@@@@@@@@@@@@@@@@@@@@@@@@@@@@@@@
Tips: Potluck Safety
Keeping Hot Food Hot
- If you have a casserole, you can keep it hot by wrapping it in a couple of bath towels. If it is something that might spill, use a towel that will not be ruined by a stain.
- If you have a crock pot or hot plate that will need to be plugged in, it is YOUR responsibility to bring an extension cord, not your hosts. A heads-up ahead of time would be considerate as well.
Keeping Cold Food Cold
- You can create a double boiler cooler by putting ice in the bottom of a large baking pot, and then putting a steel dish on top of it. It is even better if you can put a lid over top.
- You can also simply place your item in a tray of ice.
- Wrapping up your item in a towel with an ice pack works, almost as well as bringing your item in a cooler.
- The benefit of the first two items is that they will stay cold even on the serving table.
Spoilage
- This is the greatest fear of potluck attendees. If you have something that used mayo, eggs or some other easily spoil-able ingredient, for God’s sake be sure to take adequate precautions.
Sharing
- If you are a beer drinker, don’t bring a six-pack just for yourself – bring a case to share.
- Bring enough food to share. Don’t bring a half pint of potato salad and fill up your plate three times.
Food Choices
- This is not the place to experiment. Forget about your spicy chicken lips. Stick with something that is a tried and true favorite.
- People tend to bring meaty dishes to share. Consider bringing a vegetable plate.
- If you bring soup, don’t expect the host to have bowls and spoons. Part of your contribution includes utensils that are probably not otherwise available.
Left Overs
- It is a nice gesture to leave food behind, but it is actually not the norm. Usually people will “help clear up” and take the food home with them. Each situation can be evaluated on a case-by-case basis. Here are three examples that happened to us:
- Amy is on a diet, but LOVES to cook and bake. She made cookies and a trifle and brought them to our potluck. She left them behind so she would not eat them and ruin her diet.
- Tim is a single guy who brought baked chicken and fried chicken. Only half of it was eaten. I asked him “Would it be OK to combine them into one box.” This gave him the opportunity to say “Oh, you just keep them all.” His reply was “That would make it much easier for me. Thanks.”
- Tina brought a 48 pack of misc chips. She put it under the table saying that she would bring it out if it was needed. She then ate and left early, taking the chips with her. This was just tacky.
Social Etiquette
- A potluck, by definition, is a party to which each guest brings something to share. An entree, a salad, a desert, or some other part of the meal. Condiments do not count as a contribution.
- You can, however, ask the host if you should bring a dish to share, or it if would be more helpful to bring a couple stacks of paper plates and some cups. You should, however, coordinate this substitution with the host.
- If you are told that you don’t have to bring anything, this is technically a dinner party, not a potluck. It is still common courtesy to bring something. A potted plant, a bottle of wine, or a loaf of bread.
- Hosts: Don’t ask that guests bring a pot to share, plus a couple of bottles of wine to share. It is OK to ask people to bring whatever they want to drink, but don’t be stingy about it.
- Rather than being the first in line, as the food starts to come out, ask your host if there is anything you can do to help. You won’t starve to death if you don’t get up to the buffet table in the first fifteen minutes.
- If the host asks you to bring something for which you are known, try your best to accommodate their request. If you can’t, let them know ahead of time.
- Do not criticize food that you feel is below par. The person that prepared the dish could be sitting right next to you.
- Don’t pig out just because you can. This is a social dining experience, not preparation before a fast.
- Don’t bring something that will require additional cooking time without informing the host of your requirements far ahead of time. They may have alternate plans for their stove.
- Wait for everyone to have firsts, before you go back for seconds. Frequently the host will not even get a chance to eat.
- After everyone has finished eating, ask if you can help clean up – or just start carrying some of the dishes into the kitchen, following the example of your host.
- Host: Be sure to return all of the CLEANED dishes brought to your potluck. Make a note somewhere of what belongs to whom so you can be sure to return them.
- If you can’t follow these simple rules and behave, just offer a reasonable reason you cannot attend and stay home.
Tips: Butter and Oil
Tips are coming soon:
Storing
Butter vs Margarine
Oil
Olive Oil, green
Refrigerated
Tips: Skills and Kitchen Safety
Tips are coming soon:
Knife
Cooking
Cleanliness
Tips: Animals – Cows, Pigs, Chickens…
Tips are coming soon:
Cows, Veal and Beef
Pigs and Pork
Chickens and Poultry
- Use gloves when working with raw poultry
Seafood
Tips: Life Hacks
Tips are coming soon. For now, you can BROWSE HERE.
Links to Third Party Sites
- YouTube – Household Hacker
- YouTube – Food Life Hacks
- YouTube – Crazy Russian Hacker
More Hacks
- Chip bag – no bowl – bit a hole in the face of the bag and tear a spiral until you have a bowl
- No charcoal? chips work here too. Light and use a a substitute for charcoal. Finishes quickly though.
- Corn chips are more along the lines of petro chemicals, so if you need something to start a fire on your camping trip, try Doritos.
- Sterilize your sponges by putting a damp sponge into the microwave for two minutes
- CD Case – Use for transporting bagels
- Website for using leftovers – www.MyFridgeFood.com
- Repair scratches on a table:
– Rub with a walnut – get all of the oils into the crack
– Rub the oils in with your finger
– Clean with a soft cloth - Elevator – Easter Egg – Close and your floor at the same time – Straight up
- Nervous – Chew gum – Body has nothing to fear or wouldn’t be eating
- Use a dab of honey for pimples or a cut. Use toothpaste for a bee sting.
- Slow sink ? Use a toilet plunger
- When buying a used car, NEVER pay the asking price on a car lot. Have a price in mind, but start at about 20% lower than what they are asking. Find a couple of flaws, or some things you don’t like about the car. Also, carry cash to the lot, and they will start foaming at the mouth. Don’t be afraid to walk away – also don’t fall prey to their guilt trips.
- Coffee Filters – Use for pinch pots or splatter guard in microwave
- Lock screen on phone or iPad – “if found, please return to”
- V to keep waxed paper or saran wrap roll in dispenser
- Bagel freshener – wrap in wet paper towel and microwave 15 seconds
- Juice bottle for power failure – See tip and picture this website
- Book: How to Rebuild the world from scratch by Lewis Dartnell
- Separating eggs: Put all eggs into a bowl, then use a water bottle. Squeeze, touch yolk, release.
- Dicing an avocado for guacamole: Halve the avocado and remove the pit. Push into a cross hatch bread rack.
- Cutting a Kiwi: Halve the kiwi and scoop out meat with a soup spoon.
- Pitting a strawberry: Use a (firm) soda straw. Push through the tip and shove up to the leaves.
- Peeling Garlic: Cut the entire head around the “equator” and put them both face down. Smack it with your cleaver.
- Use a spice grinder to make your own rice flour or bean flour
- Cut a hole in the plastic top of your spaghetti storage container to get the right amount every time.
- Dip your hot skillet bottom into batter for a perfectly formed crepe
- Place a wooden spook across your pot to prevent boil-overs
- Use binder clips to help keep cables organized
- Fix wobbly furniture by gluing a penny to the bottom of one of the legs
- Eat your hamburger upside down. The tops are more durable.
- Use a n emptied chap stick tube to hold your emergency money
- Use a needle nosed pliers to hold your nail to get it started
- To help clean your microwave, boil 1 C water for 5 minutes. The steam loosens everything.
- Use a can opener to cut open some ridged plastic packaging
- \
Tips: Salads
Tips are coming soon:
Dressing on the side of bowl
Tear or use plastic knife
Iceburg – smash end
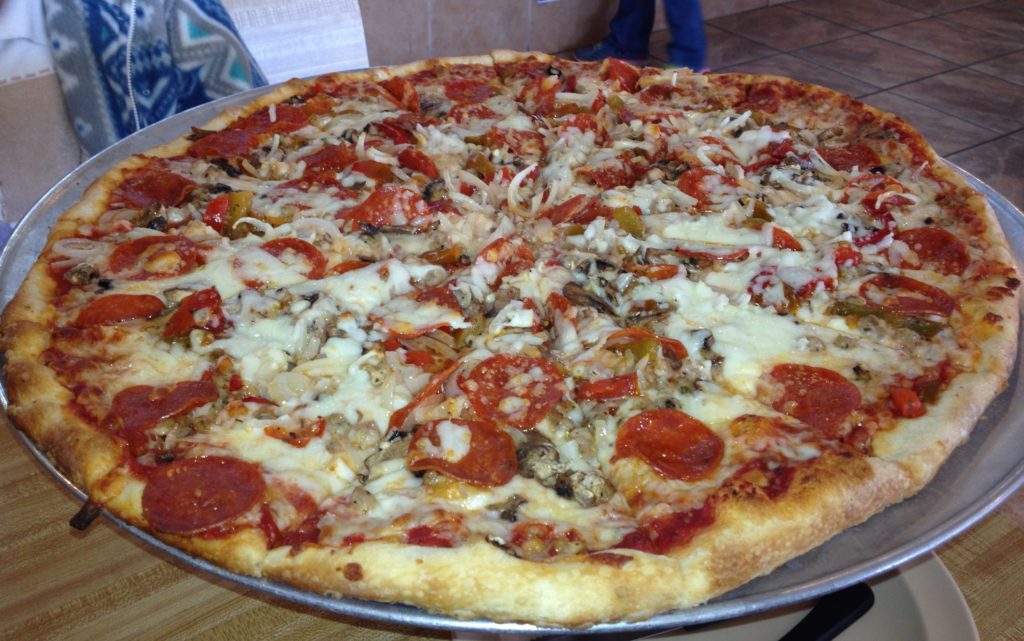
Tips: Pizzas
Preparing your Dough
- Many pizza places will sell you a ball of their dough for a couple of bucks.
- Alternately, you can get oven-ready dough at the supermarket
- It is not too difficult to make your own dough. CLICK HERE for several of my recipes
- Here is my good friend, Steve, that owns Grande Pizza PREPARING HIS DOUGH for an overnight rise.
- Albert Grande shows you a basic dough recipe and some of the proper techniques WITH THIS VIDEO.
- Dough that is risen without sugar will take longer, but will have a more fully developed flavor
Flattening your Pizza
- A rolling pin may seem like a good idea, but it squeezes many of the air pockets out of the dough. Your pizza will taste more like cardboard
- Use your finger tips and palms to flatten your pizza
- Turn it (flip it) often during the flattening
Toppings
- Sauce is a good thing, but too much will give you a soggy crust. Serve your pizza with a sauce side for dipping instead.
- I have a lot of recipes for RED SAUCE and for MARINARA. I really like pizza!
- Put onions and pepperoni on the top so they fully cook
- Generally speaking, try to hold your pizzas to about five toppings (not counting sauce or cheese)
Baking
- Pizzas should be cooked at high heat fairly quickly. 500º for 12 minutes is pretty good for the home oven.
- Use a baking stone if you have one. Bring it up to temperature with your oven. Never put a cold baking stone in a hot oven – it will crack.
- Never use soap to wash your baking stone.
Reheating
- Use a baking stone for reheating your left-over pizza. The microwave will make it kind of soggy.
- No baking stone? Put it on a cooling rack and slide that into your oven. Put a pan under the cooling rack to catch drips.
- Grandma and I both like different toppings, so we get an extra large cheese pizza and keep it as a base for later toppings.
- To reheat, we bake at 400º for 8-10 minutes.
Tips: Freezing Things
OVERVIEW
- These freezer tips are a perfect companion book to our Casseroles and Pan Dishes cookbook. The basics in this tip can be used for many casseroles and pan dishes.
- Prepare the recipe as you normally would. Instead of putting it in the oven, cover it and put in the freezer. For longer term storage, use a vacuum sealer.
QUICK FREEZE
- If you have strawberries, or other similar high-liquid produce, it is best to freeze them quickly.
- Put a heavy metal baking sheet in your freezer overnight.
- The next morning, spread your berries on the cold baking sheet and place back in the freezer for 4-5 hours.
- Use a spatula to remove the berries and place in a vacuum sealer bag.
- Always thaw out berries overnight in the refrigerator to minimize them becoming mushy.
- Freezing berries is a good way to create ingredients for smoothies.
- Break them into smaller pieces
- Freeze them as shown above
- Place them right in your blender instead of ice cubes to chill your smoothie.
GENERAL FREEZING
- Prepare in large deep-dish baking tray.
- Let cool on the counter to the point where it may be warm, but not hot.
- Place in refrigerator overnight
- Using a sharp knife (see Tips and Tricks) cut into serving-sized portions
- Place each serving onto a square of aluminum foil
- Carefully fold the corners over so that you don’t end up with any pieces of foil embedded into the sauce
- Label and freeze
- For extra protection, the next day (when it is frozen solid) enclose the frozen foil-wrapped meal in a twist-tie plastic storage bag – or better yet a vacuum sealed bag.
HOW LONG WILL THIS BE KEPT IN YOUR FREEZER
- For a couple of days you can just keep it wrapped in the foil. Even better would be a baggie sealed with a twist tie.
- For a couple of weeks, you need a baggie with a twist tie. Even better would be a vacuum sealed bag.
- For two weeks or more, you need to invest in a vacuum sealer.
- Amazon sells a Seal-a-Meal which is OK for occasional use.
- For more frequent use, invest in a Food Saver System
TO THAW
It is always best to thaw something in the refrigerator overnight (or one or two days before if it is a larger item) to prevent bacteria growth. Thawing something on the counter, or in water for more than a half hour, may cause unsafe and potentially harmful bacteria to grow.
LASAGNA: A POTENTIAL STEP BY STEP
- Let thaw out in fridge overnight (over a couple of nights if it is a large piece)
- Preheat oven to 350 degrees.
- Unfold foil, and place (still on foil) onto baking sheet
– If foil is frozen into the lasagna, cook for 10 minutes before proceeding to step 4. - Lay another layer of foil over the top (do not tuck or secure foil)
- Cook 45 minutes (60 minutes if larger)
- To finish, remove top foil, then cook 20 more minutes
- Let stand at least 5 minutes before serving
FREEZING AND THAWING SOUPS AND STOCKS
- These freezer tips are a perfect companion book to our Stews and Soups cookbook. The basics in this tip can be used for many recipes.
- Anytime you have a chicken, turkey, ribs, or anything with bones, you have the perfect beginnings for GREAT soup or spaghetti sauce.
- See the recipe in Grandpa’s book Stews and Soups on how to make stock, THEN once it is done, come back here for instructions on how to freeze it.
- Making your own stock is easy and tastes much better than canned stuff.
GENERAL FREEZING
- Clean canning jars. If you want to go the whole canning route, you will need a pressure canner. These steps will prepare your stock for freezing, NOT canning.
- Place your canning lids in a bowl of extremely hot water.
2 cups of water in a microwave for 3 minutes is adequate - While stock is still too hot to touch, ladle stock into your canning jars leaving at least 1/2 inch clearance on top.
DO NOT COMPLETELY FILL THE JARS, OR THEY WILL CRACK AS THEY FREEZE, AND THE LIQUID EXPANDS - Screw the lids onto the jars
- Place jars in an ice bath for about 3 minutes to cool them rapidly.
- You will notice the fat start to separate from the stock
- You will hear pinging as the jars somewhat seal themselves.
- Once the jars cool down to nearly room temperature, put the jars into the refrigerator overnight to cool even further.
- Move to the freezer the following day.
NOTE: Moving them to the fridge or freezer before they have somewhat cooled will thaw other stuff in your freezer, and increase the chance for bacteria to grow in those other foods. Be patient, and let the jars cool.
HOW LONG WILL THIS BE KEPT IN YOUR FREEZER
- For up to a couple of weeks, just placing the jars in your freezer is good enough.
- For two weeks or more, once the liquid has complete frozen, float a thin later of water on top and freeze again. This will create a flavor barrier that will isolate your broth from freezer burn.
TO THAW
- If you have used water to create a flavor barrier, take the lid off your jar and rinse off any ice crystals that have formed. Discard this tainted water.
- Place the jar in your refrigerator for one or two days. Two or three days if you used a quart canning jar.
- Use a spoon to scrape off the congealed fat and discard
- Use this stock as the base for any soups or home-made spaghetti sauces at a ratio of about 1 to 1
- Add vegetables or meat as desired, depending on what you are making
A NOTE ABOUT SPOILAGE
If this is only a week old, and has been properly refrigerated, you should be safe BUT if it is older than a week, and has been thawed out that long and in the refrigerator, proceed as follows:
- Put your stock in a soup pan over medium high heat.
- Make sure that the temperature comes up to at least 185 degrees so that any pathogens are killed.
- Let simmer for at least ten minutes. Longer is better.
- Add your other ingredients, and cook for long enough to finish cooking the other ingredients.
- Stock should be bubbling on the sides.
- Since bacteria growth has started, do not save left-overs.
If it has NOT been refrigerated for several hours or more, please discard it.