Doggo Bun for Hot Dogs

See full article at AZ Central.

This doggo dough can be made by hand or with a mixer. There is no shame or prestige in one over the other, though there is a satisfying learning opportunity in kneading a dough to the correct tenderness by hand.

Makes: 8 buns

Ingredients:

For the tangzhong starter:

  • 172 g (¾ cup) whole milk
  • 28 g unbleached bread flour

For the dough:

  • 600 g unbleached bread flour
  • 75 g granulated sugar
  • 12 g kosher salt
  • 18 g dry active yeast
  • 114 g butter, room temperature
  • 2 large eggs
  • 226 g (1 cup) whole milk, room temperature

For baking:

  • Baking tray
  • Parchment paper
  • 1 egg
  • 1 teaspoon water

Preparation:

  1. Working in a small sauce pot, whisk together the milk and flour for the Tangzhong until completely smooth.
  2. Cook over low heat while continuously stirring, until a paste thick enough to stick to the sides of the pot forms, approximately 3 minutes. Allow to cool slightly.
  3. In a large bowl, mix together the dough ingredients, starting with the dry ingredients, then incorporating the butter, followed by the eggs, then milk. Finally add the Tangzhong.
  4. Knead with either a mixer fitted with a dough hook or with the heel of your palm, either will produce the necessary kneading motion to stretch the dough and fold it over itself until a smooth elastic dough has formed.
    To test for correct gluten development, form the dough into a smooth ball, then gently press your thumb into the top. If the indentation remains, the dough is underworked. If the indentation bounces back most of the way, but retains a shallow dent, it is just right.
  5. Place the dough in a lightly oiled bowl and turn to coat. Cover and rest until the dough has puffed up nicely, about an hour or hour and a half. The dough will be proofed to the correct level when a slight poke into the dough holds its shape.
  6. Once proofed, turn out the dough on an unfloured surface (resist the urge to flour the working surface to prevent the dough from sticking. If needed, lightly oiling the hands will provide just enough oil to keep everything moving smoothly).
  7. Divide dough into 8 equal portions and form them into smooth balls. Then roll each one into an even 5 ½-inch cylinder, about the length of a hot dog.
  8. Line a baking tray with parchment paper. Place the dough cylinders on the tray abut a ½-inch  apart and flatten slightly.
  9. To proof, bring a small pot of water to a boil. Place the pot at the bottom of a cold oven. Place the bread tray on the center rack. Proof for approximately 50 minutes, or until noticeably poufy.
  10. Remove the bread tray from the oven and preheat to 350°F.
  11. Brush the tops of the buns with a wash consisting of 1 egg beaten well with 1 teaspoon water.
  12. Bake until the dough reaches an internal temperature of 190 F and is heavily fragrant, approximately 20 to 25 minutes.
  13. Cool the buns completely on a wire rack to prevent sogginess.
  14. Once cool, separate the buns and cut a slit into the side, keeping the ends together. Fill as desired.
  15. Store cooled buns in a paper bag for freshness.


Choc Peanut Candy Bars

  • Combine 3 C Chocolate Morsels and 2 TBL salted butter
  • Melt chocolate mixture in a double boiler
  • Meanwhile prepare a baking pan with parchment paper
  • Pour half into the pan – smooth
  • Prepare filling – combine
    • 1 C marshmallow
    • 1/2 C peanut butter
    • 3 C powdered sugar
    • 2 TBL melted butter
  • Press into the pan over top of the chocolate layer
  • Add a thin layer of salted roasted peanuts
  • Melt 1-2 C caramels in a pan with 2 TBL butter
  • Pour caramel over top of the peanuts and spread flat
  • Add the remainder of the chocolate
  • Sprinkle lightly with Maldon salt
  • Refrigerate 1 hour, then cut into bars
  • Wrap bars in waxed paper or parchment paper

Sun Dried Cherry Tomatoes

An easy way to preserve an over-abundance of cherry tomatoes is to put them in a jar


  • Preheat oven to 200º
  • Rinse (4 C) tomatoes and dry with a tea towel
  • Place in a mixing bowl and add 1 TBL EVOO
  • Add 1/2 tsp each crushed oregano, salt and pepper
  • Place on a parchment lined baking sheet in a single layer
  • Place a knife prick in each tomato
  • Leave in hot oven for 2 hours
  • Start checking every 10-15 minutes
    • You are looking for rubbery, not crisp
  • Allow to cool completely
  • Place on a new sheet, and freeze 3-4 hours
  • Place a handful in a food storage bag.
  • Return to freezer for up to 12 months

You can use as tomatoes if you let them soak in water for an hour.

You can also eat them as a cool beat-the-heat-of-the-summer snack.


Pineapple Sheet Pan Cake

CLICK HERE TO VIEW VIDEO

  • 1 can of sliced pineapple (usually 7 slices)
  • In non-stick pan (on stove top) add 2 TBL butter
  • Melt – then sprinkle with 2 TBL granulated sugar
  • Stir until caramelized
  • Add 7 pineapple slices
  • Cook for two minutes
  • Turn off heat and let pan cool (on burner)
  • Add candied cherry into center of each slice
  • Separate 2 eggs
  • Beat white of only 1 egg to soft peaks
  • Put other egg and 2 yolks into a mixing bowl
  • Add 1/4 C sugar and a pinch of salt and 1 tsp vanilla
  • Whisk until lightened in color
  • Drizzle in 1/4 C vegetable or peanut oil while continuing to whisk
  • When completed blended, add 1/4 C whole milk
  • Mix 1 TBL baking powder with 1 1/4 C AP flour
  • Sift into the liquid
  • Pour batter into the oven-safe pan
  • Cover and cook over low heat for 10-15 minutes
  • Use toothpick test – Should come out clean
  • Turn over – onto a lightly oiled dish
  • Return (upside down) to the skillet
  • Cook the other side for 5 more minutes
  • Cut six wedges from the pan – or slip onto a serving plate to serve


Relleno BRIEF – IN PROCESS

  • Get 4 poblano chilies
    • Brush with canola oil
    • Bake in 450º oven for about 20-25 minutes
    • Remove from oven and put into a bowl and cover
  • Turn oven down to 350º
  • Lightly oil 4-6 chicken thighs – bone in without skin
    • Coat liberally with Thunder Powder
    • Put into hot oven-safe pan with a bit of oil in the bottom
    • Cook, sear, color – flip
    • After flipping, cook 4 more minutes, then add chicken stock
    • Add some BBQ sauce and ancho chili powder
    • Cover and bake at 350º for an hour
  • Remove cover from bowl and pull away poblano skin
    • DO NOT RINSE.  Just pull off using a paper towel.
    • Put small slit into the pepper, then remove seeds
  • Lightly chop tomato, jalapenos, garlic, tomatillos
    • Puree in a blender
    • Dump into a skillet
    • Add some Mexican oregano, salt and pepper
    • Bring to a boil, then let simmer
  • Fry up your corn tortilla strips – blue, white or yellow
    • Cut 5 tortillas into strips
    • Put into hot oil and fry for 15-30 seconds each @ 365º
    • Spider strainer them out onto a paper towel
    • Salt them right away using Maldon salt
  • Shred a chicken thighs
    • Toss chicken into tomatillo sauce
  • Bring 1 C heavy cream to a simmer in a stock pot
    • Let slowly reduce
    • Grate Chihuahua or Oaxaca cheese or Monerey Jack
    • Dump into the hot cream
    • Season with Salt and Pepper
  • Plate a schmear of the sauce
    • Top with Poblano
    • Add your chicken and egg
    • Top with roasted veggies
  • MIGAS:  In a large mixing bowl, combine
    • 2 roma tomatoes (quartered)
    • 1 tomatillos (quartered)
    • 1/2 large red onion (diced)
    • 1 chipotle pepper (sliced)
    • 1 red bell (sliced)
    • 2 jalapeno peppers (sliced)
    • 1/2  tsp salt
      • Dump all into a large skillet
      • Sautee until charred and blistered
    • Add 3-4 scrambled eggs
    • Add some pulled chicken
    • Add cilantro and tortilla chips
    • Stuff Migas into Poblano
    • Drizzle cheese sauce on top
    • Top with Fresh chopped Cilantro


Mitarashi Dango Tofu

CLICK HERE FOR ORIGINAL RECIPE WEB PAGE


Silken or firm tofu? And what can be replaced? 

Both silken or firm tofu works, however, I recommend using silken tofu for a smooth chewy texture. If you can not get tofu for whatever reason, you can replace it simply with water. The amount of water should be about 90% of the flour weight. You should aim for a dough firmness similar to your ear lobe. So do not add tofu or water all in one go. Rather add the tofu or water gradually, watching the consistency of the dough.

How to cook dango?

It is super easy too. Simply drop the dangos into boiling water. When cooked they float up to the top of the water.  Then scoop them with a sieve and place the cooked dango into a bowl of cold water.

3, 4, or 5 on skewers? How many should be on a skewer?

It is traditionally 5. It originated from an anecdote when Emperor Godaigo washed his hands at Mitarashi. One big water bubble came out followed by four more water bubbles. Personally, when you you make Mitarashi dango at home, I don’t think the number matters. I bought the short skewers from a local supermarket and thought it is really cute to have just 3 on them.

What types of flour do I use for mitarashi dango?

This time, I bought a rice flour (more like granule?) called “Shiratamako” from a local Japanese grocery store. Also I often use rice flour that you can get from the supermarket international isle. The rice flour is a product of Thailand. There are red, blue and green writing packets.  Make sure you get the green one.

Grill, fry or blow torch? 

It depends what you have. Using a non-stick frying pan will be the easiest, though be careful not to burn your finger when you flip the dango skewers. Also you don’t need oil. I like the burnt mark made by a blow torch. It looks nicer but not much different in taste.

Ingredients

  • 150 g silken tofu *1
  • 100 g Shiratamako *2

Mitarashi Sauce

  • 1 tbs soy sauce
  • 1 tbs mirin
  • 2 tbs sugar
  • 1 tbs potato starch
  • 80 ml water

Instructions

    • To make the Mitarashi sauce, place all ingredients for the mitarashi syrup in a small saucepan over medium heat and stir constantly with a wooden spatula until the syrup becomes thick and clear. Set aside the sauce
    • Place the rice flour and silken tofu in a large bowl and mix well until it forms a dough.
    • Divide the dough into 4 equal portion. 
    • Roll each dough into long cylinder shape and cut into 6 each.
    • Roll each dough into small round ball shape. 
    • Boil some water in a pot or sauce pan and add the dango balls.
    • Once the dango raises to the surface of the water, scoop them out and put them into a bowl of cold water.
    • Thread 3 balls each onto a skewer.
  • Char or grill the surface of the balls on a frying pan then set aside. *3
  • Roll the skewers in the syrup to serve.

Notes

*1 If you can not access to fresh silken tofu, it can be replaced with 90% water of the flour amount.


*2 if you use rice flour, use same weight of tofu.  


*3 or you can use brow torch 
 

Easter Juevos Rancheros

  • Chorizo – cooked – and set aside
  • Cook jalapeno, onion, and garlic in the chorizo grease
  • Add garlic minced and salted
  • Add minced onion
  1. Brown chorizo
  2. Remove – leaving grease and oils
  3. Add jalapeno, etc
  4. Deglaze with red wine
  5. Add finely minced tomato
  6. Add chipotle, pasilla powder, and ancho chili powder
  7. Cook for about 30 minutes
  8. Add 2 TBL honey to the sauce

Put 1/2 inch olive oil in a skillet and bring up to 365º

  • Avocado Relish
    • Add red onion, jalapeno, onion, cilantro, fresh lime juice
    • Salt and pepper – mash together
    • Fold in with Crema plus lime zest
  • Cook scrambled eggs
  • Cook a Corn Tortilla in olive oil until crispy
    • about 30-45 seconds
    • OPT:  Cut into strips and create topping slices
  • Refried Beans
  • Fried egg – Steamed
  • Top with tortilla strips

Ranchero sauce and cheese on the plate

Add cheese, then eggs, then chorizo

Top with avocado

Tortilla strips and cilantro


Jalapeño Shrimp

  • Nice large shrimp
  • 1/2 C jalapeno juice
  • 1/2 C olive oil
  • 2 cloves crushed salted garlic
  1. Combine juice, olive oil and garlic
  2. Marinate shrimp for about 30 minutes
  3. Put shrimp into hot grill skillet and cook no more than 60 seconds per side
  4. Serve with a dipping sauce of
    • sour cream, lime juice, cilantro, yogurt

American Sushi Rolls

  • Cut skirt steak on the bias against the grain as thinly as possible
  • Marinate in soy, mirin and karo syrup overnigh
  • Put in hot skillet and cook quickly
  • Prepare a sushi roll pad
  • Lay down plastic wrap and then a sheet of skin – shiny side up
  • Lay down a layer of sticky rice
  • Line with
    • Cucumbers thinly chiffonaded
    • Shred strips of carrots
    • Thinly shredded red cabbage
  • Roll it over as tightly as possible
  • Hold for 15 seconds to let it set
  • Cut into 6 or 8 pieces – Dip knife in water between cuts


Yesica’s French Toast Wheels

This is a special recipe for Eliseo.

  1. Roll fresh brioche bread flat
  2. Spread with cinnamon mixture
    • 1/4 C Brown sugar
    • 3 TBL Softened butter  (not melted)
    • 1 TBL Cinnamon
  3. Mix number 2 ingredients to create a spread
  4. Optional spreads:  Nutella in Cinnamon cream cheese mixture
  5. Roll into tube
  6. Cut (without pressing too hard) into 1/2 inch “coins”
  7. Dip in traditional French toast mixture
    • Milk, egg, cinnamon, nutmeg, vanilla
  8. Cook in skillet until browned

Buttermilk Donuts

WET INGREDIENTS

  • 1 stick of butter  (8 TBL) melted and browned (see below)
  • 1 lemon – zest and juice
  • 2 eggs + 3 egg yolks
  • 1 TBL vanilla extract
  • 1 tsp almond extract
  • 3/4 C buttermilk

DRY INGREDIENTS

  • 1 C almond flour
  • 5 tsp baking powder
  • 1/2 C granulated sugar
  • 1/2 C packed brown sugar
  • 4 C cake flour (AP flour, if you must)
  • 1/2 tsp baking soda
  • 1 tsp salt
  • 1 tsp ground CinnaSugar

BROWN YOUR BUTTER

  1. Over medium heat melt your butter
  2. Let it simmer until the “sizzling” stops and the edges start to brown
  3. Don’t overcook it, or it will become bitter

COMBINE WITH WITH DRY

  • Add 1/2 C dry (a bit at a time) into the wet until all in
  • The dough should be about the consistency of Play Dough
  • Wrap in Plastic and Refrigerate 2 hours (or overnight)
  • Roll to 1/2 – 3/4 inch thickness
  • Form either bars or donuts
    • 1/2 inch bars
    • 3″ donuts with 1″ hole in center
  • Place on baking sheet
  • Combine and re-roll scraps
  • Put back onto sheet pan and refrigerate for another 30 minutes
  • Using spider strainer or fish spatula, lower into fry at 350º (min 345º – max 360º)  till browned and cracked.  Flip occasionally.
  • Wire rack to drain
  • Dip into Glaze – both sides
  • Drain on wire rack

GLAZE

  • 2 C powdered sugar
  • zest and juice from one lemon
  • 2 tsp vanilla extract
  • 2 TBL Melted butter
  • 2 TBL boiling water (ONLY IF NECESSARY)

 – Glaze should be like thick syrup or cold honey


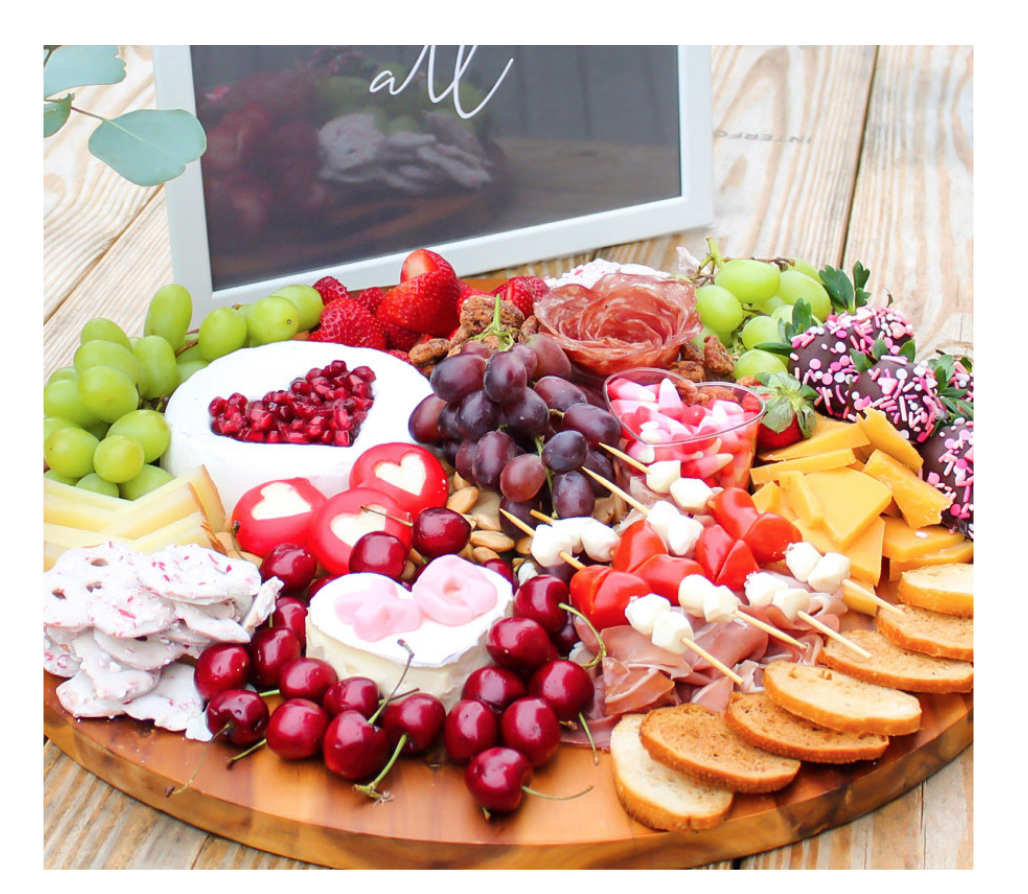
Gourmet Charcuterie Board

This is a compilation of an AARP video session, and several other sources

Equipment

  • Cheeseboard (Marble or Wood) any clean transportable flat surface
    • Really cool to have a four foot six inch board
  • Heart Shaped or square or round Cookie Cutter
  • Paring & Bread Knives
  • Pastry Brush

Charcuterie & Fromage

Portion Size

  • Plan on 3 ounces of each cheese and charcuterie per person when served as an appetizer.

Accoutrements

    • Vegetables
  • Strawberries
  • Clusters Green Grapes
  • Tear Drop Tomatoes
  • Purple Grapes
  • Cucumber Medallions or Spears
  • Mushrooms
  • Green or Black Olives
  • Approx. 20 Cherries
  • Baby Carrots
  • Sweet Gerkins
  • Red Onions – sliced thin
  • Pomegranate Arils
    • Fruit
  • Cherries
  • Blueberries
  • Raspberries
  • Blackberries
  • Grapes
  • Strawberries
    • Nuts
  • 1 Cup Candied Pecans
  • 1 Cup Marcona Almonds
    • Cheese
  • 16 Mini Mozzarella Balls
  • Brie
  • Gruyere
  • 1.5” Wheel of Brie
  • Ounces Manchego
  • Cream Cheese
  • Gouda
  • Slices of Parmesan
  • Cream Cheese
  • Gorzonzola
  • Three Baby Bellas
  • Cheddar
    • Meat
  • Soppressata
  • Prosciutto
  • Capiocola
  • Sliced Deli Ham
  • Devilled Eggs
  • Meatballs
  • Bacon
  • Smoked Salmon
  • Sardines
  • Shrimp
  • Vienna Sausages
    • Cracker, etc.
  • Triskets
  • Batels
  • 1/4 French Baguette
  • 1/2 Baguette
  • Bruschetta
  • Pretzels
  • Popcorn
  • Pita Wedges
    • Sweets
  • Assorted Valentines Candy
  • 1 Cup Dark Chocolate Chips
    • For most of them
  • 4 Ounces Olive Oil
    • Dips
  • Ranch Dressing (with spices)
  • Hummus
  • Sour Cream (with spices)

Shredded Pancake

with Plum Sauce

  1. Two eggs (separated)
    1. Beat whites until thickened
    2. Add 2 TBL sugar
    3. Add sprinkle of kosher salt
    4. Continue to beat until fluffy and stiff peaks
  2. Whisk egg yolks in separate bowl
  3. Sprinkle in 1/2 C flour and scant nutmeg
  4. Add 1 TBL whole wheat flour
  5. Add 1/2 C milk
  6. Add 1/2 tsp vanilla and a dash of almond extract
  7. Add 2 TBL melted butter
  8. Stir to combine
  9. Fold in egg whites
    1. Better to be under mixed, than over mixed
  10. Add 1 TBL butter into hot pan
  11. Cook for a minute in the pan till it starts to rise
  12. Put into the oven at 400 for about 14 minutes
  13. Make Plum Sauce
    1. Add 1 C chopped plums
    2. Add 2 TBL misc fruit jam
    3. Add 1 TBL lemon
    4. scant salt
    5. 1 TBL water
    6. Heat
    7. Cook until thickened
  14. Flip pancake over into the pan
  15. Use spatulas to break it apart
  16. Drizzle in butter, and sprinkle with sugar
  17. Toss over medium heat until it starts to crisp up
    1. Serve with plum sauce
  18. Sprinkle with powdered sugar


Grandpa’s Home Fries

  • Poke holes in a large potato
  • Microwave potato for 2 minutes on high
  • Rough chop
  • Add 3 TBL butter in cast iron
  • Bring up to high heat
  • Add potatoes and sprinkle with salt and pepper
  • Flip when crusty
  • Optional:  Put some grated white cheddar cheese on top
  • Let it start to melt
  • Bake at 350º till browned

Optional Treatment

Dressing

  • Dijon mustard
  • garlic – mince and paste
  • white wine vinegar
  • Mayonnaise
  • Salt and pepper
  • Olive oil – emulsify
  • Poblano Peppers – roasted, peeled, seeded
    • Cook just to heat
  • Green peppers
  • cilantro
    • Barely heat
  • Add dressing
  • A bit of radicchio – Not too much


Cooking Garbanzo Beans

How to Cook Chickpeas

Cooking chickpeas from scratch is easy, they taste better and you get to control the texture.  They can also be frozen or canned.  That being said, canned chickpeas or garbanzo beans are readily available and we use them in our kitchen.


If you’re planning on making a dip or spread (like hummus), then having a batch of really soft cooked beans ready is perfect.

If you’re adding them to a salad or stew, the option to keep the beans more firm is nice. And if all of that isn’t enough to convince you, it’s ridiculously cheap and you will always know what’s added to the beans. You’ll be a chickpea star!

More basic cooking recipes: See how we cook lentils so that they are perfect every time. Or see these creamy black beans.


Our Favorite Methods for Cooking Chickpeas

There’s more than one way to deal with dried chickpeas. I’m going to show you how to cook chickpeas on the stove, in a slow cooker or crockpot, and in a pressure cooker (like an Instant Pot).

Here are three methods we use in our kitchen. All three methods work really well and depending on your day you may find one that makes more sense for you.

After sharing the recipe, many of our readers asked about using a pressure cooker to cook chickpeas. I’ve added tips for pressure cooker chickpeas below.

  • Long soak and simmer on the stovetop, which takes about 10 hours or overnight plus 2 hours
  • Quick soak and simmer on the stove, which takes about 3 hours
  • In the Slow Cooker, 4 hours on high heat or 8 hours on low heat
  • In a pressure cooker (like an Instant Pot), about 1 hour

How Many Cups of Cooked Chickpeas Will 1 Cup of Dried Chickpeas Make?

Dried chickpeas triple in size when cooked (if not a little bit more). So 1 cup of dried chickpeas will make about 3 cups of cooked chickpeas.


Using the Stove to Cook Garbanzo Beans

Before cooking on a stovetop, you will need to soak the dried beans. Look through the dried beans and pick out anything that doesn’t look like a bean — sometimes a rock or something else from the bulk aisle sneaks in.

Now you can choose which soak method is best for you. As I mentioned above, we use both methods. It comes down to how much time we have or the time of day.

For example, if you have a late start and need the beans tomorrow, use the long soak method and soak the beans overnight. When you get up in the morning, you’ll have plump beans ready to cook. If you need the beans cooked asap, the quick soak is best.

  1. For the long soak method, add the beans to a large bowl and cover them with several inches of water. As the beans rehydrate, they triple in size — adding plenty of water is key. Soak the beans for 8 hours or overnight. After soaking the beans, you can cook them (see how below).
  2. For the quick soak method, add the beans to a large pot, cover them with several inches of water and bring them to a boil. Boil for 5 minutes then take the pot off of the heat and let the beans sit in the water for 1 hour. After soaking the beans, you can cook them (see how below).

To cook the soaked beans, add them to a large pot, cover the beans with several inches of water, and bring everything to a boil. Reduce the heat and simmer until they reach your desired tenderness, 1 ½ to 2 hours.

When simmering, you can keep the pot lid off or on, but slightly ajar (allowing some steam to escape while cooking). Beans simmered without a lid will be cooked, but firm (perfect for salads or chili).

Beans cooked with the lid on, but ajar, will be creamier, softer, and break apart more easily. These are perfect for hummus or dishes where you want the beans to break apart.


The beans can be cooked by themselves or with a few extras added in for flavor.

We love adding a bay leaf and a few garlic cloves. Adding a quarter of an onion, some carrot, or celery is also a great idea. We do this when cooking black beans, too. See our recipe for black beans here.

We add a generous pinch of salt when there are about 30 minutes left. Only add salt towards the end of cooking since adding it in the beginning can cause the beans to become a little tough.

Cooking Chickpeas in the Slow Cooker

Another option is to cook them in a slow cooker. The benefit of this is there is no soaking step — everything is added to the slow cooker you turn it on and walk away. Pretty easy.

Add 1 pound of dried chickpeas and 7 cups of water to a slow cooker. Cook on high for 3 to 4 hours or on low for 6 to 8 hours. Note that some of our readers have found this method to make very soft beans, so if you are looking for firmer beans, keep an eye on them towards the end of cooking.

Cooking Chickpeas in a Pressure Cooker

You can cook soaked and unsoaked chickpeas in a pressure cooker. Here are the details:

Soaked chickpeas: Add soaked chickpeas (from 1 pound dried) and 6 cups of water to the pressure cooker. Seal the lid and cook on High Pressure for 12 minutes, and then naturally release for 10 minutes. Vent the remaining pressure before opening the lid (you can tell when it is safe to open the cooker when the steam release valve drops). We recommend you read the user manual of your specific pressure cooker before using it.

Unsoaked chickpeas (my preferred method): Add 1 pound of dried chickpeas and 6 cups of water to the pressure cooker. Seal the lid and cook on High Pressure for 50 minutes, and then naturally release for 10 minutes. Vent the remaining pressure before opening the lid (you can tell when it is safe to open the cooker when the steam release valve drops). We recommend you read the user manual of your specific pressure cooker before using it.

When Are the Chickpeas Done?

Keep in mind that depending on how you plan to use the beans you may want them to be firmer or softer. If you are cooking chickpeas for hummus, you’ll want the beans to be soft.

On the other hand, if you plan to add the beans to a salad or stew, you may want them on the firmer side. If your chickpeas are still hard after the cooking time we suggest and you want them to be softer, continue to simmer them or cook in the slow cooker until soft.

How to Store Cooked Beans

Refrigerate cooked chickpeas in an airtight container or food-safe bag without additional liquid. Cooked beans will keep 3 to 4 days in the refrigerator.

To freeze cooked chickpeas, pat them dry then place them in a single layer on a baking sheet lined with parchment paper or foil. Slide the baking sheet into the freezer and wait until the beans are mostly frozen, about 30 minutes. Throw the beans into a freezer bag and store for up to 3 months.

How to Make Aquafaba

In recent years, aquafaba — or the liquid the chickpeas cook in — has become popular. Since it is starchy, it works wonders as an egg replacer. Those who don’t eat eggs have fallen head over heels for aquafaba! We use it in baking and to make vegan mayonnaise. We have shared a deep dive into this magical ingredient, but for now, I’ll briefly share how you can make aquafaba when cooking your own batch of chickpeas from scratch.

  1. Soak the chickpeas as suggested above — use either the long or quick method.
  2. Drain the soaked chickpeas, and then cook according to the stovetop directions in this article, but be more accurate when measuring the beans and cooking water. For 1 pound (2 cups) of chickpeas, you will need 8 cups of water. Do not use any salt or spices.
  3. Once the chickpeas are cooked, turn off the heat and cover with a lid. Allow the beans to cool down in the cooking liquid. This step leaves extra starch in the liquid, which is what gives aquafaba its egg-like magical properties.
  4. When cool, remove the chickpeas with a slotted spoon, and then bring the cooking liquid to a simmer and cook for another 30 to 45 minutes. In this time, the liquid should reduce and turn into a thicker, yellowish liquid resembling the liquid that comes out of canned chickpeas.
  5. Allow the aquafaba to cool, and then store in the fridge for up to 5 days or freeze for months.

FAQ: How Do You Peel Chickpeas?

Since posting this recipe, many of you have asked us about the best way to peel chickpeas. Here are two methods:

  1. Add the cooked chickpeas to a clean dishtowel, cover, and then roll the beans around until the skins fall away from the beans. Carefully pour the beans into a bowl of clean water, stir and wait as the skins float to the top. Skim away the skins and you are done. This might not get rid of all the skins, but it does a good job for most of them.
  2. Add cooked chickpeas and baking soda to a skillet. Toss them around a bit, and then heat them over medium heat for a few minutes. Transfer the beans to a large bowl with cold water. Agitate the beans between your hands so that the skins begin to release. Wait as the skins float to the top. Skim away the skins and you are done. You will need to change the water a couple of times. (We learned this trick from America’s Test Kitchen who picked it up from Yotam Ottolenghi and Sami Tamimi’s cookbook, Jerusalem. The baking soda helps to break down the pectin in the beans, which makes it easier for them to be removed.) Use 1 ½ teaspoons baking soda for 2 cups cooked beans.

Easy Chickpea Recipes

Now that you know how to cook them, here’s some ideas for using them!

Roasted Red Pepper Hummus Recipe: How to make simple, creamy roasted red pepper hummus with sweet red bell peppers, canned chickpeas, garlic and tahini.

Easy Chickpea Salad with Lemon and Dill: An easy chickpea recipe with lemon, fresh dill, crisp cucumber and tomatoes that’s quick to make and can be made in advance.

Honey Roasted Chickpeas with Sea Salt: How to make crunchy roasted chickpeas with honey, cinnamon, and sea salt. We love how easy it is to make this honey roasted chickpea snack. They are so good that once you start eating them, it’s hard to stop.

Honey Dijon Chicken Lettuce Wraps Recipe: We love these chicken lettuce wraps because they are easy, healthy, and so tasty.

Hummus with Spiced Ground Beef, Feta and Mint: How to make hummus topped with spiced ground beef, feta cheese and mint.

Use these cooked chickpeas to make our Utterly Delicious Chipotle Bean Chili Recipe!

Toss them into a salad — here’s one of our favorites: Easy Kale and Bean Salad with Tahini Dressing and Walnuts.

Make falafel! Try our Easy Recipe for Crispy Falafel (there’s even a video to help you out).


How to Cook Dried Chickpeas (Ultimate Guide)

  • PREP
  • COOK
  • TOTAL

There are four simple methods for cooking chickpeas. The first two make use of the stove, the third uses a slow cooker, and the fourth method uses a pressure cooker. We use all methods in our kitchen and the one we choose will usually depend on timing. The long soak allows you to get most of the prep time done overnight. The quick soak allows you to start with dried beans and finish with cooked in about 3 hours and the slow cooker is hands-off.

*If you use the slow cooker method, there is no need to soak the dried beans.

Makes approximately 7 cups cooked chickpeas
 

You Will Need

1 pound dried chickpeas (garbanzo beans)

Water

Salt, optional

Bay leaf, garlic cloves, onion or carrot, optional

Directions

    • Prepare Chickpeas

Look through the dried beans and pick out anything that doesn’t look like a bean — sometimes a rock or something else from the bulk aisle sneaks in. If you are using the stovetop to cook the beans, you need to soak the dried beans. There are two options: Long Soak and Quick Soak.

Long Soak Beans: Add dried beans to a large bowl and cover with several inches of water. As the beans rehydrate, they triple in size — adding plenty of water is key. Soak the beans for 8 hours or overnight. Drain and rinse.

Quick Soak Beans: Add the dried beans to a large pot, cover with several inches of water and bring to a boil. Boil for 5 minutes then take the pot off of the heat and let the beans sit in the water for 1 hour. Drain and rinse.

      • Cook Chickpeas – Stovetop

If using the stovetop, add the soaked, drained, and rinsed beans to a large pot. Cover with several inches of water and bring to a boil. Reduce the heat and simmer until they reach your desired tenderness, 1 ½ to 2 hours (see notes).

        • Cook Chickpeas – Slow Cooker

If using a slow cooker, add dried chickpeas and 7 cups of water to a slow cooker. Cook on high for 3 to 4 hours or on low for 6 to 8 hours. There is no need to soak the beans when using a slow cooker. Note that some of our readers have found this method to make very soft beans, so if you are looking for firmer beans, keep an eye on them towards the end of cooking.

          • Cook Chickpeas – Pressure Cooker

If using a pressure cooker, add 1 pound of dried chickpeas and 6 cups of water to the pressure cooker. Seal the lid and cook on High Pressure for 50 minutes, and then naturally release for 10 minutes. Vent the remaining pressure before opening the lid (you can tell when it is safe to open the cooker when the steam release valve drops). We recommend you read the user manual of your specific pressure cooker before using this method.


Adam and Joanne’s Tips

  • Stovetop Method: When simmering, you can keep the pot lid off or on, but slightly ajar (allowing some steam to escape while cooking). Beans simmered without a lid will be cooked, but firm (perfect for salads or chili). Beans cooked with the lid on, but ajar, will be creamier, softer, and will break apart more easily. These are perfect for hummus or dishes where you want the beans to break apart.
  • Adding Salt: You can add some salt, but only add salt towards the end of cooking since adding it in the beginning can cause the beans to become a little tough. We like adding a generous pinch of salt when there are about 30 minutes of cooking time left.
  • Adding baking soda: Baking soda is often added when cooking dried beans. Some say it can reduce the gassy effects of fresh beans since it binds to sugars and helps to break them down, making the beans easier to digest. If you plan to add baking soda, add about 1 tablespoon to the soaking water for the stovetop methods. If using a slow cooker, add 1/4 teaspoon along with the beans and water before turning the slow cooker on.
  • Nutrition facts: The nutrition facts provided below are estimates. We have used the USDA Supertracker recipe calculator to calculate approximate values.

If you make this recipe, snap a photo and hashtag it #inspiredtaste — We love to see your creations on Instagram and Facebook! Find us: @inspiredtaste

Nutrition Per Serving: Serving Size 1/4 cup cooked beans / Calories 148 / Protein 8 g / Carbohydrate 25 g / Dietary Fiber 7 g / Total Sugars 4 g / Total Fat 2 g / Saturated Fat 0 g / Cholesterol 0 mg
AUTHOR: Adam and Joanne Gallagher
 

Chickpea Snack from Scratch

See also Chickpea Snack from Canned Garbanzos


Recipe One

Roasted chickpeas from dried

I often use canned chickpeas in this recipe because that’s what I buy more of, but if you have a bag of dry chickpeas and you’re wondering if you can make this chickpeas recipe from dried chickpeas, yes you can! In fact, baked chickpeas from dried can be even more crunchy! You do not have to cook the dried chickpeas before you roast them. Here is how:

  • When making this recipe from dried beans, start by soaking the chickpeas in plenty of water for about 24 hours. They will expand and at least double in size, which is what you want.
  • Before you roast them, be sure to dry the chickpeas very well.
  • Bake the chickpeas on a large sheet pan at 400 degrees F until they are nice and crispy (about 20 to 35 minutes).
  • Season with your favorite spices just as they come out of the oven.


Why are my roasted chickpeas not crunchy?

Here are a few tips to make sure your chickpeas are as crispy as possible:

Recipe Two

To go with cocktail hour, or just for fun, we’ve adapted a classic Italian snack. I think this is a smart way to start a meal.

  1. In a small bowl, combine the garlic powder, oregano, Stardust, and salt and pepper. Heat the olive oil in a small skillet over medium­high heat. Add the chickpeas and spice mix and cook, shaking the pan occasionally, about 7 minutes. Keep cooking until most of the moisture is gone. They won’t be crispy fried, more like very small russet potatoes when cooked. Drain the chickpeas on a paper towel.
  2. Taste and adjust the seasonings. Serve at room temperature.

Recipe Three

Ingredients

  • 31 ounces chickpeas organic, cooked or canned without salt
  • 2 tbsp olive oil (extra virgin)
  • 1 tsp garam masala
  • 1/2 tsp sea salt kosher salt (omit for low-sodium diets)
  • 1/2 tsp cinnamon
  • 1/4 tsp cloves (dried, ground)
  • 1/4 tsp ginger (dried)

Instructions

  • Preheat oven to 300F/150C/gas mark 2.
  • Wrap chickpeas in a towel; lightly roll to loosen skins.
  • Whisk the oil with the spices together in a large bowl. Add the chickpeas and stir well to combine.
  • Arrange on a baking sheet covered in parchment paper.
  • Bake for 1 hour to 1 hour and 40 minutes, stirring every 20 minutes. Taste after one hour; they might be done at that point.
 

Notes

Per serving:

  • 212 calories
  • 6 g fat
  • 0 g cholesterol
  • 410 mg sodium (12 mg sodium with salt omitted, no-salt added beans)
  • 321 mg potassium
  • 31 g carbohydrate
  • 8 g fiber
  • 5 g sugars
  • 10 g protein
  • 5 Weight Watchers Points Plus

Required FTC disclosure: I am part of the Cooking Light Bloggers’ Connection. I was not paid to write this post.

Recipe Four

This roasted garbanzo bean snack is a delicious, healthy alternative to chips and crackers. Feel free to use your own choice of favorite spices and herbs. This recipe makes about 4 servings.

Ingredients
  • 2 cups of dry garbanzo beans
  • 3 Tbsp of vegetable oil
  • 1/2 Tsp ground black pepper
  • 1 Tsp cayenne pepper
  • 1/2 Tsp cinnamon
  • 1 Tsp dry cilantro herb
Method
  1. Soak 2 cups of dry garbanzo beans for 12 hours, drain the soak water away.
  2. In a saucepan with fresh water, boil the beans for an hour or until they are tender. Drain the water away so the beans are quite dry.
  3. Preheat oven to 450 degrees.
  4. Put the beans and other ingredients in a bowl and toss to coat.
  5. Tip the beans into a large dish (9”x13” is ideal) so they are in one layer.
  6. Bake them in the oven for about 30 minutes until they are crisp and crunchy.
  7. Serve immediately.

Baby Ray’s BBQ Sauce

  • approx 1/4 of each
  • 3 C Heinz ketchup
  • 1/4 C Worchestershire
  • 1/4 C Pineapple Sauce
  • 1/4 C Dark Corn Syrup
  • 1/4 C Apple Cider vinegar
  • 3 TBL Lemon juice
  • 1 tsp Liquid Smoke
  • 3 TBL Tabasco (I prefer cayenne pepper sauce)
  • 1 tsp Kosher salt
  • 1 tsp Granulated garlic
  • 1 tsp Mustard powder
  • 1 tsp Onion powder
  • 1/2 tsp Black Paper
  • 1 C dark brown sugar
  • 1/2 C honey

Bring to a boil, then simmer 1 hour.
Pour into small sterile canning jars while still hot.


This is from the son of the creator of Baby Rays BBQ Sauce – as presented.
Adjusted recipe is up above, with tweaks from Grandpa.

  • #10 can of Heinz ketchup (12 C)
  • 1 C Worchestershire
  • 1 C Pineapple Sauce
  • 1/2 C Dark Corn Syrup
  • 1/2 C Apple Cider
  • 1/2 C Lemon juice
  • 1 TBL Liquid Smoke
  • 1/2 CTabasco
  • 1 TBL Kosher salt
  • 1 TBL Granulated garlic
  • 1 TBL Mustard powder
  • 1 TBL Onion powder
  • 2 tsp Black Paper
  • 2 pounds brown sugar


HTML Snippets Powered By : XYZScripts.com