Beatitudes Carrot Cake

We’ve all had extra cream cheese containers after we’re done with our bagel.  Here is a great recipe for a special, but small, treat.


Ingredients

For the carrot cake:

  • 1/2 C all-purpose flour spooned & leveled
  • 1/2 baking powder
  • 1/4 tsp baking soda
  • ½ tsp ground cinnamon
  • scant ground ginger
  • scant ground nutmeg
  • scant salt
  • 1/4 C canola or vegetable oil 
  • 1 large eggs at room temperature
  • ½ cups packed light brown sugar
  • 2 TBL granulated sugar
  • 2 TBL unsweetened applesauce
  • ½ tsp pure vanilla extract
  • 1 cups lightly packed grated carrots (300 grams)

For the cream cheese frosting:

  • 2 oz package brick style cream cheese (226 grams) softened
  • 2 TBL unsalted butter (115 grams) softened
  • ½ C powdered sugar (240 grams)
  • 1/4 tsp pure vanilla extract

Instructions

  • To make the carrot cake: Preheat the oven to 350°F (180°C). Spray two ramekins or muffin rings well with non stick cooking spray and line the bottom of each pan with a parchment paper circle. Set aside.
  • In a large mixing bowl, whisk together the flour, baking powder, baking soda, cinnamon, ginger, nutmeg, and salt until well combined. Set aside.
  • In a separate large mixing bowl, whisk together the oil, eggs, brown sugar, granulated sugar, applesauce, and vanilla extract until fully combined. Add the grated carrots to the wet ingredients and mix until well combined.
  • Pour the wet ingredients into the dry ingredients and mix with a whisk or rubber spatula until just combined, making sure not to over mix the batter.
  • Pour the cake batter evenly between both prepared cake pans. Bake for 25 to 30 minutes or until the tops of the cakes are set and a toothpick inserted into the center of each one comes out clean.
  • Remove from the oven, transfer to a wire rack, and allow to cool in the pans for 20 to 25 minutes. Once the cakes have cooled, remove from the pans and return the cakes to the wire rack to finish cooling.
  • To make the cream cheese frosting: In the bowl of a stand mixer fitted with the paddle attachment, or in a large mixing bowl using a hand-held mixer, beat the cream cheese until smooth. Add the butter and mix for about 30 seconds to 1 minute until well combined and smooth.
  • Add in the powdered sugar and vanilla extract and continue mixing until fully combined, stopping to scrape down the sides of the bowl as needed.
  • To assemble the cake: Level the tops of each cake with a knife or cake leveler. Place one of the cake layers on a cake stand, top with a little over 1/2 cup of the frosting, and smooth it out into one even layer. Place the other cake layer on top and use the remaining frosting to frost the top and sides of the cake. Top with pecans or other toppings of choice, if desired.
 

Notes

Storage Instructions: Cake may be stored in an airtight container in the fridge for up to 4 days.

Freezing Instructions: Cake and frosting will freeze well for up to 3 months, thaw overnight in the fridge and bring to room temperature before assembling the cake.

Applesauce: You may replace the applesauce with 1/2 cup (120 grams) of sour cream or plain Greek yogurt.

To make a 9×13 cake: Spray a 9×13 pan with nonstick cooking spray and pour the batter into the pan. Bake at 350°F (180°C) for 35 to 45 minutes.

Easy Pickled Okra

Source Recipe:   Eat Simple Food
 
You may have heard that when you cook okra, it turns slimy.  Well, that’s true.  Here are two recipes though, that make okra pretty easy to prepare and tasty.
 
      • Trim okra stem to 1/4 inch
      • ¾ lb okra
      • 2 fresno red chili peppers, sliced – use red peppers if you can’t find them or skip
      • 2 small garlic cloves, peeled
      • 4 dill sprigs or 1 ½ tsp dried dill
      • 1 ½ tsp mustard seeds
      • ½ tsp crushed red pepper (for heat)
      • 1 cup apple cider vinegar
      • 1 cup water
      • 2 Tbsp salt
      • 1 quart size jar – equipment

Instructions

    1. Add garlic, dill, mustard seeds, and crushed red pepper to two pint sized jars.
    2. Small okra is better.  Not more than three inches, anyway.
      Plump – no wrinkles
    3. Trim okra stems to ¼”. Add cleaned whole okra to jar vertically, alternating stem ends up and down.
    4. Pack okra in tightly, packing dill along the sides
    5. Bring a small pot with vinegar, water, and salt to a rolling boil and stir.
    6. Pour mixture into clean canning jar(s) (careful it’s hot!), leaving ~ ¼″ air at top.  
    7. Cover with cleaned canning jar lid.
    8. Let sit at room temperature ~ 1 hour to cool down, and then place in refrigerator.  
    9. Wait at least a couple days before eating, but probably will need about a week to soak up all the pickling liquid.  Good for ~3 weeks in the refrigerator.  Happy eating!  Beckie


Artichoke – Instant Pot

Instant Pot Whole Steamed Artichokes are a faster and easier way to cook artichokes. Pressure cooker artichokes are tender and ready to dip in your favorite sauce!

 
Ingredients
    • 1-4 Artichokes
    • Lemon Wedge
    • 1 ½ cups Water (for the 6 qt pressure cooker, 2 ½ cups for the 8 qt, 1 cup for the 3 qt)
Aromatics to Add to the Water (optional)
    • ½ Lemon, sliced
    • 2 cloves Garlic, chopped
    • 2 small Bay Leaves
    • 1 tsp Salt
    • ½ Sweet Onion, sliced
    • 1 sprig Fresh Rosemary (optional)
Instructions
Prepare the Artichokes
    1. Remove small outer leaves that are dry, and cut the stem off, leaving about ¼”. Then use a really sharp serrated knife to cut the top inch or two off of the artichoke. This exposes the inside and will allow the steam to penetrate it.
    2. Rinse the artichokes and pat dry with a paper towel. Then rub some lemon on the cut surface to prevent browning.
Prepare the Steaming Liquid
    1. Add the water to the stainless inner liner. Then add the aromatics, optional, (garlic, bay leaves, lemon slices, salt, onion, and rosemary). 
    2. Place the trivet/rack into the pot.
Cook the Artichokes
    1. Place the artichokes into the pot, stem side up (cut side down). Close the lid and set the steam release knob to the Sealing position.
    2. Press the Pressure Cook/Manual Button or dial, then the + or – button or dial to select the cook time (cook times may vary*):
      • Small artichokes – 10 minutes
      • Medium Artichokes – 15 minutes
      • Large artichokes – 25 minutes
    1. When the cooking cycle is finished, do a Quick Release of the steam/pressure by turning the steam release knob to the Venting position, or pushing the release button, if applicable (If you like softer artichokes, let the pot naturally release the pressure).
    2. You can tell when the artichoke is done when a knife slides into the bottom easily.
What to Dip Them In
    1. Lemon Mayo – Mix some mayo and lemon juice together.Plain Mayo (my favorite)
    2. Melted Butter – Melt butter in a microwave safe dish.
    3. Garlic Butter – Sauté a couple of pressed garlic cloves in butter.
Recipe Notes

*Cook times will vary based on the size of the artichokes, as well as the density of the leaves. Tightly packed, denser quantity of leaves (and a heavier artichoke) will take longer to cook.


Beyond the Grave Chicken Salad

by Mary Kay Andrews

Did y’all hear about the Coca-Cola heiress who got kicked out of the Junior League for making chicken salad with dark meat? It’s an urban legend in Atlanta, but every Southern woman worth her salt has a tried and true recipe for chicken salad. My personal favorite used to be served in the dearly departed tea room at Maas Bros. Department Store in St. Petersburg, Florida. I’ve tasted some great versions over the years, but none greater than the one I sampled at the wake of a friend’s father in Dalton, Georgia. It inspired the recipe for Beyond the Grave Chicken Salad in Little Bitty Lies.

Beyond the Grave Chicken Salad Recipe

5 lbs. chicken breasts
2 quarts water
parsley sprigs
1 large onion, quartered
1 tsp seasoned salt
2 chicken bullion cubes

In large pot, bring water and seasoning to boil, add chicken, lower heat and simmer 40 min. Remove from heat, cool. Shred chicken and refrigerate.

Dressing:

1/2 C bottled Italian salad dressing
1 C Duke’s mayonnaise
1 TBL white vinegar
1-1/2 tsp celery seed
2 TBL sugar
1/8 tsp. salt
dash paprika

Blend well together.

For salad:

Toss shredded chicken with one cup of dressing and let stand at least one hour to marinate.

Combine remaining dressing with:
1/2 C sour cream
1 TBL honey

Add to chicken and mix well. May add canned water chestnuts, blanched almonds or chopped pecans.

Whipped Cream

Stabilized Whipped Cream


Learn how easy it is to make stabilized whipped cream with this step-by-step tutorial. This whipped cream is perfectly sweet and holds its shape for days!
 
Course Dessert
Cuisine American
Keyword stabilized whipped cream
Prep Time 15 minutes
Total Time 15 minutes
Servings 2 cups
Author Danielle
 

Ingredients

  • 4 teaspoons cold water
  • 1 teaspoon unflavored gelatin
  • 1 cup cold heavy whipping cream (240 ml)
  • ¼ cup powdered sugar (30 grams)
  • ½ teaspoon pure vanilla extract

Instructions

  • Add the water to a microwave safe bowl and sprinkle the unflavored gelatin on top. Allow to sit for 3 to 4 minutes.
  • Transfer the gelatin mixture to the microwave and microwave until the gelatin is fully dissolved, this will just take a few seconds. Stir the mixture, then set aside to cool slightly.
  • In the bowl of a stand mixer fitted with the whisk attachment, or in a large mixing bowl using an electric mixer, combine the heavy whipping cream, powdered sugar, and vanilla extract. Whip the mixture until it starts to thicken and soft peaks form, then turn the mixer to low speed.
  • Slowly pour in the gelatin mixture until well combined. Increase the mixer to medium speed and continue mixing until stiff peaks form.
  • Pipe the whipped cream on your favorite dessert (or use it to frost it) and refrigerate your dessert until ready to serve.

Carrot Cake

The BEST Carrot Cake with Cream Cheese Frosting


This is my favorite recipe for homemade carrot cake! This cake is so easy to make, perfectly moist, and topped with an easy homemade cream cheese frosting.
 
Course Dessert
Cuisine American
Keyword easter
Prep Time 35 minutes
Cook Time 35 minutes
Total Time 1 hour 10 minutes
Servings 10 slices
Author Danielle
 

Ingredients

For the carrot cake:

  • 2 cups all-purpose flour spooned & leveled (250 grams)
  • 2 teaspoons baking powder
  • 1 teaspoon baking soda
  • 1 ½ teaspoons ground cinnamon
  • ½ teaspoon ground ginger
  • ¼ teaspoon ground nutmeg
  • ½ teaspoon salt
  • ¾ cup canola or vegetable oil (180ml)
  • 4 large eggs at room temperature
  • 1 ½ cups packed light brown sugar (300 grams)
  • ½ cup granulated sugar (100 grams)
  • ½ cup unsweetened applesauce (125 grams)
  • 1 teaspoon pure vanilla extract
  • 3 cups lightly packed grated carrots (300 grams)

For the cream cheese frosting:

  • 1 (8-ounce) package brick style cream cheese (226 grams) softened
  • ½ cup unsalted butter (115 grams) softened
  • 2 cups powdered sugar (240 grams)
  • 1 teaspoon pure vanilla extract

Instructions

  • To make the carrot cake: Preheat the oven to 350°F (180°C). Spray two 9-inch round cake pans well with non stick cooking spray and line the bottom of each pan with a parchment paper circle. Set aside.
  • In a large mixing bowl, whisk together the flour, baking powder, baking soda, cinnamon, ginger, nutmeg, and salt until well combined. Set aside.
  • In a separate large mixing bowl, whisk together the oil, eggs, brown sugar, granulated sugar, applesauce, and vanilla extract until fully combined. Add the grated carrots to the wet ingredients and mix until well combined.
  • Pour the wet ingredients into the dry ingredients and mix with a whisk or rubber spatula until just combined, making sure not to over mix the batter.
  • Pour the cake batter evenly between both prepared cake pans. Bake for 30 to 35 minutes or until the tops of the cakes are set and a toothpick inserted into the center of each one comes out clean.
  • Remove from the oven, transfer to a wire rack, and allow to cool in the pans for 20 to 25 minutes. Once the cakes have cooled, remove from the pans and return the cakes to the wire rack to finish cooling.
  • To make the cream cheese frosting: In the bowl of a stand mixer fitted with the paddle attachment, or in a large mixing bowl using a hand-held mixer, beat the cream cheese until smooth. Add the butter and mix for about 30 seconds to 1 minute until well combined and smooth.
  • Add in the powdered sugar and vanilla extract and continue mixing until fully combined, stopping to scrape down the sides of the bowl as needed.
  • To assemble the cake: Level the tops of each cake with a knife or cake leveler. Place one of the cake layers on a cake stand, top with a little over 1/2 cup of the frosting, and smooth it out into one even layer. Place the other cake layer on top and use the remaining frosting to frost the top and sides of the cake. Top with pecans or other toppings of choice, if desired.
 

Notes

Storage Instructions: Cake may be stored in an airtight container in the fridge for up to 4 days.


Freezing Instructions: Cake and frosting will freeze well for up to 3 months, thaw overnight in the fridge and bring to room temperature before assembling the cake.


Applesauce: You may replace the applesauce with 1/2 cup (120 grams) of sour cream or plain Greek yogurt.


To make a 9×13 cake: Spray a 9×13 pan with nonstick cooking spray and pour the batter into the pan. Bake at 350°F (180°C) for 35 to 45 minutes.

Mini Pie

Mini Apple Pies

  •  
 

These Mini Apple Pies are easy to make and filled with a simple homemade apple pie filling. The perfect mini dessert for fall!

Three mini apple pies on a decorative white plate. A small container of sliced apples and a fork are in the background.

If you’ve been around for a while, you may recognize these adorable mini apple pies! I originally shared this recipe in 2017 and since then it’s become a reader favorite, especially around Thanksgiving.


Just like with my carrot cake recipe, I decided it was time to give this recipe a little update. I’ve included more step-by-step photos and tips and tricks to ensure that these mini apple pies turn out perfect for you!

I promise this is one recipe you will want to keep on hand for the upcoming holidays. And besides, mini desserts are just better than regular desserts. Right?

The ingredient list for these pies is surprisingly short and simple. It’s very similar to my classic apple pie recipe, but scaled down.

First time visiting? Start Here
 
 
  •  
 

These Mini Apple Pies are easy to make and filled with a simple homemade apple pie filling. The perfect mini dessert for fall!

Three mini apple pies on a decorative white plate. A small container of sliced apples and a fork are in the background.

If you’ve been around for a while, you may recognize these adorable mini apple pies! I originally shared this recipe in 2017 and since then it’s become a reader favorite, especially around Thanksgiving.


Just like with my carrot cake recipe, I decided it was time to give this recipe a little update. I’ve included more step-by-step photos and tips and tricks to ensure that these mini apple pies turn out perfect for you!

I promise this is one recipe you will want to keep on hand for the upcoming holidays. And besides, mini desserts are just better than regular desserts. Right?

An overhead view of the ingredients for this recipe in various bowls.

What You Need

The ingredient list for these pies is surprisingly short and simple. It’s very similar to my classic apple pie recipe, but scaled down.


Here’s a quick overview of what you will need:

  • Pie Crust: You’ll need two pie crusts for this recipe. You can either use my homemade pie crust recipe or buy a box of pie crusts from the store.
  • Apples: I prefer to use a mix of sweet and tart apples, so I used Granny Smith and Honeycrisp apples in this recipe. Some other great options are Braeburn, Fuji, or Pink Lady apples.
  • Sugar: To keep things simple this recipe uses just 1/4 cup of granulated sugar. Feel free to use light or dark brown sugar if you prefer though.
  • All-Purpose Flour: This helps to thicken the apple pie filling. Make sure that you measure your flour correctly, otherwise you can end up with a dry filling.
  • Vanilla: This adds a little more flavor. I highly recommend sticking with pure vanilla extract, imitation vanilla does not taste nearly as good.
  • Spices: There’s a blend of cinnamon and nutmeg in this recipe. If you prefer more spices, feel free to adjust to your personal preference!
  • Butter: This ingredient is technically optional, but I’ve since added it to this recipe to add a little more moisture and flavor to the filling.

How To Make Mini Apple Pies

Prepare The Pie Crust

  1. Roll the pie crusts out on a lightly floured surface until they are about 1/8-inch thick. Then, use a 3.5-inch cookie cutter (or a cup) to cut out 12 circles from the pie crusts. If you don’t have a circle cookie cutter that is the right size, just measure some glasses you have at your house and use that instead.
  2. Press each circle of pie crust into 12 cavities of a regular muffin pan. You want the crust to fit in the bottom and snuggly around the sides. Transfer the pan and any leftover pie crust to the fridge while you prepare the filling. This will keep your pie crust cold and ensure that it turns out nice and flaky!

Make The Apple Pie Filling

  1. Add your chopped apples, sugar, flour, ground cinnamon, vanilla extract, and ground nutmeg to a large mixing bowl and stir until the apples are fully coated in the mixture.
  2. Remove the muffin pan from the refrigerator and spoon about 3 tablespoons of the filling into each pie crust. If adding the butter, go ahead and dice it into 12 small pieces and place one piece on top of each one.

Assemble and Bake

  1. If you have any leftover pie crust, you can use that to add some decorations on top of the mini pies. I like to use it to make a simple lattice topping. In other words, no weaving. You could also cut out some cute pie crust decorations with small cookie cutters. If you want to make these a little more intricate, I have a post that shows you how to make a lattice pie crust.
  2. Bake for 18 to 23 minutes at 425°F or until the pie crust is lightly golden brown and the filling starts to bubble around the edges.
  3. Let the pies cool for 10 to 15 minutes in the pan, then carefully remove them and transfer to a wire rack to cool completely (or until they’re cool enough to eat!).

Baking Tips

  • Pie crust has quite a bit of fat in it, so it won’t stick to a muffin pan. Feel free to grease your pan with some nonstick cooking spray or butter if you’re worried about them sticking.
  • You can make these just a bit easier and completely leave the top off and they still taste just fine! I personally love to serve these with a little scoop of ice cream and salted caramel sauce on top.
  • If the tops of your pies brown too much before the filling is cooked, place a piece of foil over the pan until it’s done.
  • I personally skip using an egg wash on top of these pies. If you prefer to add one, whisk together one egg with 1 tablespoon of milk and brush it over the top of the pie crust.
  • If you need to reheat the pies, microwave them in 20 to 30 second increments or heat in the oven at 300°F until warmed through.


Pumpkin Oatmeal Cookies

Pumpkin Oatmeal Cookies


Ingredients

  • 1 1/2  cup all-purpose flour (spooned & leveled)
  • 1 teaspoon pumpkin pie spice
  • 1 teaspoon ground cinnamon
  • 1 teaspoon baking soda
  • 1/2 teaspoon salt
  • 3/4 cup  unsalted butter softened to room temperature
  • 3/4 cup brown sugar lightly packed
  • 1/2 cup  granulated sugar
  • 2 large eggs room temperature
  • 2 teaspoon pure vanilla extract
  • 1 cup pumpkin puree squeeze out excess moisture with paper towels*
  • 2 C instant oats

Instructions

  1. COMBINE DRY INGREDIENTS
    • In a large bowl, whisk together the flour, pumpkin pie spice, cinnamon, baking soda, and salt. Set aside
  2. COMBINE WET INGREDIENTS
    • In the bowl of a stand mixer fitted with the paddle attachment, or in a large mixing bowl using an electric mixer, cream together the softened butter, brown sugar, and granulated sugar for 1-2 minutes until well combined.
    • Add the eggs and vanilla extract and mix until fully combined.
    • Then mix in the pumpkin puree until well combined.
  3. COMBINE WET AND DRY
    • Slowly mix in half the dry ingredients, making sure to stop and scrape down the sides of the bowl as needed.
    • Then mix in the instant oats until just combined.
  4. Cover the cookie dough tightly with plastic wrap and refrigerate for 30 minutes.
    • You don’t have to do this step, but if you don’t your cookies will not be as puffy and soft.
  5. Preheat the oven to 350°F (180°C).
  6. BALL DOUGH
    • Line two large baking sheets with parchment paper.
    • Using a 1.5 tablespoon cookie scoop, scoop the cookie dough and drop onto the prepared baking sheets.
    • Roll the cookie dough into balls and very gently press down with your hand to flatten each ball of cookie dough slightly.
    • Make sure to leave a little room between each ball of cookie dough as they will spread a little while they bake.
  7. BAKE
    • Bake in separate batches at 350°F for 12-15 minutes or until the edges of the cookies are lightly browned and the top is set.
    • Remove from the oven and cool on the baking sheet for 5 minutes, then transfer the cookies to a wire rack to finish cooling.

Notes

*Make sure to press some of the moisture out of the pumpkin puree before mixing it into the wet ingredients. I like to spread the pumpkin onto a few paper towels then use some more paper towels to press out as much moisture as possible.


Store cookies in an airtight container at room temperature for up to five days. 


Freezing Instructions: Cookie dough balls may be frozen for up to 3 months. Bake from frozen for an additional 1-2 minutes. Baked cookies will also freeze well for up to 3 months, thaw to room temperature before serving.


Perfect Poached Eggs and Three Mistakes

Perfect Poached Eggs and the most common Three Mistakes Cooks Make

Mistake 1: Foamy mess of egg whites.

Use fresh eggs only. Boiled hardboiled eggs want an older yolk, because the albumen (egg white) begins to break down, making it easy to peel. With poached eggs, this turns to foam – a very bad situation for poached eggs.

Sometimes you don’t know how old the eggs are. In this case, break them into a strainer, allowing the water from the white to drip away before putting it into the hot water.

Mistake 2: Make sure your water is boiling hot.

You don’t want a rolling boil, just a high simmer. Boiling water will break the white apart. Water that is not hot enough will allow your white to float away before it sets, and create foam.

A splash of vinegar will help the white set more quickly, but some people can taste the vinegar, so don’t use too much. Ideally, use lemon. This has a better taste than vinegar, and in the case of Eggs Benedict actually enhances the flavor. Both are acids, and have a pH level of about 2.

If using an electric range, you can bring the water up to a rolling boil, then drop a few ice chips into the water just before putting your egg in, the rolling boil will stop immediately. Put your egg into the calmed water. If using gas, it’s easy – turn the heat down to low once the water is boiling. The water will calm in seconds.

Mistake 3: Avoid turbulence

Along with a rolling boil, if you drop an egg into the hot water too abruptly it “splashes” breaking apart the white. Lower the egg gently into the water.

The best way is to break an egg into individual ramekins, then gently lower the bowl into the water, then tip up to release the egg. This takes time, so using a strainer is a good way to avoid Mistake 1 and Mistake 3 at the same time.

Poaching Times

  • 2½ minutes White is mostly cooked, while yolk is very molten
  • 3 minutes White is complete set but soft, yolk begins to harden
  • 3½ minutes White is now hard, yolk is mostly cooked
  • 4 minutes White is now hard, yolk is completely cooked

This assumes room temperature eggs. If using cold eggs, add 10-15 seconds to the above times.

If poaching multiple eggs, put them ALL into a glass bowl, and set them into the water at the same time, otherwise some of the eggs will be overcooked.

Removing an egg from the water:

Use a slotted spoon. If you use a regular spoon, you get too much water in with the egg. Spider strainers can tend to break the yolk. Ideally, put the egg into a paper towel or tea towel, and roll it very slightly before rolling it into your serving bowl or onto your English muffin.

Preparing eggs ahead of time:

This works only if people want harder cooked eggs, but does not work when people want runny yolks.

To prepare eggs ahead of time, poach the eggs for 2-2½ minutes in a basket, then put the basket into an ice bath to stop the cooking process. When ready to serve, return individual eggs to boiling water and cook for 60 seconds for a 3 minute egg. Slightly longer if they want a hard-cooked poached egg.

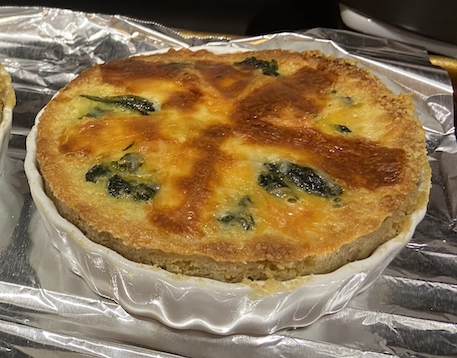
Tofu Quiche Florentine

QuicheMis en Place
to make ONE 6 inch quiche

It is baked in a homemade cracker crust that is very easy to make and can be prepared in under 10 minutes!

Ingredients

Pie Crust

  • 6 packets crackers (or 10 Ritz)
  • 3 TBL tofu
  • 2 TBL EVOO

Spinach mixture

  • 1 tbsp olive oil
  • 1 egg
  • 2 scallions
  • 8 oz fresh spinach (optional frozen spinach)

Tofu filling

  • 1/4 C silken tofu 350g, drained and pressed
  • 1 TBL pecan or similar flour or soy flour
  • 1 TBL cornstarch
  • 1 tsp salt
  • scant black pepper
  • 1/4 tsp garlic powder optional
  • 1 oz cheddar cheese 125g, or other shredded cheese (optional)

Instructions

Prepare Pie Crust

  • Food process crackers and butter till crumbs
  • Add VERY cold water very slowly just until dough starts to come together. 
  • Finish on the counter.
    • Flatten dough into a disc, wrap in plastic and refrigerate for 30 minutes.
    • Roll out evenly on a floured surface, about ⅙-inch (4mm) thick, then transfer into a  6-inch lightly greased pie dish.
    • Prick the bottom a few times with a fork.
    • Preheat oven to 425°F (220°C).

Spinach mixture

  • Chop spinach so that it is in smaller chopped pieces
  • In a large pan, heat the oil.
  • Add the spinach, and continue cooking until wilted, about 2 minutes (or simply thaw frozen spinach).
  • Add diced chives
  • Optional:  1 TBL sun dried tomatoes (chopped)
  • Transfer into a colander and drain. Then wrap in paper towels and squeeze to remove any excess liquid

Tofu filling

  • Blend the tofu, flour, and seasonings until smooth and creamy.
  • Chop spinach mixture, then mix to combine.
  • Then, stir in shredded cheese.
  • Taste and adjust seasonings as needed. (If the filling seems too thick, add a bit of non-dairy cream, or if it seems too watery, stir in a bit of flour.)
  • Fill the filling into the prepared crust, smoothing out evenly.

BAKING

  1. Preheat oven to 350º
  2. Bake 25 minutes
  3. Let rest 5 minutes before serving
  • Bake for 10 minutes to set pie crust, then turn the temperature down to 356°F (180°C) and bake for further 30-40 minutes until filling is set and light golden brown on top. (*If the crust seems getting too dry during baking, brush with a little non-dairy cream for a shiny golden color, and if it’s getting too dark, cover loosely with aluminum foil or baking paper).
  • Allow the quiche to cool slightly before slicing.

Notes

  • The baking time may vary, depending on your oven temperature, which pie dish you use, or if you cover the quiche during baking. I recommend checking every now and then.

Soft Sourdough Pretzel

Find it online: https://www.theperfectloaf.com/seriously-soft-sourdough-pretzel/

  • Author: Maurizio Leo
  • Prep Time: 18 hours
  • Cook Time: 25 minutes
  • Total Time: 18 hours 25 minutes
  • Yield: 12 pretzels
  • Category: Sourdough, Pretzel
  • Cuisine: German

Description

Chewy and soft, these sourdough pretzels are the real deal. Equally delicious with mustard, cheese, and beer, they have that unmistakable pretzel flavor and deep color.


Ingredients


Levain

  • 10g ripe sourdough starter, 100% hydration
  • 51g all-purpose flour
  • 51g whole wheat flour
  • 102g water

Main dough

  • 635g high-protein flour (“bread” flour)
  • 120g all-purpose flour
  • 369g water
  • 17g fine sea salt
  • 60g unsalted butter, softened to room temperature
  • 3g diastatic malt powder

Lye bath

  • 940g cool water
  • 38g food-grade lye

Topping

  • coarse pretzel salt

Instructions

  1. Levain (9:00 p.m.)
    In a small bowl or jar, mix the Levain ingredients. Cover the jar and keep it at a warm temperature for 12 hours.
  2. Mix (9:00 a.m., next day)
    Add the flour, water, salt, softened butter, diastatic malt powder, and levain to the bowl of a mixer fitted with a dough hook. Mix on speed 1 for 2 to 3 minutes until all of the ingredients are incorporated. Let the dough rest for 5 minutes. Continue to mix on speed 2 for 4-6 additional minutes until the dough becomes smooth and cohesive—an improved mix.
  3. Bulk fermentation (9:15 a.m. to 12:45 p.m.)
    Give the dough one set of stretch and folds after the first hour of bulk fermentation. Return the dough to the bulk container and let rest until time to divide.
  4. Divide and preshape (12:45 p.m.)
    Because the dough is low hydration, keep it covered at all times. Divide the dough into twelve 115 gram rectangular pieces. Preshape each rectangle into a tapered cigar shape. Let the pieces rest 15 minutes covered with plastic.
  5. Shape (1:00 p.m.)
    Line two half-sheet pans with parchment paper. Starting with the piece preshaped first, place the cigar in front of you so the tips are at your sides. Begin with your hands slightly overlapping in the middle, press down and roll the dough back and forth away from and then toward your body. As you are rolling, start to move your hands outward to encourage the tube to spread out and become increasingly thin as you move from the center out to the tips. You want to keep an exaggerated bulge in the very center of this rope, this will be the part you later score to open in the oven. Grab the two tips and arrange the dough so it loops away from you. Take one tip and fold it over the other side . Switch your hands so your right hand is holding the new right tip and your left is holding the new left tip. Fold the same side over the other as previously. Grab the two tips and fold them up over the knot in the middle and place each tip on its corresponding side inside the loop. It looks nice to have a little overlap with each tip — gently press it down into the side to seal.
  6. Proof (1:15 p.m. to 1:45 p.m.)
    Let the dough proof on the counter at room temperature for 30 minutes, uncovered. Then, transfer the uncovered baking sheets holding your pretzels to the fridge for 45 minutes to 1 hour.
  7. Lye bath (2:45 p.m.)
    Place two racks in your oven, one at the bottom and one in the top third. Preheat your oven to 450°F (230°C) convection (475°F (245°C) without convection). While wearing long latex or rubber gloves, add 940g cool water  to a stainless steel bowl. To the water, add 38g food-grade lye while mixing with a stainless steel whisk or large spoon. The mixture will initially be cloudy, keep stirring until all the powder/pellets are dissolved. With gloves, pick up one shaped pretzel and transfer it to the lye bath and let sit for 15-20 seconds. Transfer to the cooling rack on top of the parchment paper inside a baking sheet. Repeat with remaining dough pieces. Once all the pretzel have been dipped, carefully flush the remaining lye solution down the toilet.
  8. Bake (3:00 p.m.)
    Score each pretzel with the razor blade and sprinkle on pretzel salt. Bake at 450°F (230°C) for 10 minutes. Rotate the pans back to front and top to bottom, turn the oven down to 425°C (220°C) and bake for 8-12 minutes longer until a deep brown color. Remove from the oven and let cool. Enjoy warm from the oven.

Notes

  • For the lye bath, you will need a stainless steel bowl, stainless steel cooling rack, and pair of rubber gloves.

Jalapeño Popper Pinwheels

Jalapeño Popper Pinwheels are bite sized, creamy, delicious snacks or appetizers that are filled with cheese, bacon and jalapeños and rolled up in a tortilla!
 
 
Author Brandie @ The Country Cook
 

Ingredients

  • 8 ounce block cream cheese, softened to room temperature
  • 1/3 cup sour cream
  • 1 1/2 cups shredded sharp cheddar cheese
  • 6 slices bacon, cooked crispy and crumbled
  • 1/4 cup finely chopped jalapeno, seeds and membrane removed
  • 2 green onions, thinly sliced (green part only)
  • 5 (8-inch) flour tortillas
  • ranch dressing, for dipping (optional)

Instructions

  • In a big bowl, use an electric mixer to blend the cream cheese and sour cream until it’s smooth.
  • Add in the cheese, bacon, jalapenos, and green onions to the bowl. Stir everything together until it’s well mixed.
  • Place a tortilla on a clean surface. Take about one-fifth of the mixture and spread it evenly on the tortilla, leaving a half-inch border around the edges.
  • Roll up the tortilla tightly, making a long log shape. Repeat this with the rest of the tortillas and filling.
  • Wrap each log tightly in plastic wrap, folding the ends of the plastic under. Put them in the fridge for at least 4 hours, but overnight is even better.
  • Take the logs out of the plastic wrap. Slice them into half-inch pieces and serve. Enjoy!

Rice Pudding with Condensed Milk

Rice Pudding with Condensed Milk

 
Rice pudding is a creamy and slightly sweet with subtle warm vanilla and spices. The milk and starch from the rice create a creamy and smooth texture. Sugars in the condensed milk give a moderately sweet flavor while still letting the natural and nutty flavors of rice and milk come through. The rice, while softened during the cooking process, is such a nice soft chewy bite. Finally, the vanilla, nutmeg, and cinnamon give this dessert it’s warm, aromatic, and nostalgic flavors.
 
Author Carrie Tyler

Ingredients

  • 1 cup Uncooked white rice, long grain
  • 2 cups Water
  • 14 ounces Sweetened Condensed Milk
  • 2 cups Whole Milk
  • 1 teaspoon Vanilla extract
  • teaspoon Ground Nutmeg
  • Pinch Salt
  • ¼ teaspoon Ground Cinnamon (to sprinkle on top)

Instructions

    1. Rinse the rice under cold water until the water runs clear.
      • In a medium-sized saucepan, combine the rinsed rice and 2 cups of water.
      • Bring the water to a boil, then reduce the heat to low and cover the saucepan with a lid.
      • Let the rice simmer for about 15-20 minutes or until the rice is fully cooked and tender.
    2. Once the rice is cooked, pour in the sweetened condensed milk, the whole milk, and the vanilla, nutmeg, and pinch of salt. Stir well to combine everything.
    3. Increase the heat to medium-low and let the rice pudding mixture simmer, stirring frequently, until it thickens to your desired consistency. This will take about 15-20 minutes. Be sure to keep an eye on it and stir occasionally to prevent sticking.
    4. Remove the rice pudding from the heat and let it cool slightly before serving. Sprinkle the cinnamon on top.


      You can serve it warm, at room temperature, or chilled, depending on your preference.

Tik Tok Leche Cake

INGREDIENTS

    • Glass Bowl containing
      • Half Loaf of Sponge bread or Brioche
      • 1/4 C Whole milk
      • 3 eggs
      • 1 can condensed milk
      • 1 can evaporated milk
      • 1/2 C sugar
      • 1 tsp baking powder
      • 1 tsp vanilla
    • Caramel Sauce
      • 1/2 C sugar
      • 1 TBL butter

STEP BY STEP

    1. Preheat oven to 300º
    2. Heat sugar and 1 TBL butter over medium heat
    3. Stir constantly until the sugar darkens and caramelizes
    4. Pour into lightly greased ramakin
    5. Put bread into a glass bowl
    6. Cover with milk
    7. Let soak for about 4 hours
    8. Pour into blender and blend
    9. Pour into ramakin
    10. Cover tightly with foil
    11. Put into larger pot with hot water up to halfway
    12. Put into oven and bake 40 minutes
    13. Let cool slightly, then invert onto a plate

Ideas on Which to Expand

These are titles from a cooking magazine.
Use them to create my own version:

    • Brie Wrapped in Puff Pastry
    • French Onion Soup – French Bread & Gruyere
    • Crostini with Cream Cheese, Chives and Garlic
    • Mini Grilled Cheese
    • Artichoke in Puff Pastry
      • with garlic, Parmesan, and Cream Cheese
    • Mini Beef Wellington
    • Chicken Swiss Cheese Croissant
    • Spanikopita with four cheese in Puff Pastry
    • Quiche
    • Tropezienne
    • Bourbon Bacon Lollipops
    • Artichoke with Goat Cheese
      • Breaded in Parmesan Panko mix
    • Spring Roll – Jicima, sweet potato, carrot, cabbage, cilantro, soy dipping sauce
    • Mini Meatloaves
    • Key Lime Bites
    • Pretzels & Beer Cheese
    • Spinach Artichoke Dip – garlic, onion, Parmesan
      • Serve with crostini
    • Creme Brule
    • Cheddar & Chive Rolls
    • Potato au Gratin – mini
    • Veggie Casserole – onion, garlic, cheese, bread
    • Garlic knots with cheese sauce
    • Mini Mac & Cheese
    • Pumpkin Pie
    • Three Bean Casserole
    • Stuffed Salmon – spinach & goat cheese
    • Tamales
    • Shepher’s Pie
    • Ekmek

Strawberry Rhubarb Pie

Ingredients

Yield:6 to 8 servings
[ amounts in bracket are for two baking ramekins ]

For the Filling  [indicate Ramekin Measurements]

      • 3 C rhubarb  [1.5 C] peeled and cut into 1/2 inch pieces,
        about one pound  [8 oz]
      • 2 C strawberry halves  [1 C]
      • 1/2 C sugar  [1/4 C]
      • 3 TBL Minute Tapioca or 1/4 C Tapioca flour  [1.5 TBL or 2 TBL]
      • TBL unsalted butter   [1 1/2 TBL]
      • 1/4 C cornstarch  [2 TBL]
      • 1 tsp vanilla   [1/2 tsp]
      • 1 tsp CinnaSugar [1/2 tp]
      • Dash of cardamom

For the Crust

    • 1 C pulverized crackers   [1/2 C]
    • 1 1/2 C AP flour  [3/4 C]
    • ½ teaspoon salt   [1/4 tsp]
    • ¾ teaspoon sugar, plus CinnaSugar for sprinkling   [1/2 tsp]
    • 2 sticks COLD unsalted butter  – ¼-inch cubes  [1 stick]
    • ½ cup ice-cold water  [1/4 C]
    •  1 TBL  milk    [2 tsp]

Step by Step

  1. Prepare the Crust
    1. Pulverize the crackers
    2. Combine all crust ingredients in large COLD glass mixing bowl.
    3. Using a fork or pastry cutter, work half of the butter into the flour until it resembles coarse meal.
    4. Quickly work the remaining butter into the dough until the biggest pieces are the size of peas.
    5. Drizzle in the ice water in several additions, tossing and mixing between each. (It should look rather ropy and rough.)
      • Stop adding water when a few bits of dry flour remain in the bottom of the bowl; do not overwork the dough or it will become tough.
    6. Gather two-thirds of the dough and wrap tightly with plastic wrap. Do the same with the remaining third.
      • [If you are using two Ramekins, cut the dough into three equal pieces.]
      • Flatten into disks.
      • Refrigerate for at least 30 minutes.
      • When the dough is chilled, roll out the larger piece and line a nine-inch pie pan.
  2. Prepare Rhubarb
    • If rhubarb is thick, peel it.
    • Cut into 1/2 inch pieces
    • Combine rhubarb and strawberries in a bowl.
    • Mix sugar and tapioca together and fold gently into the strawberries and rhubarb.
    • Allow to macerate for 15 minutes.
  3. Turn on the Oven
    • Preheat oven to 425.
  4. Fill pie shells
    1. Spoon fruit into pastry shell and dot with butter.
    2. Roll out remaining pastry,
    3. Cut into strips 1/2 inch wide and weave a lattice to cover the pie.
    4. Seal, trim and crimp the edges.
    5. Brush the lattice with milk and sprinkle with a bit of CinnaSugar.
  5. Bake your Pie
    1. Bake in preheated oven for 20-22 minutes. [15 minutes if using ramekins]
    2. Lower heat to 350 degrees and bake 40 minutes longer [30 minutes if using ramekins] until pastry has browned and filling begins to bubble.
  6. Enjoy
    1. Let pie cool completely before serving, at least 3 hours and up to overnight to set the filling.

Chicken Layered Casserole

Chicken and Stuffing Casserole

 
Chicken and Stuffing Casserole is an easy, one dish dinner that’s a family favorite! Made with pantry staples- it’s filling, and delicious!
 
Course Main Course
Cuisine American
Keyword Chicken and Stuffing Casserole, Stove Top Stuffing Casserole
 
Prep Time 15 minutes
Cook Time 45 minutes
Total Time 1 hour
 
Servings 6 servings
Calories 371kcal
Author Brandie @ The Country Cook

Ingredients

  • 2 pounds chicken tenderloins
  • 1/2 teaspoon kosher salt
  • 1/2 teaspoon black pepper
  • 10.5 ounce can cream of celery soup
  • 10.5 ounce can cream of chicken soup
  • 1/4 cup milk
  • 6 ounce box Stove Top chicken stuffing mix
  • 1 1/2 cups chicken broth (see notes below)
  • fresh or dried parsley for garnish (optional)

Instructions

  • Preheat the oven to 375°F. Spray an 11×7-inch baking dish with cooking spray, and set aside.
  • Cut 2 pounds chicken tenderloins into bite-sized pieces and place them into the baking dish.
  • Toss the chicken pieces with 1/2 teaspoon kosher salt and 1/2 teaspoon black pepper.
  • In a small bowl, whisk together 10.5 ounce can cream of celery soup, 10.5 ounce can cream of chicken soup and 1/4 cup milk until smooth.
  • Pour the sauce over the chicken pieces and smooth it out, so all of the chicken is covered.
  • Evenly sprinkle the 6 ounce box Stove Top chicken stuffing mix on top.
  • Pour 1 1/2 cups chicken broth on top of the stuffing mix, and make sure that all of the stuffing is moistened by the broth.
  • Cover with foil and bake for 40 minutes. Take the foil off and bake for an additional 5 minutes to lightly brown the top.
  • Garnish with fresh or dried parsley (optional) and serve. When serving, scoop up some of the gravy at the bottom and drizzle it over each serving.

A SIMILAR RECIPE

Chicken and Biscuits Casserole


This Chicken and Biscuits Casserole is so easy to make, uses simple ingredients and can be made quickly. A family favorite dinner recipe!
 
Course Main Course
Cuisine American
Keyword Chicken and Biscuits, Chicken and Biscuits Casserole, Chicken Pot Pie Casserole
 
Prep Time 15 minutes
Cook Time 40 minutes
Total Time 55 minutes
 
Servings 6
Calories 397kcal
Author Brandie @ The Country Cook

Ingredients

  • 2 (10.5 ounce) cans cream of chicken soup
  • 1 cup milk
  • 1 teaspoon garlic powder
  • 1/2 teaspoon rotisserie seasoning
  • 1/2 teaspoon black pepper
  • 12 ounce can refrigerated biscuits (or two smaller 6 ounce cans)
  • 1 cup frozen peas and carrots
  • 1 cup shredded cheddar cheese
  • 2 cups cooked chicken (shredded or diced)
  • 1/4 cup sliced green onion (optional)

Instructions

  • Preheat oven to 375F degrees. Spray a 9×13-inch baking dish with nonstick cooking spray.
  • In a large bowl whisk together the cream of chicken soup, milk, garlic powder, rotisserie seasoning and black pepper. Whisk until fully combined and most of the lumps are gone. 
  • Open the can of biscuits and separate each biscuit. Cut each biscuit into fourths. Add the biscuits to the bowl and stir to combine. 
  • Next, add peas and carrots, cheddar cheese and chicken. Stir to combine. 
  • Pour this mixture into prepared baking dish. 
  • Bake uncovered for about 35-45 minutes. Biscuits will puff up while cooking so they should be golden brown and you should see the liquid bubbling around the edges. 
  • If you are unsure if it is done in the middle, just add on a few extra minutes to the cooking time to make sure all the biscuits are fully cooked. If necessary, cover the top of the baking dish with aluminum foil so it doesn’t get any darker but will allow the biscuits to keep cooking. 
  • Allow to cool for a few minutes, top with sliced green onions, then serve!
 

Strawberry Crumble

HOW TO MAKE STRAWBERRY CRUMBLE 

Preheat the oven to 350°F. Spray an 11×7-inch baking dish with cooking spray and set aside. Remove the stems from the strawberries. Prepare them by leaving small ones whole, cut medium ones in half, and quarter large ones. Place the strawberries in a large bowl. Toss them until coated in the cornstarch, sugar, lemon juice, and vanilla. Set aside. In a medium-sized bowl, stir together the oats, flour, brown sugar, melted butter, and cinnamon until combined and crumbly.

Give the strawberries another good stir and place them in the baking dish in an even layer. Take your hands and add the crumble on top, breaking it up and crumbling it evenly all over.

Bake for 30-40 minutes until the strawberry mixture is bubbling up along the sides of the baking dish, and the crumble is golden brown.

Allow the crumble to sit for 10 minutes before serving (this will give the filling time to thicken.)

Ingredients

For the filling:


For the topping:

Instructions

  1. Preheat the oven to 350°F. Spray an 11×7-inch baking dish with cooking spray and set aside.
  2. Remove the stems from the strawberries. Prepare them by leaving small ones whole, cut medium ones in half, and quarter large ones.
  3. Place the strawberries in a large bowl. Toss them until coated in the cornstarch, sugar, lemon juice, and vanilla. Set aside.
  4. In a medium-sized bowl, stir together the oats, flour, brown sugar, melted butter, and cinnamon until combined and crumbly.
  5. Give the strawberries another good stir and place them in the baking dish in an even layer.
  6. Take your hands and add the crumble on top, breaking it up and crumbling it evenly all over the strawberries.
  7. Bake for 30-40 minutes until the strawberry mixture is bubbling up along the sides of the baking dish, and the crumble is golden brown.
  8. Allow the crumble to sit for 10 minutes before serving. Don’t skip this step. It allows the filling time to thicken up. Then scoop and serve!

Recipe from The Country Cook.

Oreo Fluff

HOW TO MAKE OREO FLUFF

In a large bowl, add the instant vanilla pudding and the milk. Using a handheld electric mixer, mix until the pudding is fully dissolved. This can also be done by hand if you don’t have an electric mixer. Add in the softened cream cheese to the pudding mixture. Continue mixing on medium speed until the cream cheese is completely incorporated. Set aside the bowl. 

Add the Oreo cookies into a gallon-sized Ziploc bag. Using a rolling pin, crush the cookies until they are in small chunks. Take out about ½ cup of the crushed Oreos to use later, for topping. Stir the remaining crushed cookies from the Ziploc bag as well as the mini marshmallows into the bowl with the pudding mixture until fully combined. Finally, gently stir in the whipped topping (Cool Whip).

Transfer into a serving bowl and top with remaining ½ cup of crushed Oreos, for topping.

Ingredients

  • 2 (3.4 ounce) packages instant vanilla pudding
  • 3 cups cold milk
  • 8 ounce block cream cheese, softened to room temperature
  • 1 package family size package Oreo cookies (19.1 ounce package)
  • 2 cups mini marshmallows
  • 8 ounce tub frozen whipped topping, thawed (Cool Whip)

Instructions

  • In a large bowl, add the instant vanilla pudding and the milk. Using a handheld electric mixer, mix until the pudding is fully dissolved. This can also be done by hand if you don’t have an electric mixer.
  • Add in the softened cream cheese to the pudding mixture. Continue mixing on medium speed until the cream cheese is completely incorporated. Set aside the bowl.
  • Add the Oreo cookies into a gallon-sized Ziploc bag. Using a rolling pin, crush the cookies until they are in small chunks. Take out about ½ cup of the crushed Oreos to use later, for topping.
  • Stir the remaining crushed cookies from the Ziploc bag as well as the mini marshmallows into the bowl with the pudding mixture until fully combined.
  • Finally, gently stir in the whipped topping.
  • Transfer into a serving bowl and top with remaining ½ cup of crushed Oreos, for topping.

Notes

  • Please refer to my FAQ’s and ingredient list above for other substitutions or for the answers to the most common questions.
  • This fluff recipe is pretty rich, a little goes a long way so be careful how much you serve at one time. 
  • The cream cheese MUST be fully softened to prevent chunks in your fluff dip. 
  • I made this recipe with standard Oreo cookies. You can try double stuffed but they are a little harder to crush up because of the extra filing. 
  • Do not substitute marshmallows with marshmallow fluff.
  • I suggest enjoying this within 2 days, but it can be kept in the fridge covered with plastic or in an airtight container for up to 4 days.
  • I do not recommend freezing.

Nutrition

Calories: 534kcal | Carbohydrates: 87g | Protein: 11g | Fat: 17g | Saturated Fat: 8g | Polyunsaturated Fat: 2g | Monounsaturated Fat: 6g | Trans Fat: 0.1g | Cholesterol: 11mg | Sodium: 649mg | Potassium: 370mg | Fiber: 2g | Sugar: 63g | Vitamin A: 127IU | Vitamin C: 0.2mg | Calcium: 239mg | Iron: 7mg
 

Nutritional Disclaimer

“The Country Cook” is not a dietician or nutritionist, and any nutritional information shared is an estimate. If calorie count and other nutritional values are important to you, we recommend running the ingredients through whichever online nutritional calculator you prefer. Calories can vary quite a bit depending on which brands were used.

HTML Snippets Powered By : XYZScripts.com