![]() MFL62184416_Sign3_E.pdf
MFL62184416_Sign3_E.pdf
Model LFX25991ST
French door refrigerator
Bottom freezer drawer
Category: Grandpa’s Use Only
These recipes are for Grandpa and his family. This category includes recipes from magazines, TV shows, newspapers, and other sources where I don’t have permission to republish the recipes, but still feels they are recipes that he may want to cook for himself at a later time.
Tip: Buying in Season
Season
- Summer – watermelon, corn and tomatoes, cucumber, honeydew, cantaloupe,
NOTE: Smell the point where it was cut from the plant - Labor Day – Utah peaches
- November – Persimmons
- Hard squash (check out Butterkin) butternut and pumpkin cross
Peach Tips
- Clingstone – Used for lots of canned peaches
- Out of Hand – Freestone
- Muir – Yellow flesh
- Lovel – Yellow flesh
- Alberta – Yellow flesh
- White peaches – Lower acid content, less peachy but sweeter
- Mountain Rose
- Alexander
- Old Mixon
- Summer Snow
- Pick peaches from the tree when possible – California grows a lot
- Age in a paper bag – will soften, but will ripen no more
- OK to store in fridge to keep, but room temp before eating
Wine tips
- Cut foil front and back
- Point facing out and twist – not all the way in
- Champagne – 36
- White 48-55º
- Red wine 65º
- STORING WINE – 55º – Leave in the fridge
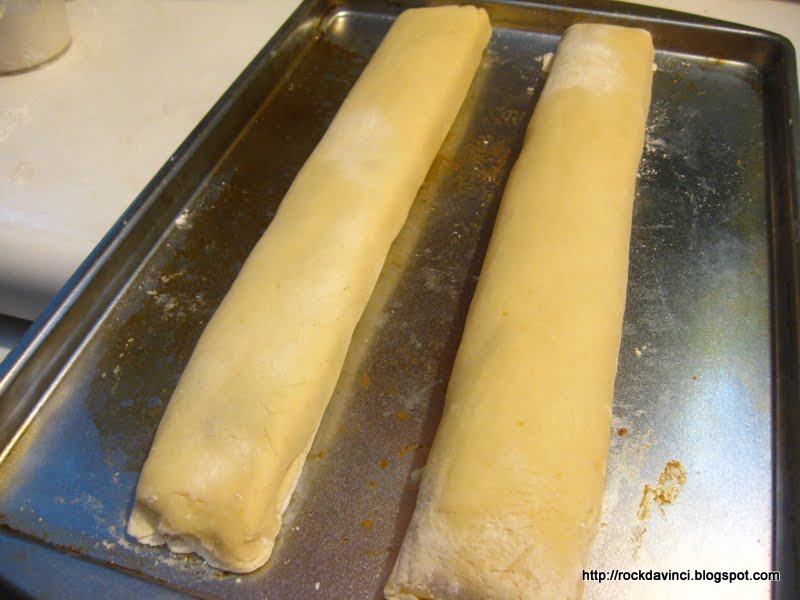
Fig Newtons
 Ingredients
- 1 C AP flour
- 1/2 C wheat flour
- 1/2 C masa or Maseca
- 2/3 C sugar
- 1/2 tsp salt
- 2 egg yolks
- 1 tsp vanilla
- 12 TBL butter (1.5 sticks)
FILLING INGREDIENTS - 1.5 C chopped figs (stems removed)
- 1/4 C port, brandy or whisky
- 3 TBL brown sugar
- 1 tsp vanilla
- 1/2 tsp salt
Step by Step
- Combine first seven ingredients in food processor
- Pulse until it comes completely together
- Create two separate logs, wrap in plastic wrap, and refrigerate for at least an hour
- Combine figs and alcohol into a sauce pan
- Bring to a simmer and let cook 3-5 minutes or until liquid has completely absorbed
- Put into food processor with sugar, vanilla and salt
- Bring dough out of fridge and roll flat (about 1/4 inch)
- Spread filling into center – edge to edge, but only the center third (like a burrito)
- Fold both sides up and over creating a flattened burrito
- Press firmly, cover with plastic wrap again, and chill for 1 hour
- Remove from plastic and place on baking sheet and brush with egg white wash
- Sprinkle with Turbinado sugar
- Cut into slices, but do not separate
- Bake 325º for 30 minutes
- Let cool 5 minutes, then cut again (sugars will have fused)
- Let cool completely, then wrap in plastic for longer term storage
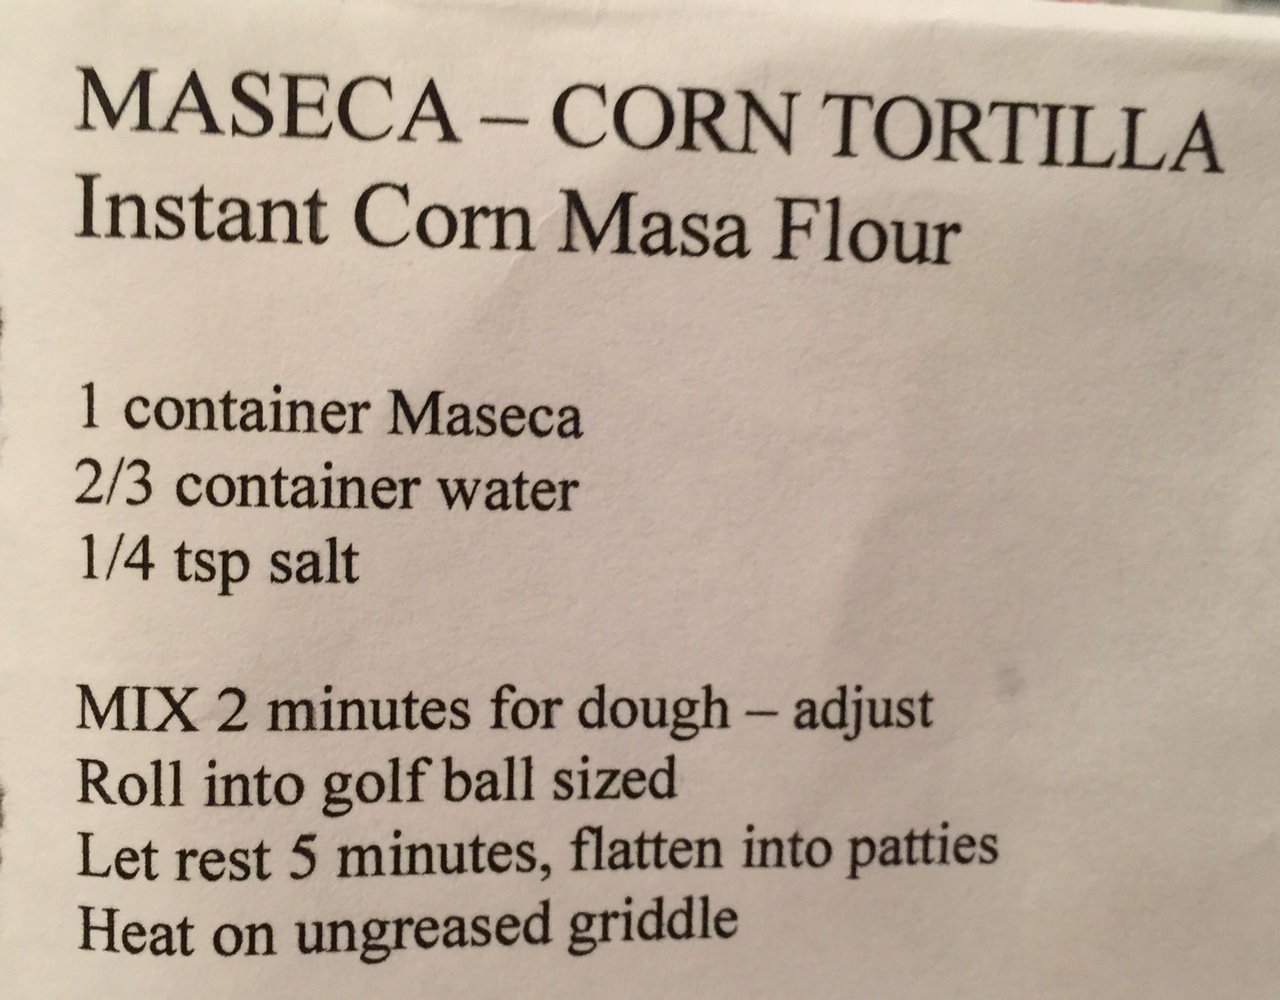
Maseca
I made a label for my jar, but I am not sure it ever made it into Grandpa Cooks.
Chocolatey Hot Chocolate
Ingredients
- 1⁄2 cup sugar
- 1⁄3 cup cocoa mix (recipe below)
- 1⁄3 cup water
- 1/4 C Hershey’s baking chocolate chunks
- 4 cups milk
- 1 teaspoon vanilla
Step by Step
- Stir cocoa mix and sugar in a pot.
- Add water and stir.
- Bring to a boil over medium heat. Boil two minutes.
- Put chocolate chips into the mixture and stir until dissolved.
- Add milk and vanilla. Serve.
Cocoa Mix
This can be prepared and stored for up to two months
- 300 gm confectioner sugar
- 200 gm cocoa powder
- 100 gm Whey protein powder
- 300 gm nonfat dried milk
- 1 TBL corn starch
- 1 tsp canning salt (or other fine salt)
- 1 pinch of cayenne pepper
Green Tomatoes – COLLECTION INDEX
In Phoenix, you can garden year-round. If you get tomatoes in early enough in the fall, you can get another harvest in. If you are a bit late, you wind up with three large bowls of green tomatoes! Here is what I did with them.
PRINTABLE GREEN TOMATOES GARDEN CLUB HANDOUT
#########
Frozen chopped Green Tomatoes – ****
Classic Pickled Green Tomato – Martha Stewart –
Green Tomato Bread – Suggests frozen chopped green tomatoes – *****
Fire Roasted Green Salsa – Latina Mama Rama – ****
Amish Green Tomato Relish – Sandra Jones – ***
Scalloped Green Tomatoes – Martha Stewart – ***
Green Tomato Mincemeat – Recipe Curio – **
Green Tomato Mincemeat – Food.com – ***
Grandma’s Fried Green Tomatoes – Delishably.com – **
Green Tomato Pie – Taste of Home – *
Notes:
- Use Green Tomato Pie to create Green Tomato Tartlets using Puff Pastry
- Green tomatoes WILL eventually ripen. They will not have the full flavor of a vine-ripened tomato, but will be just as good as supermarker ‘maters. This can take anywhere from one to five weeks. You can speed up the ripening process by putting them in a paper bag with a banana. The ethylene gas (a natural growth hormone) from the banana will speed the tomato ripening process.
- Shop locally and seasonally. Buy firm but not mushy. Don’t refrigerate or it will kill the flavor.
Ghee – aka – Clarified Butter

- Heat butter in a sauce pan at medium low heat. DO NOT STIR.
- Once it has completely melted, let rest a few minutes
– During this time the solids will precipitate to the bottom of the liquid - Skim off any foam that has formed on top.
- You now have clarified butter
- Keep cooking until the solids in the bottom begin to turn brown
- You now have ghee
- Carefully pour off the ghee, leaving the solids behind.
- Ideally, pour it through cheesecloth for even cleaner ghee
This will give a cleaner taste to whatever you are cooking. It is also less likely to burn. Just a dash of EVOO will also help inhibit burning. If you are a purist, pour the butter through cheesecloth.
Skim Milk to FATTED Milk
This was posted by Karl S (from Boston) on Chowhound.
This is my conversion chart I’ve posted a few times here:
Add the following to 1 cup of skim milk to approximate 1 cup of
1% milk
- 1.5 t heavy cream = 1% milk
- 1 T light cream = 1% milk
- 2 T half & half = 1% milk
2% milk
- 1 T heavy cream = 2% milk
- 3 T half & half = 2% milk
- 1 T 2t light cream = 2% milk
whole milk
- 3 T light cream = whole milk
- 4 T half & half = whole milk
- 2 T heavy cream = whole milk
Half and Half
- 5 T 1t heavy cream = half-&-half
- 5 oz light cream = half-&-half
Light Cream
9 T heavy cream = light cream
Clam Info from Jacques Pepîn
Clam sizes ( HINT: All of the below are Quahogs )
- Quahog (full grown – largest – AKA Chowder Clams and weigh 2-3 clams per pound.)
- Top Neck (AKA Count Neck clams, at 4-5 clams per pound.)
- Cherry Stone (A little larger, at 6-8 quahog clams per pound.)
- Little Neck (The smallest size of quahog, amounting to 9-10 clams per pound)
Which type of clam to buy depends on how you want to prepare them. The clams get tougher and chewier as they get larger, making these sizes ideal for chowders, stuffing, frying, and other cooked preparations. Choose smaller sizes when steaming, grilling, or eating raw.
To open them you can use a paring knife. The right way to do this is to put the edge of the blade at the spot furthest from the hinge. Put the hinge against the meat of your palm, then squeeze the edge into the clam. You will then cut the muscle from the shell in two places on each shell. Scoop out. The little necks you can eat raw. They are frequently served on the half shell (see recipe below.)
Alternate ways to open them:
1. Put into an oven at 350º for 8 minutes. Let cool 5 minutes.
2. Put into the freezer for 10-15 minutes.
Sauce for topping on a Little Neck served on the half-shell
- 2 TBL ketchup
- 1 TBL Siracha
- 1 TBL prepared horseradish
- Juice and zest from one lime or lemon
After you split the clams collect the juice. For a clam cocktail
- Let juice rest and pour the clarified top into a pitcher
– discard the solids that settle to the bottom - Add juice from one lemon, a dash of Siracha
- Splash on vodka or gin
Sabaione (or Sabayon)
Also called Zabaione or Zabaglione to the Italians, who claim they invented it. I call it Lemon Curd.
Sabayon
- 1/2 C granulated sugar
- 3 egg yolks – cream together eggs and sugar in a double boiler
- Add 1/2 tsp vanilla or 1/2 vanilla bean – seeds removed – beans into sugar
- Add 2 TBL dry white wine plus 1/2 tsp vinegar.
- Continue to whisk until mixture starts to thicken. (8-15 minutes)
- Take on and off as require to keep at a low temperature
Watch out for eggs cooking against the sides of the bowl. - This is your sabayon. Set aside for later use.
Creme Fraiche Custard
- Make creme fraiche.
- Mix 1/2 C cold creme fraiche and 1/2 C cold heavy whipping cream.
- Beat in Kitchen Aid until it doubles or even triples in size.
- Fold together whipped creams and sabayon.
- Put into serving dishes and top with blueberries, peaches, plumbs or nectarines – in winter use pears or soaked dried frigs, apricots, strawberry, blueberry, grapes, prunes, etc
This must be made at the last minute, and served immediately, or it deflates and separates and becomes watery.
Serving idea: Serve in same sized bowls, but each one a different shape. Goodwill is a good source for this hodgepodge of serving dishes.
To create a Sabayon Topping
- Pick your liquid: Can be practically anything based on what you are trying to accomplish. White wine, chicken stock, grapefruit juice, coffee, ginger ale, etc.
- Measure your ingredients: Generally the ratio is 1:1:1 egg yolk, sugar, liquid – figure one egg per person
- Mis-en-place: which means have everything ready. This will need to be constantly whisked, so you don’t have time to measure ingredients as you go.
- You will be whisking over a double boiler. I always just make my own. This is how. You should NEVER let your water get to a full rolling boil. Always just a simmer.
- Cream together egg yolk and sugar, when the color changes, drizzle in your liquid and start cooking over your double boiler. Move the mixing bowl on and off the heat as needed.
Here are flavor combinations from Food52.com to try:
Savory:
- egg yolk + champagne + lemon juice and zest + pinch cayenne
- egg yolk + white wine + finely chopped rosemary
- egg yolk + tequila + lime juice + pinch ancho chile powder
- egg yolk + sake + yuzu + miso paste
Sweet:
- egg yolk + rum + maple syrup + freshly grated nutmeg
- egg yolk + whisky + orange zest + honey
- egg yolk + sherry + sugar (fold in whipped egg whites at the end)
- egg yolk + beer + sugar + black pepper
Fish Tips
Get pan up to 400º before even putting the fish into the pan.
Oil should just start to smoke
Don’t crowd the fish into your pan.
Rice
Thanks to Martha Stewart, Alton Brown and Rachel Rae for parts of info included on this page.
White Rice vs Brown Rice
- The hull is inedible. It is removed from the rice.
- Brown rice has not been milled and cooking time needs to be longer. It has more nutrition than white rice.
- White rice has had the husk removed, and just the bran and endosperm remain. This is usually enriched.
Long, Medium and Short
- Long rice is high on amylose, and tends to dry out if kept as leftovers. It cooks up fluffy, and not sticky so is not good for sushi.
- Medium and Short rice have more amylopectin and cook up creamier.
- Short tends to be sticky and is good for sushi.
Jasmine Rice
- Long grain rice
- Very aromatic
- Used in rice pudding
- Used a lot in Asian cooking
Long Grain White Rice
- Husk removed
- Bran and germ remain
- Most common in the United States
Basmati Rice
- Extra long grain
- Delicate nutty flavor
- Aged
- Cooks long
- Used in Indian cooking
Long Grain Brown Rice
- Whole grain, although husk is removed
- Bran and germ is intact
Short Grain Brown Rice
- Cooks best with absorption cooking
- Nutty flavor
Sushi Rice
- Short round grain rice
- Also called glutinous or pearl rice
- Very starchy and sticky
- Here is a link to one of Grandpa’s Recipes about Sushi
Arborial Rice
- Short fat grain
- Used for Risotto
- Used in Italian cooking
- High starch, so it is great in rice pudding
- Other similar rices are Vilone Nano and Carnaroli rice
- – Yedo denado . Best for risotto . Short grain
Black Rice
- Also called purple or forbidden rice
- Chinese legend only available for emperors
- Anti-oxident properties
Bamboo Rice
- Bamboo rice is a type of rice popular in Asia, and it is made by infusing the grains with juice squeezed from bamboo plants. This action gives bamboo rice its distinctive green color and also adds a sticky consistency, so you might find bamboo rice to be a good choice for making sushi.
Wild Rice
- Not really rice. It’s seeds from marsh grass.
Cooking Rice
French Method of Cooking
- Boil large pot of salted water
- Rinse 1 C long grain rice – very well
- Add rice to the boiling water
- Boil until tender – approx 11-12 minutes
- Strain rice, shaking a couple of times
- Put into a bowl with 1 TBL butter, salt and pepper
Rice Cooker
- 2 C jasmine rice
- 2 C cold water
- Close lid and press the COOK button
- Finishes in about 55 minutes
Cooking Brown Rice
Since this must be cooked longer, it tends to scorch. Here is a good recipe.
- Rinse 3/4 C brown rice – short or medium grain
- Bring 1 1/4 C water up to boiling – add 1/2 tsp salt
- Pour over rinsed rice and stir in 1 TBL melted butter
- Put into baking dish or Dutch oven – and cover with lid or foil tightly
- Bake at 375º for one hour
- Let rest 5 minutes then fluff with a fork
Brown Rice Dressing Mix
- 3 slices of bacon – rendered till crispy, then broken into pieces – set aside
- 1/4 C red onion – minced and cooked in bacon grease over low heat
- Deglaze with 1/4 C white wine vinegar
- Add 1/4 C chicken broth
- Mix together 1 tsp Dijon, 1/2 tsp salt, 1/2 tsp sugar and scant black pepper
- Whisk mixtures together and add back in bacon and brown rice (recipe above) plus 1 tsp fresh dill
- Serve as a side
Standard Method of Cooking
- Bring 1 C of salted water to boiling
- Add 1 C rice and stir
- Return to a boil
- Cover, reduce heat and simmer for 16 minutes covered
- Add 1 TBL butter and 1/2 tsp salt to the rice at the 8 minute mark
- Finish cooking
- Take off the heat, leave covered, let rest ten minutes
- Fluff with a fork and cover until ready to serve
Tips: Non-Stick Skillets
This includes teflon, ceramic, and all surfaces that claim to be non-stick.
Please also review my post: Care of your Cast Iron Skillets
Teflon Tips
Teflon, Ceramic and other non-stick finishes need to be taken care of. Here are some tips that you may find useful.
- Wash and rub a little canola oil into it before first use.
- Don’t heat the pan empty. At least put a little oil into the pan.
- Don’t use cooking spray. There is a propellant that will build up and destroy your pan. If you must, get a spritzer bottle and put canola into it.
- Don’t let the temperature EVER exceed 450. Ideally, I never even exceed 400º This Thermapen is one of the best investments you could make. You will use it nearly every single day.
- Don’t let food dry on the surface of your pan. When the temperature has dropped to 250º (or below) wipe it off with a wash cloth and hot water. I usually don’t even like to use soap on mine.
- If you can’t clean it immediately, at least fill it with water to minimize the chemical effects of the remaining cooking oil residue.
- If you do use soap on your pan, occasionally wipe in a little canola oil (See Tip #1)
- Never ever EVER use abrasive cleansers or pads on your pan.
- Never put your teflon or ceramics into the dishwasher. The hot water is OK, but the drying cycle will kill your pan.
- For stubborn stains, use a mixture of baking soda and water. mix and apply the paste. Leave for an hour, then wipe off. Repeat if needed.
- If your pan has a wooden handle, season it VERY occasionally by wiping with canola oil
- Season a hot pan (250º) occasionally with a paper towel and olive oil (See Tip #1)
- Never use metal cookware (spatula, whisk, spoon, etc) when cooking with your non-stick pan
THE PENNY TRICK – If you are boiling water, put a penny in the bottom of your pan. If it boils dry (which will ruin your pan) the penny will start to rattle because of the boiling water beneath the penny. The rattling will tell you your pan is nearly empty (usually) before your pot is destroyed.
Sticky Bars
INGREDIENTS
First Batter
- 1 C Brown sugar
- 1 stick of butter
- 2 eggs
- 1/2 C toasted pecans
- 1/2 tsp vanilla
Sift together the below ingredients - 1 C flour
- 1 tsp coarse salt – Maldon salt
- 1 tsp Baking powder
Second Batter
- 1 stick browned butter
- 1 C brown sugar
- 1 C flour
- 1 egg
- 1 tsp vanilla
- 1 TBL coarse salt
- 1/2 C toasted pecans
STEP BY STEP
- Heavily butter a glass baking casserole pan
- Mix 1/2 C pecans into your First Batter
- Add half of your First Batter and spread till flattened
- Add spooned dollops of all remaining batter across top
- Add second batter in between the dollops
- Swirl to flatten and marbelize
- Top with your remaining pecans
- Bake 350º for 35 minutes
- While still hot from the oven, sprinkle with Maldon salt
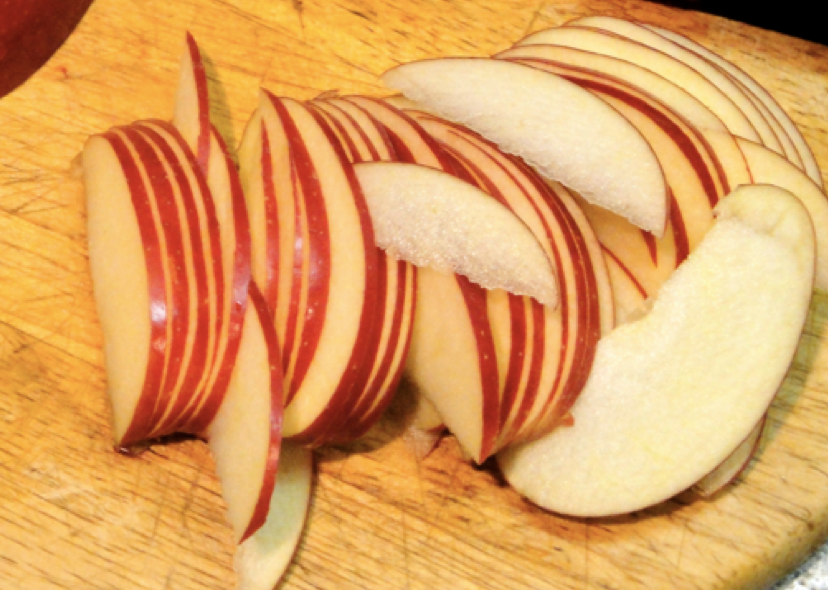
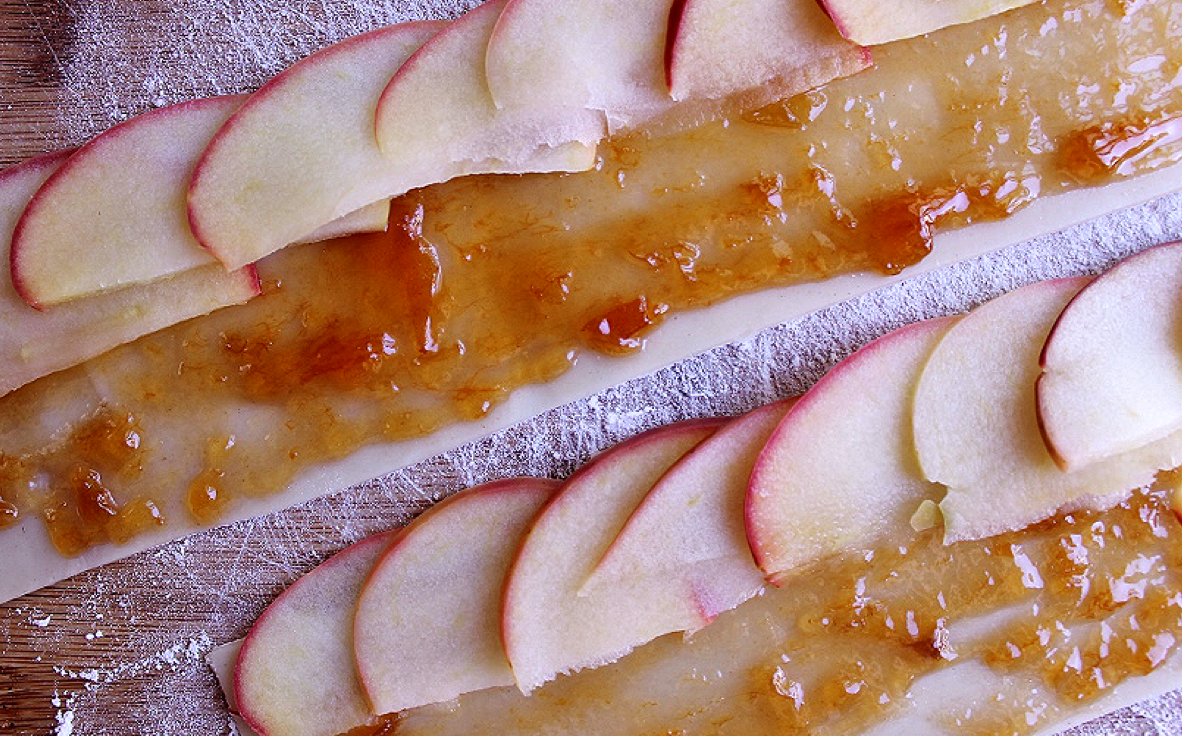
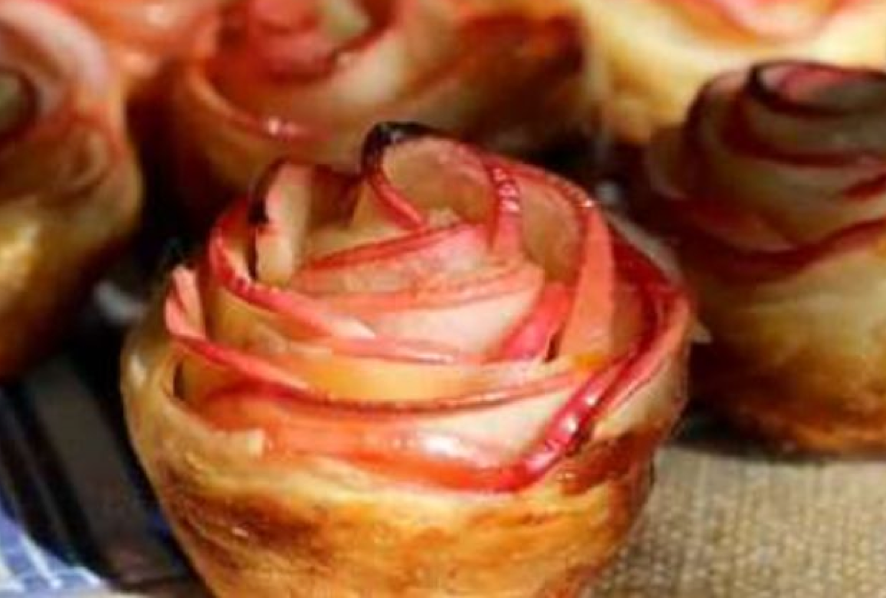
Baked Apple Roses
Baked Apple Roses
Cut apple in half and cut seeds out
Slice as thinly as possible
Soak on 1 C water and 1/4 C lemon 10 min
Microwave 3 minutes, then drain
Mix 3 TBL apricot preserves with 2 TBL water
Roll puff pastry to about twice its size
Cut into 1.5 inch strips
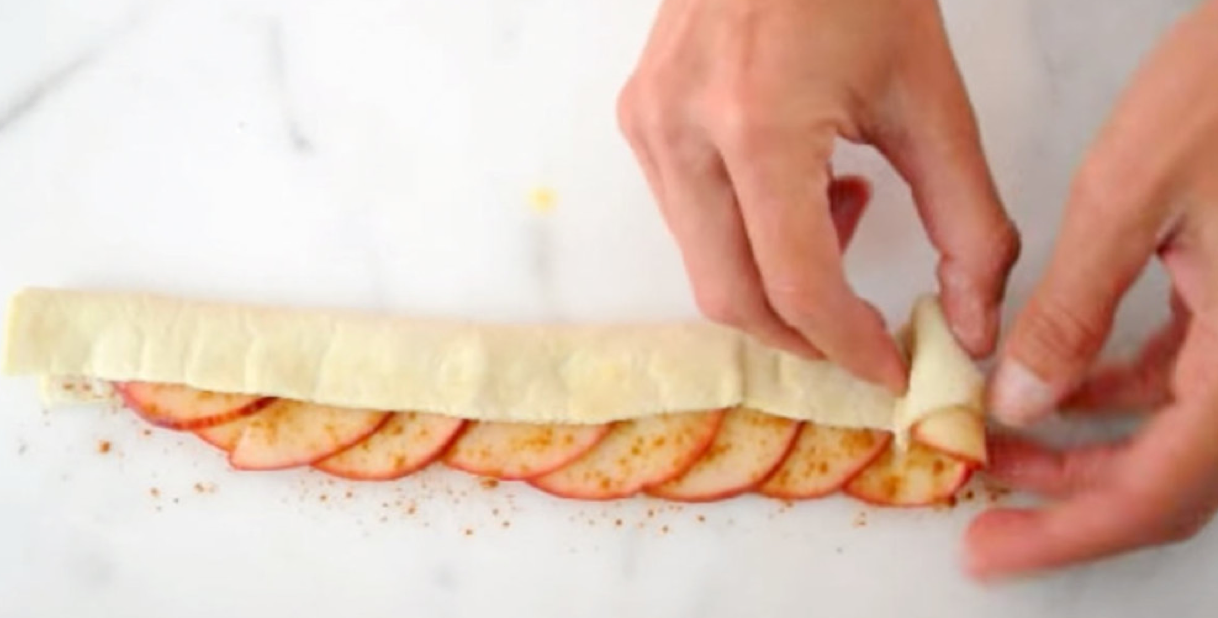
Stagger apple so that flat side is along the middle of the strip – red sticking out
Sprinkle with Apple pie spice OR Grandpa’s CinnaSugar®
Fold up edge to cover flat line of Apple
Roll
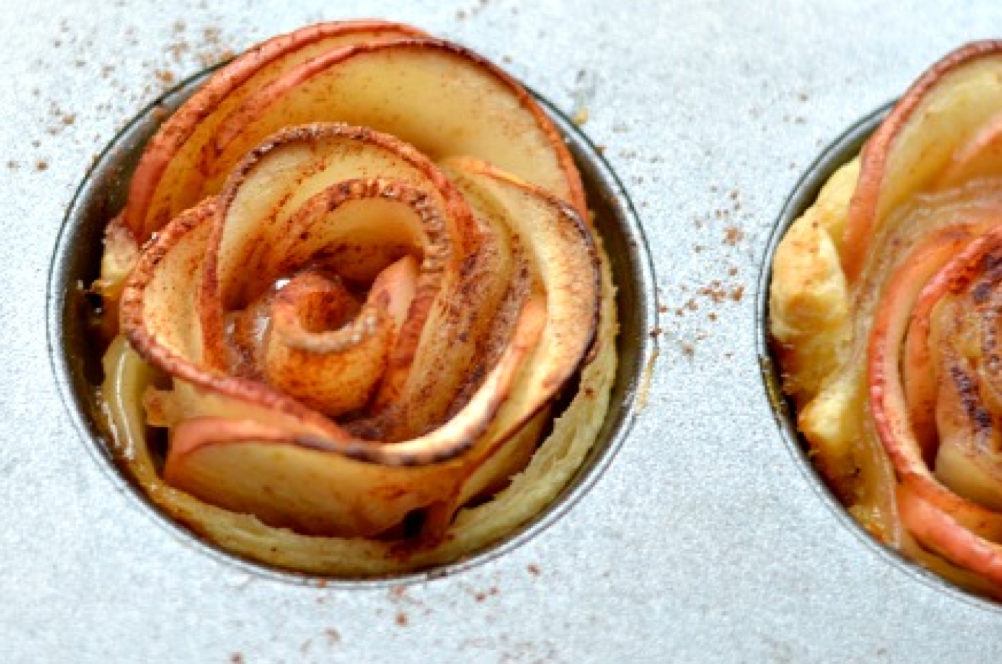
Put into muffin tin
Baker 350° for 35 minutes
Sprinkle with powdered sugar
Video exists in messenger
CLICK HERE for more great recipes from TipHero.
Baked Apple Roses
Almost too Beautiful to Eat. ALMOST!
Almost too Beautiful to Eat. ALMOST!
Posted by Tip Hero on Monday, October 5, 2015
Tip Hero Recipe: http://tiphero.com/baked-apple-roses/?ref=cmts

tiphero.com
Tip Hero Asmati Ben a couple ideas. aluminum foil like you suggested half way through baking. Also putting them on a lower baking rack in the oven would help. Could also experiment with spraying them periodically with a little water/oil.
Eggs in Clouds
Tasty Here’s the recipe:
Separate the yolk from as any egg whites as you are making. In a chilled metal bowl, whisk the whites until stiff peaks form. Mix in whatever you want.
Spoon the whites into even piles on a baking sheet and create a well in the center of each pile with the back of the spoon.
Bake at 450F for 3 minutes.
Put a yolk in each well, bake another 3 minutes at 450F.
Pin it for later: http://bit.ly/eggsnclds
Steak Stuffed Garlic Bread
Steak Stuffed Garlic Bread
FULL RECIPE: http://bzfd.it/1ZpbxX7
German Apple Pancake
Sherry Bates Yes, a Dutch baby! Try whipping eggs in blender for a minute, sugar, add 1/4 cup milk and flour for each egg, a dash of nutmeg , vanilla, and blend another minute. Good with peaches too!
Sarah Thompson I’ve made these for years Rachel. Dutch babies are what my recipe calls them and they are awesome. I’ve made them with blueberries and peaches too. You could try berries and plums if you have them.
Greek Nachos
How To Make Greek NachosThese GREEK NACHOS will be devoured by your crew: http://del.sh/6005Bsam7
FULL RECIPE: http://del.sh/6001Bsao5
RECIPE BELOW:
ingredients
6 pitas
1/4 c. extra-virgin olive oil, divided
1 tsp. dried oregano
kosher salt
Freshly ground black pepper
4 oz. Greek feta, crumbled
1/2 c. Greek yogurt
Juice of 1 lemon, divided
2 cucumbers, chopped
1/2 c. chopped kalamata olives
1 pint cherry tomatoes, halved
1/4 c. chopped dill
Directions
- Preheat oven to 400°.Slice pita into wedges. Put triangles in a single layer on a baking sheet. Drizzle with 2 tbs. olive oil, sprinkle with salt, pepper and oregano. Toss to combine. Bake until toasted, about 10 minutes. Let cool.
- Meanwhile, make whipped feta. In a large bowl, combine feta, 1/4 c. greek yogurt, olive oil and juice of half a lemon. With a hand mixer, mix until fluffy.
- Dollop whipped feta on baked pita chips. Garnish with cucumber, olives, tomatoes, and dill. Drizzle with more olive oil and the remaining lemon juice over the chips.