INGREDIENTS
- 1 C Ricotta cheese
- 1/4 C powdered sugar
- zest from one orange
- 1/2 tsp vanilla
- Optional: 1/4 C semi-sweet chocolate chips
STEP BY STEP
- Mix ingredients
- Pipe into canaloni shells or squished flat white bread
Feel free to browse.
These recipes are for Grandpa and his family. This category includes recipes from magazines, TV shows, newspapers, and other sources where I don’t have permission to republish the recipes, but still feels they are recipes that he may want to cook for himself at a later time.
INGREDIENTS
STEP BY STEP
https://www.grandpacooks.com/recipes/sesame-chicken-salad/
https://www.grandpacooks.com/recipes/oriental-chicken-salad/
https://www.grandpacooks.com/recipes/pineapple-chicken-salad/
https://www.grandpacooks.com/recipes/chicken-fajita-salad/
PREPARATION
Get large pot of water to boiling
Look for cross line on back
Pierce quickly with a butcher knife
Down and through to front
Straight into heavily salted boiling water for 2 minutes
SHELLING
Snap off the claws
Break tail at proximal joint . Twist
Press tail shell to crack to release meat till tail pulls free
Claws: snap off knuckle then pull or roll
Keep claws intact
Open up knuckles
. 8 legs- Start at thin end and r.o.l.l out meat
Gently score tail to lay flat
Lay out body, claws, and knuckles
Lay out legs
Sculpt head to lay in place
Brush with EVOO
Ingredients
Step by Step
A SAD STORY WITH A GREAT OUTCOME – – – – –
This was a GREAT skillet, but recently (7 years after purchase) it has become unusable. We will find out if Berndes will stand behind their Lifetime Warranty. I will post their reply below. I approached them as a consumer, so they did not know that this entire situation was echoed here at Grandpa Cooks.
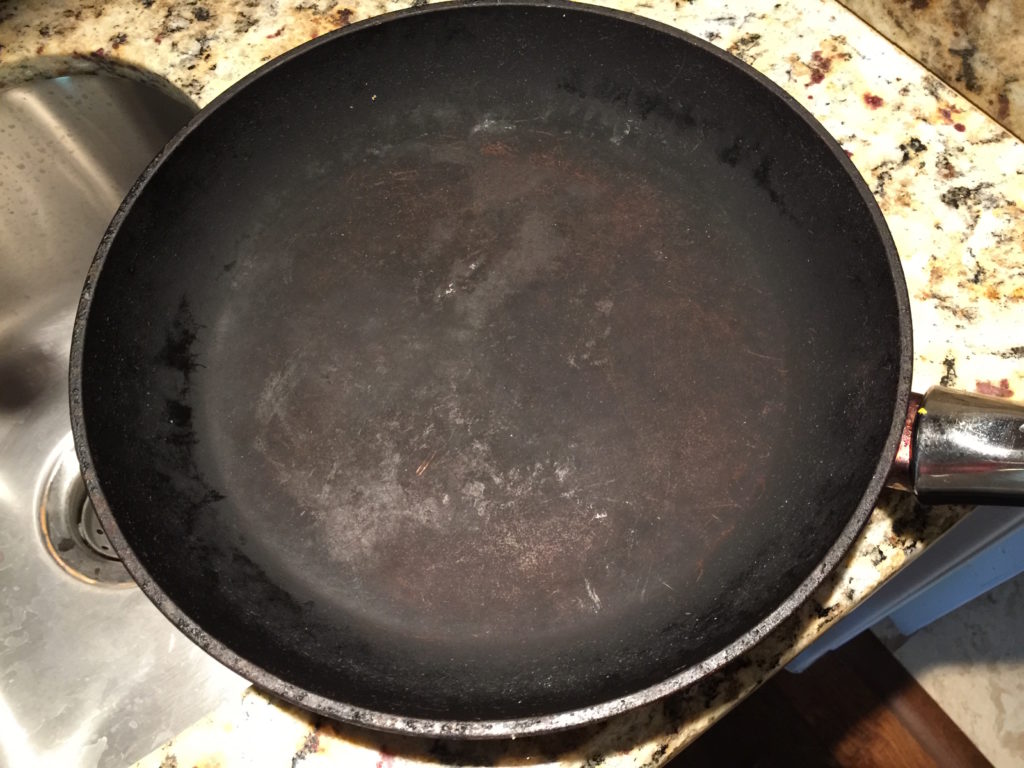
I am the main cook in our family. I got my Berndes 11″ skillet about 6-7 years ago. I loved it. I treated it well, never used abrasives, never exceeded 450º and oiled it before each use. The non-stick finish has eroded and the skillet is no longer usable. I was going to throw it away, but see that it had a lifetime warranty. How do I take advantage of that warranty?
I must say that I am truly impressed. Not only did I get a reply, but it came within about 48 hours of my original message. More to come as I have it.
Robert,
Hello! We are the US distributor for Berndes Cookware. We received your email from the headquarters in Germany. We see that you have a pan that is showing signs of wear. We are happy to inform you that we will go ahead and send you a replacement. If you are able please send a photo of the whole pan and measure the pan from outer rim to rim in inches. Is this a fry pan or a different pan? Please let us know this information so we can see if we have that same pan available. Also please provide your shipping address. We will await your reply.
Thanks and have a good day!
We Really Care!
Amanda Stemen
Receptionist / Client Support
Range Kleen Mfg. Inc
4240 East Rd.
Lima, Ohio USA 45807
What a pleasure to hear from another person from Ohio. I moved to Arizona from M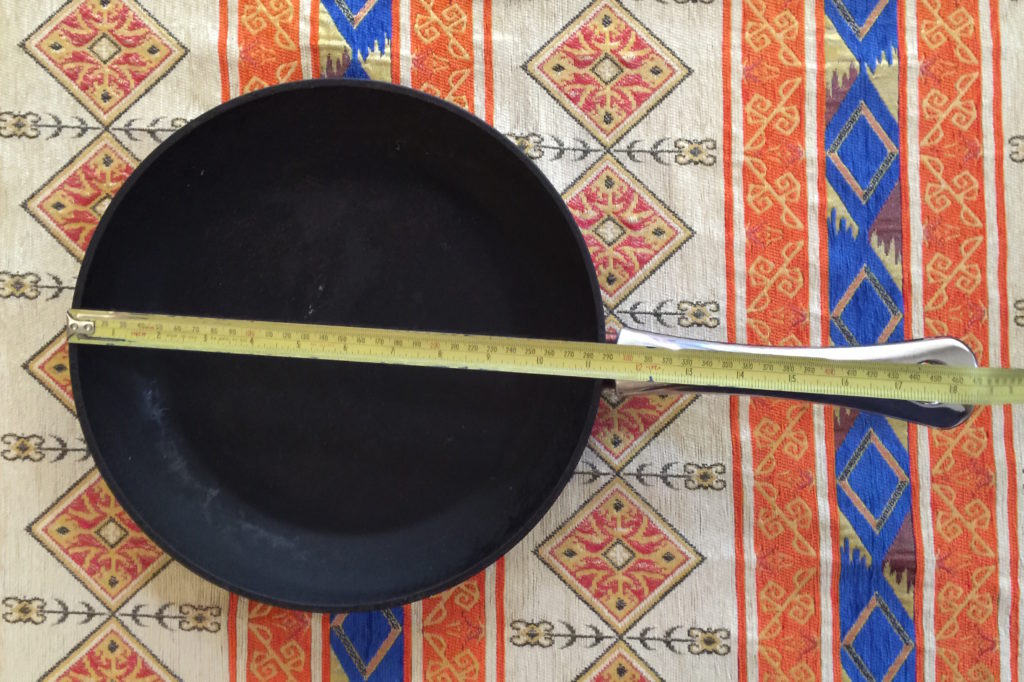 arion, Ohio nearly 30 years ago. I was also pleased to get a reply so promptly.
Attached is a measured top photo. It is an 11 inch skillet. My mailing address is … (Address removed for my privacy)
Sincerest thanks,
Robert Andrews
 The Result: Berndes Just Earned a Lifelong Customer
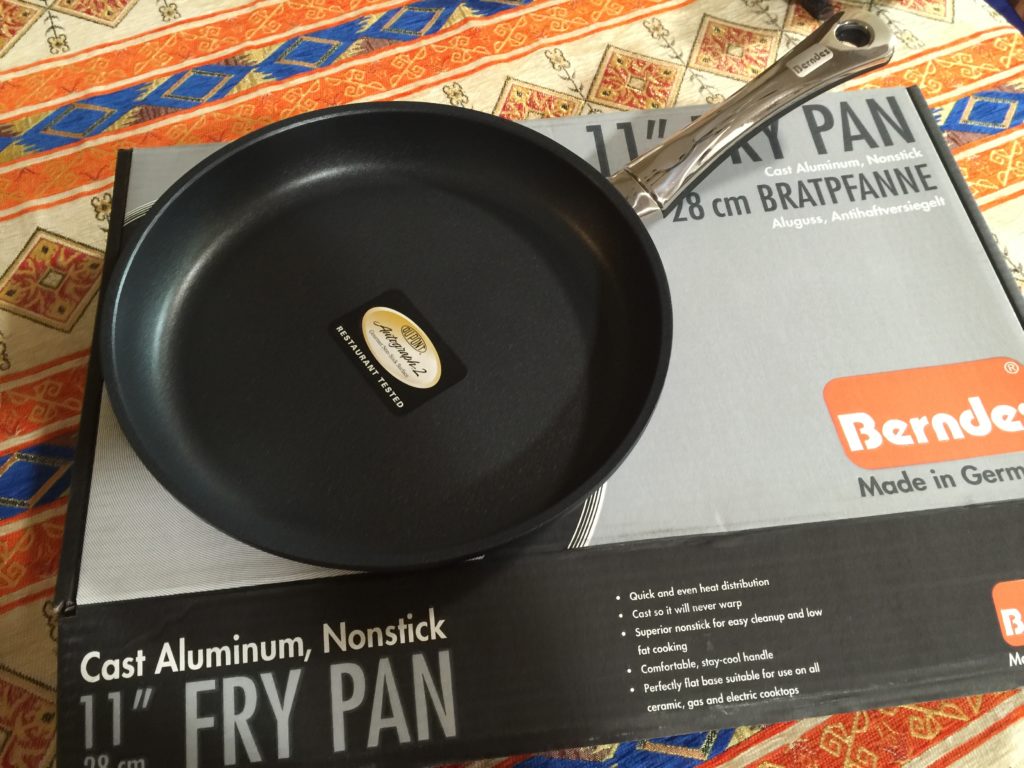
So Maggie (my dog) started going crazy. She does that whenever a delivery person comes to the door. I had ordered two cookbooks, but nothing that I was expecting in a large box, but this was a VERY large box. I opened the box and there it was… my brand new Berndes pan – exactly like the other one, except new!
For those of you who have gone to the expense of buying quality cookware (especially non-stick) please review the rules about how to treat your precious skillets. If you are looking to invest in something with which you will be happy, give Berndes a try. Here is a link to Amazon for a quick and easy review of everything they have to offer. Thanks Berndes for a job VERY well done.
Robert Andrews
Grandpa Cooks
This recipe first appeared on senseornosense.
Found an old cookbook that I started back about 1985. Here are some of the recipes:
We were preparing for a party, when I found a note that I had written to myself over a year ago. It stated that I had sent in a knife for replacement, but I realized that the knife had never arrived. I thought perhaps I had not mailed it in, or it got lost in the mail, but I looked back and found the check we had written, and on the back evidence that you had cashed it.
The knife in question is your “cut nails then cut a tomato” knife with the two points on the end.
The quality of the knife was outstanding. I actually used it for yard work, cutting small branches, then brought it in and used it to slice paper thin tomatoes. It really does what you claim. I absolutely loved it.
I had forgotten about the guarantee, and bought an entire set, with which I am very happy, but then I saw that the first knife was actually guaranteed. I sent it in with high hopes, but the replacement knife never arrived. I would still like the replacement knife promised to me.
I am enclosing bank images of the checks; Front and back. The check had actually been cashed. Please send a replacement knife to Robert Andrews, 903 W Glendale Ave, Unit 3, Phoenix, AZ 85021
So far I have not been able to contact Jesco. My eMails have come back as undeliverable. More info to come as I have it.

This has changed a bit, so I will make notes here. Starting from the COLOR pot to the left and working my way around.
These are not the dumplings that are most commonly served in tomato soup here in the US. These are kind of like miniature sealed burritos or calzones… although that comparison is made VERY loosely. They are commonly called Pot Stickers.
There are too many dumplings to list here, so I have taken the liberty of including a post from Culinary One which is a great reference site. Only slight modifications have been made, although links have been removed. If you want to explore this page in more detail, complete with photos, use the link in this paragraph.
Every country on earth has its own glorious regional cuisines that have developed over centuries, if not millennia, and when you travel, you have the opportunity to try all the different morsels of delight that each has to offer. One type of food that seems to be ubiquitous is the stuffed pocket, or dumpling: it’s a comfort food that can be made with either the simplest, or fanciest ingredients, and every culture has its own style and flavour for you to experience.
These delicious Vietnamese dumplings are made with tapioca flour, and filled with a mixture of shrimp and pork that’s been seasoned with fish sauce and green onion, and then the dumplings are cooked in banana leaves. The tapioca wrapper becomes translucent, and has a unique chewy texture that contrasts beautifully with the savoury filling.
Mongolian steamed dumplings, these are most often filled with mutton, onion, and garlic. The flour used for the dough can be either wheat, or a mixture of wheat, barley, and buckwheat.
Made with glutinous rice flour, daifuku are dessert dumplings with sweet fillings such as red (adzuki) bean paste, lotus seed paste, sweetened plum, and pureed chestnuts. The flour can be tinted with green tea, and can also have sesame seeds added to it for texture.
Common foods not only in South and Central America, but also in Spain and Portugal (from whence they originated), these can be filled with anything you can imagine: Argentine empanadas are filled with a mixture of ground beef, olives, onions, and raisins, while in Portugal, you may find them filled with sardines or pork loin. Vegetarian versions are common as well.
Made with very thin wrappers and usually filled with a mixture of finely-chopped pork and vegetables, these fried Japanese dumplings are staples at just about any restaurant you visit. They’re also ridiculously easy to make at home, and can be stuffed with your filling of choice.
Chinese shrimp and pea shoot dumplings wrapped in rice paper: the wrapper goes translucent when steamed, making these morsels into tiny bite-sized jewels. The flavours within complement each other gorgeously.
If you think you’d enjoy a mixture of pork, beef, cilantro, chili pepper, and fenugreek, you’d likely love these Georgian dumplings. Some people make them with caraway seeds instead of Fenugreek, but both add a very subtle bitter note to the filling.
An Eastern European Ashkenazi Jewish specialty, kreplach are filled with a mixture of minced meat and mashed potato, and are usually served in soup.
Don’t let the name put you off: these Swedish stuffed dumplings filled with smoked pork, onions, and cracked pepper, and can be served with either cream, or lingonberry jam.
These Korean dumplings can be made with store-bought gyoza wrappers, and are most often filled with minced kimchi, or kimchi and tofu. These base fillings are mixed with bean sprouts, shredded carrots, garlic, leeks, and green onion, and seasoned with ginger, garlic, and brown sugar. These are then either steamed, fried in sesame oil, or boiled in soups.
A different kind of Turkish delight altogether, these are filled with a mixture of minced lamb, onion, pine nuts, and garlic, doused liberally with smoked paprika, and served with yoghurt.
Literally translated as “a sack for your maw”, these large Schwabian dumplings are filled with spiced meat, spinach, breadcrumbs, and herbs. They can either be pan-fried with onions, or simmered in a broth.
Popular in both Tibet and Nepal, the Nepalese momo has more vegetables than its Tibetan cousin. Most commonly made with ground buffalo or yak meat, you can substitute beef or pork if those aren’t readily available. Vegetarian versions can be made with cabbage, onions, and herbs. Mixed with spices and fresh herbs, the filling is stuffed into flour wrappers, pleated, and then the dumplings are steamed.
Hailing from Cornwall, these are large dough pockets stuffed with chopped beef, potatoes, carrots or parsnips, and peas, and then baked until golden brown. They were traditionally made as lunch for miners, and one corner may have been created as a “dessert”, with the filling at that end consisting of jam, or cream cheese and fruit.
Like a cross between an Italian tortellini and Turkish manti, these are little folded and wrapped savoury dumplings that are easily recognized by the thickness of the dough. They can be filled with meat (goat, mutton, poultry), mushrooms, vegetables, or cheeses, but never have sweet fillings. These are boiled, and then served with melted butter, sour cream, and chopped green onion or chives.
Known as varenyky in Ukranian cuisine, Pierogis are made of wheat dough, and filled with a variety of stuffings such as mashed potato with onion and cheese; sauerkraut; wild mushrooms and buckwheat; spiced ground beef; even sweet fillings like blueberries, gooseberries, or plums.
Anyone who’s a lover of Italian cuisine will be well-acquainted with these pillows of glee. Dough squares are filled with anything from ground meat or cheese to squash, nuts, herbs, and even fruit, sealed well, and then boiled. They can be served with any kind of sauce, or even lightly pan-fried and topped with browned butter.
These Indian delicacies are usually stuffed with a mixture of spicy potatoes, onions, and peas, and can be either baked or fried. They go wonderfully with tamarind or mango chutney, or any other sweet/sour dipping sauce.
Sweet and adorable, these Czech dumplings are as delicious as they are simple to make. A small, whole fruit (like a plum or apricot) is wrapped in a dough made of flour, egg, milk, and butter, and then dropped into a pot of boiling water. They’re considered “done” once they’ve risen to the surface and bobbed around for a couple of minutes, and are then immediately rolled in a mixture of melted butter, sugar, and cinnamon.
Translated as “little ears”, these tiny Polish dumplings are usually filled with assorted wild mushrooms and onion, or minced meat. They can be boiled and served with melted butter and chives, or in borscht-style beet soup.
If you’ve never tried these steamed “soup dumplings”, you must. The filling is made of seasoned ground pork, but the magic of these little beauties is the gelatin: cubes of gelatinized chicken or pork broth are mixed in with the rest of the filling, so that when the dumpling is sealed and steamed, the gelatin melts and creates a “soup” inside.
Ice cream without an ice cream maker.
Translates as “Semi Frozen”
INGREDIENTS
STEP BY STEP
Amaretti cookies
INGREDIENTS
See optional ingredients below.
STEP BY STEP
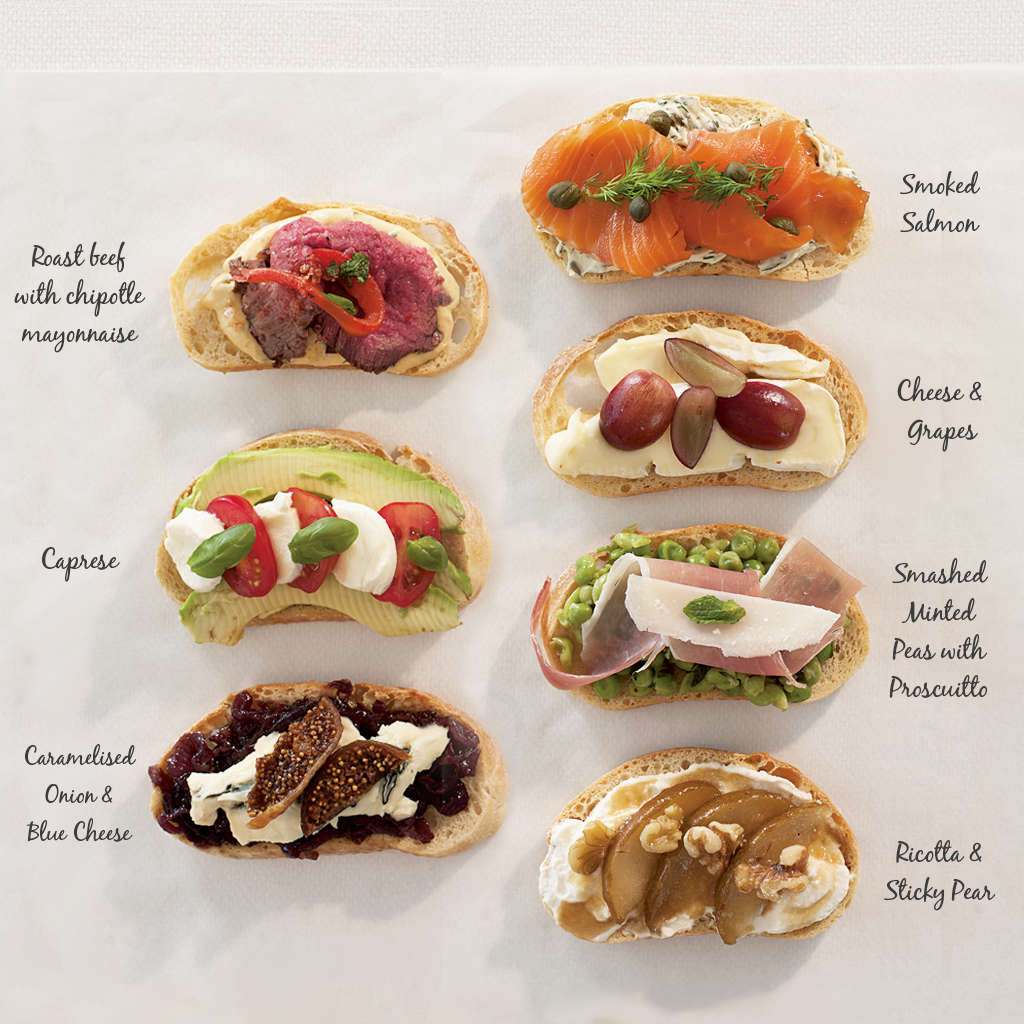
OTHER TOPPINGS
The toppings are virtually unlimited. Don’t be afraid to use your imagination. Here is some guidance.
Ingredients
Step by Step
Ingredients
15 pounds ripe tomatoes
1/4 to 1/2 cup lemon juice or red wine vinegar
2 teaspoons salt (optional)
Optional ingredients: grated carrot, chopped onion, minced garlic
Equipment
6 1/2-quart or larger Dutch oven or stockpot
Mixing bowls
Slotted spoon
Knife and cutting board
Food processor or blender
Jars for canning or containers for freezing
Then they’re boiled for about 10 minutes, just long enough to soften the pulp. It’s a quick enough cooking time that the fresh tomato flavor isn’t lost, but long enough that the pulp will pass* through a food mill or vegetable strainer.
In fact, in Italian this watery, fresh tomato purée is called a passata (“passed”).
According to Harold McGee in On Food and Cooking, this quick-boil method allows pectins to thicken the sauce much more effectively, requiring less overall sauce reduction (and therefore a fresher-tasting sauce!).
This does require having either a food mill or some other type of mechanical strainer, but for large quantities of sauce, it’s a minimal investment that will save a lot of time. Plus, it’s one of the easiest ways to remove seeds and skins while keeping all the good stuff in the sauce.
Once we have our tomato purée, the next question is what to do with it.
One of the goals I outlined above for fresh-tomato sauce is that it should retain some of that fresh-tomato flavor. So I knew I wanted some of my tomato purée to be cooked minimally. But one of the things my initial test batches made me think about is how damned delicious long-cooked tomatoes are. You see, when I was cooking down my beefsteak tomato purée, I had to cook it a long, long time to get rid of all of its excess water, and by the time it was done, it was sooooo delicious: dark red, intensely sweet, and oh-so rich. I just kept going back to it with a spoon.
To get that flavor into my sauce, I consulted several cookbooks, and settled on the idea of turning a portion of the purée into a tomato-paste like extract in the oven, called estratto in Italian. It’s a technique described well by Paul Bertolli in his fantastic Cooking By Hand, and Rosetta Costantino in My Calabria, and while it’s traditionally done in the Southern Italian sun, a low oven is the easy alternative.
Because so much evaporation is required to reach the concentrated stage I was going for here, I used only paste tomatoes for this portion of the recipe—I’d rather let the small portion of beefsteaks in the batch contribute their water elsewhere than have to cook it all off here. Overall, a little less than half of my tomatoes went towards this component (10 pounds out of 25).
The method is simple: pour the purée into rimmed baking sheets or baking dishes (basically anything wide that will maximize surface area and therefore evaporation) and set them in a low oven, stirring from time to time, especially as it begins to thicken, until a rich, sweet extract is formed. Don’t even think of taking a shortcut with store-bought tomato paste here: This stuff is way more flavorful than any canned tomato paste I’ve ever tried.
The low-and-slow reduction allows the tomato sugars to caramelize, creating an intensely sweet, concentrated flavor base for the sauce.
Just one tip: Keep an eye on these and stir them frequently. I learned the hard way that the thin layer of tomato paste can burn quickly, even at low oven temperatures, if it’s left unattended for too long.
With most of my remaining tomato purée, about 15 pounds of mixed tomatoes, I used a more classic stovetop method, cooking it down for about 45 minutes to a sauce-like consistency. But before I did that, I set about a quart of the fresh tomato purée aside, thinking I would add it back in at the end for a blast of fresh-tomato flavor. I had gotten the idea while thinking about the common practice of adding a splash of high-quality uncooked olive oil at the end of cooking to get its great taste into the dish. I figured, if it works for olive oil, why shouldn’t it work for tomatoes?
What that meant was I ended up with three sauce components: my rich, delicious tomato paste; my basic cooked sauce; and then my very fresh-tasting tomato purée.
Here they are side-by-side, and the color alone speaks volumes about how each is different. In terms of absolute quantities, I had only about a quart’s worth of both the concentrated paste and the fresh purée; the regular sauce seen in the middle here produced about a gallon, and is the backbone of the sauce. The idea is to enrich the bulk of the sauce with the deep, sweet, caramelized notes of the paste, and then finish it with the bright, fresh flavor of the barely-cooked purée, to create layers and layers of flavor that hit every note.
So, now that I’ve explained my three-pronged approach to the sauce, we’re basically done, right? Nope!
Just because I have my amazing tomato paste and my fresh-and-fruity purée doesn’t mean I’m just going to accept that the bulk of the sauce is going to taste merely good, especially if there’s anything I can do about it.
The first trick is one we’ve all seen a million times: toss in some basil. It’s no accident that basil is usually included in canned tomatoes: Canning require intense heat and cooking, which kills any trace of fresh tomato flavor. A few sprigs of basil help add a little freshness back in. I added some basil to a portion of my bulk sauce while it was still warm and let it steep.
It worked, adding a fragrant, floral, anise-y scent to the sauce that is totally wonderful. At the very least, it’s worth steeping the basil in the sauce.
Some folks, though, also add some tomato leaves to their sauce. Writes McGee, “tomato leaves have a fresh-tomato aroma thanks to their leaf enzymes and prominent aromatic oil glands.”
I tried it out, and, aside from putting way too much in my sauce, found that it does indeed add a grassy green flavor that can help offset whatever fresh notes are lost from cooking the tomato. The only hard part for most of us is getting our hands on tomato-plant cuttings. If you can’t, rest assured the basil does more than enough on its own—honestly, if I had to choose between the two, I’d take the basil. But if you can do both, each will help in its own way.
One other major concern for the bulk sauce is whether to add aromatics like onion and garlic, and if so, how to do it. Some recipes call for cooking the aromatics first until soft and sweet (but not browned), while others have the aromatics dumped in raw and simmered in the sauce as it cooks.
I tried it three ways*: with raw aromatics, sautéed aromatics, and none at all. In my tests I just used onion and garlic, which are the most common, though you can opt to also include others like carrot and celery—each will alter the flavor of the sauce somewhat, and whether or not you include them is a matter of personal preference.
*Actually four ways, I also did a batch with crushed red pepper, and loved the subtle warm heat it adds to the sauce.
Raw onion and garlic produced a cleaner-tasting sauce with fresh vegetable notes, but the overall flavor and texture was less integrated. To avoid the texture issue, you can use Marcella Hazan’s method of submerging raw onion halves in the simmering sauce and then fishing them out whole.
When blind-tasting these two sauces on spaghetti, more of my colleagues preferred the sautéed aromatics to the raw ones, but opinion wasn’t unanimous.
My third batch, without any aromatics, was also delicious, and in some ways I preferred its pure tomato flavor, which goes to show that if the sauce is good enough, you really don’t need to enhance it much. On that note, I also preferred my sauce without cheese, which shocked me, because I always put cheese on my pasta with tomato sauce, but this sauce really is that good—too much other stuff just gets in the way.
There are many, many ways to make very good tomato sauce, but if you’re going to take the time to prepare it using fresh tomatoes, the key to creating a balanced, rich, and layered sauce that tastes both fresh yet also deep and complex is to think of it as a blender’s art: make tomato purée and divide it into parts, then slow-cook one portion of it into a thick, sweet, caramelized paste; cook another portion into the bulk of the sauce, flavored with basil, possibly tomato leaves, and aromatics; and save a small portion of the barely-cooked purée to add at the end for a bright, fresh note, similar to how we often finish dishes with a drizzle of uncooked olive oil.
Exactly how you use the sauce will determine final steps: On pasta, for instance, you can finish the pasta in a pan with the sauce and some of the pasta-cooking water, adding a little raw olive oil, pat of butter, or splash of cream at the end, depending on the final flavor you want.
It may be a little fussy, but it’s also the first tomato sauce I’ve made that I haven’t wanted to top with cheese. And really, I don’t even really need the pasta. Just give me a spoon.
Since many senior discounts are not advertised to the public, our advice to men and women over 55 is to ALWAYS ask a sales associate if that store provides a senior discount. That way, you can be sure to get the most bang for you buck. Here is a list that is good to put into your car for quick reference.
113 Stores with Senior Discounts
Restaurants
Retail and Apparel
Grocery
Travel
Activities & Entertainment
INGREDIENTS
STEP BY STEP
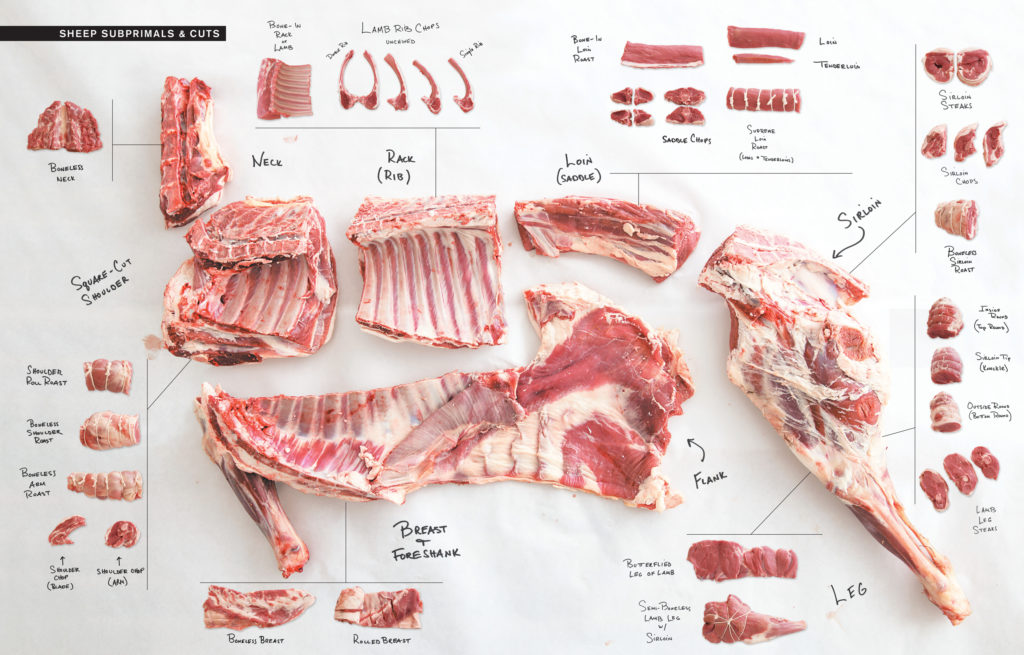
CLICK HERE for cuts from other animals

Chicken needs to cook longer and should be at the back of the oven when baking. Internal temp should reach 175º
Breast cooks for a shorter period of time, and in the front of the oven, or it will become dry. Internal temp should reach 160º
Together they will cook approximately 1.5 hours at 250º

