Basic Tart Crust

INGREDIENTS

  • 4 C flour
  • 1/2 tsp salt
  • 1 tsp sugar
  • 1 stick cold butter
  • 2 crushed ice cubes

STEP BY STEP

  1. Pulse flour, sugar, salt and butter in food processor till crumbly
  2. Add crushed ice and pulse to incorporate
  3. Put in fridge for 10 minutes
  4. Roll out while cold
  5. Roll onto rolling pin to transfer to pie pan
  6. Bake 12-15 minutes at 357º

Your crust is now ready for filling.

  • Blueberry Pie Filling
  • Lemon Custard
  • Sliced apple tossed with sugar and cinnamon
  • Strawberry and rhubarb tossed with sugar

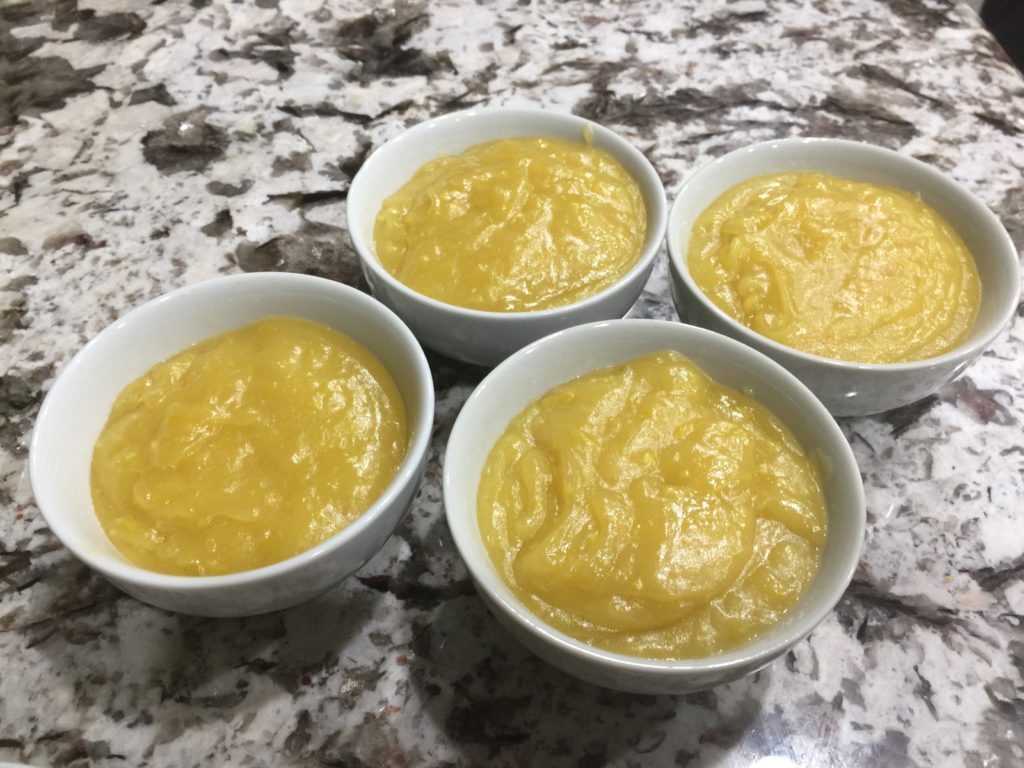
Basic Lemon Curd

Also called Zabaglione by the Italians, who claim to have invented it.

Basic Lemon Curd

This does not follow all of the rules, but it is about as easy as you can get.  I like easy, and this is the way I do it.

You will need a double boiler or a bowl which fits into a saucepan to make lemon curd. This restricts the temperature from never getting hotter than 212º – which is actually too hot for lemon curd, so you still need to be careful. 202º is the perfect water temperature. This also reduces the risk for scorching. You CAN do it in a sauce pan alone, but your chances of failure increase greatly.

The eggs will need to heat between 150º and 170º  – NEVER exceed 175º

Limes and Lemons both work really well in this recipe.

INGREDIENTS

  • lemon zest and juice of 4 lemons
    ( about 1/2 C )
  • 6 egg yolks
    Reserve the whites for an omelet
  • 1/2 cup Karo Syrup
  • 1 dash of salt
  • 1/4 C ( 1/2 stick – 8 TBL ) butter ( cut into tabs )
  • 2 TBL corn starch
  • Scant vanilla or Grand Marnier at the very end

STEP BY STEP

NOTE:  Just the yolk makes custard.  Yolk plus lemon makes lemon curd.

  1. Wash lemons.
    • Info: The lemons and the eggs should be at room temperature. Roll the lemons firmly on a table as a preparation for extracting the maximum quantity of juice from them.
  2. Grate rind, leaving white pith
    • Info: Using a citrus zester or a fine microplane grater, remove the yellow portion of the lemon rind, leaving behind the white pith (the white part under the rind which is bitter). Put the grated peel (also known as the zest) into a large mixing bowl.
  3. Squeeze juice from lemons into the mixing bowl.  Don’t worry about the seeds and the pulp, we will be straining in Step 14.  Plus, the seeds have a bit of pectin in them, which will help with your custard creation.
  4. Mix together eggs, sugar, salt, corn starch in a large mixing bowl.  Your mixing bowl should be a larger diameter than your stock pot.  We will be using the bowl as a double boiler.  Cream together the eggs and dry ingredients.  This will break apart the strings of white.
  5. Pour the egg into the large mixing bowl.
  6. Fill a large stock pot about 2 inches with water and bring to a rapid boil, then reduce the heat to a light simmer.  As I mentioned 202º – 205º is the perfect temperature
  7. Cut your butter into pieces and put into your mixing bowl.  This will become your “wok” bowl.
  8. Put your mixing bowl on top of the pot to create kind of a low-temperature wok.  This is called a double-boiler.
  9. Everything (except the vanilla) should now be in your double-boiler.  You need to stir VERY frequently.  About every 15 seconds, at least.
  10. When butter has completely melted, stir continually.
  11. Cook over double boiler until thickened ( 10-15 minutes ) then add your vanilla.  Mixtures continues to thicken upon standing.  If the temperature of the egg mixture rises above 175 the egg will cook and develop clumps.  Ideally, keep the egg mixture temperature between 150 and 170º.  The clumps can be removed in Step 14 if this happens.
  12. Put in about 1/2 tsp of vanilla or Grand Marnier. 
  13. Put bowl into an ice bath and stir until temperature drops.
  14. Strain the custard into a measuring cup, lined with a plastic bag.
  15. Cut the merest tip from the bag, and pipe into bowls or dump into tart crust (see recipes at top of this page)
  16. Cool at least an hour before serving

NOTES and ADDITIONAL INFORMATION

  • Lemon curd is a summer treat which isn’t difficult to prepare.
  • You can transfer the curd to a clean jar or store in the refrigerator, covered with wax paper.
  • Use the lemon curd to fill tarts, as a pie filling, or spread on crackers, toast or waffles.
  • You can also just serve this in a little bowl as a side dish.


Ghee – aka – Clarified Butter

  1. Heat butter in a sauce pan at medium low heat.  DO NOT STIR.
  2. Once it has completely melted, let rest a few minutes
    – During this time the solids will precipitate to the bottom of the liquid
  3. Skim off any foam that has formed on top.
  4. You now have clarified butter
  5. Keep cooking until the solids in the bottom begin to turn brown
  6. You now have ghee
  7. Carefully pour off the ghee, leaving the solids behind.
  8. Ideally, pour it through cheesecloth for even cleaner ghee

This will give a cleaner taste to whatever you are cooking.  It is also less likely to burn.  Just a dash of EVOO will also help inhibit burning.  If you are a purist, pour the butter through cheesecloth.

Canoli Creme

INGREDIENTS

  • 1 C Ricotta cheese
  • 1/4 C powdered sugar
  • zest from one orange
  • 1/2 tsp vanilla
  • Optional: 1/4 C semi-sweet chocolate chips

STEP BY STEP

  1. Mix ingredients
  2. Pipe into canaloni shells or squished flat white bread


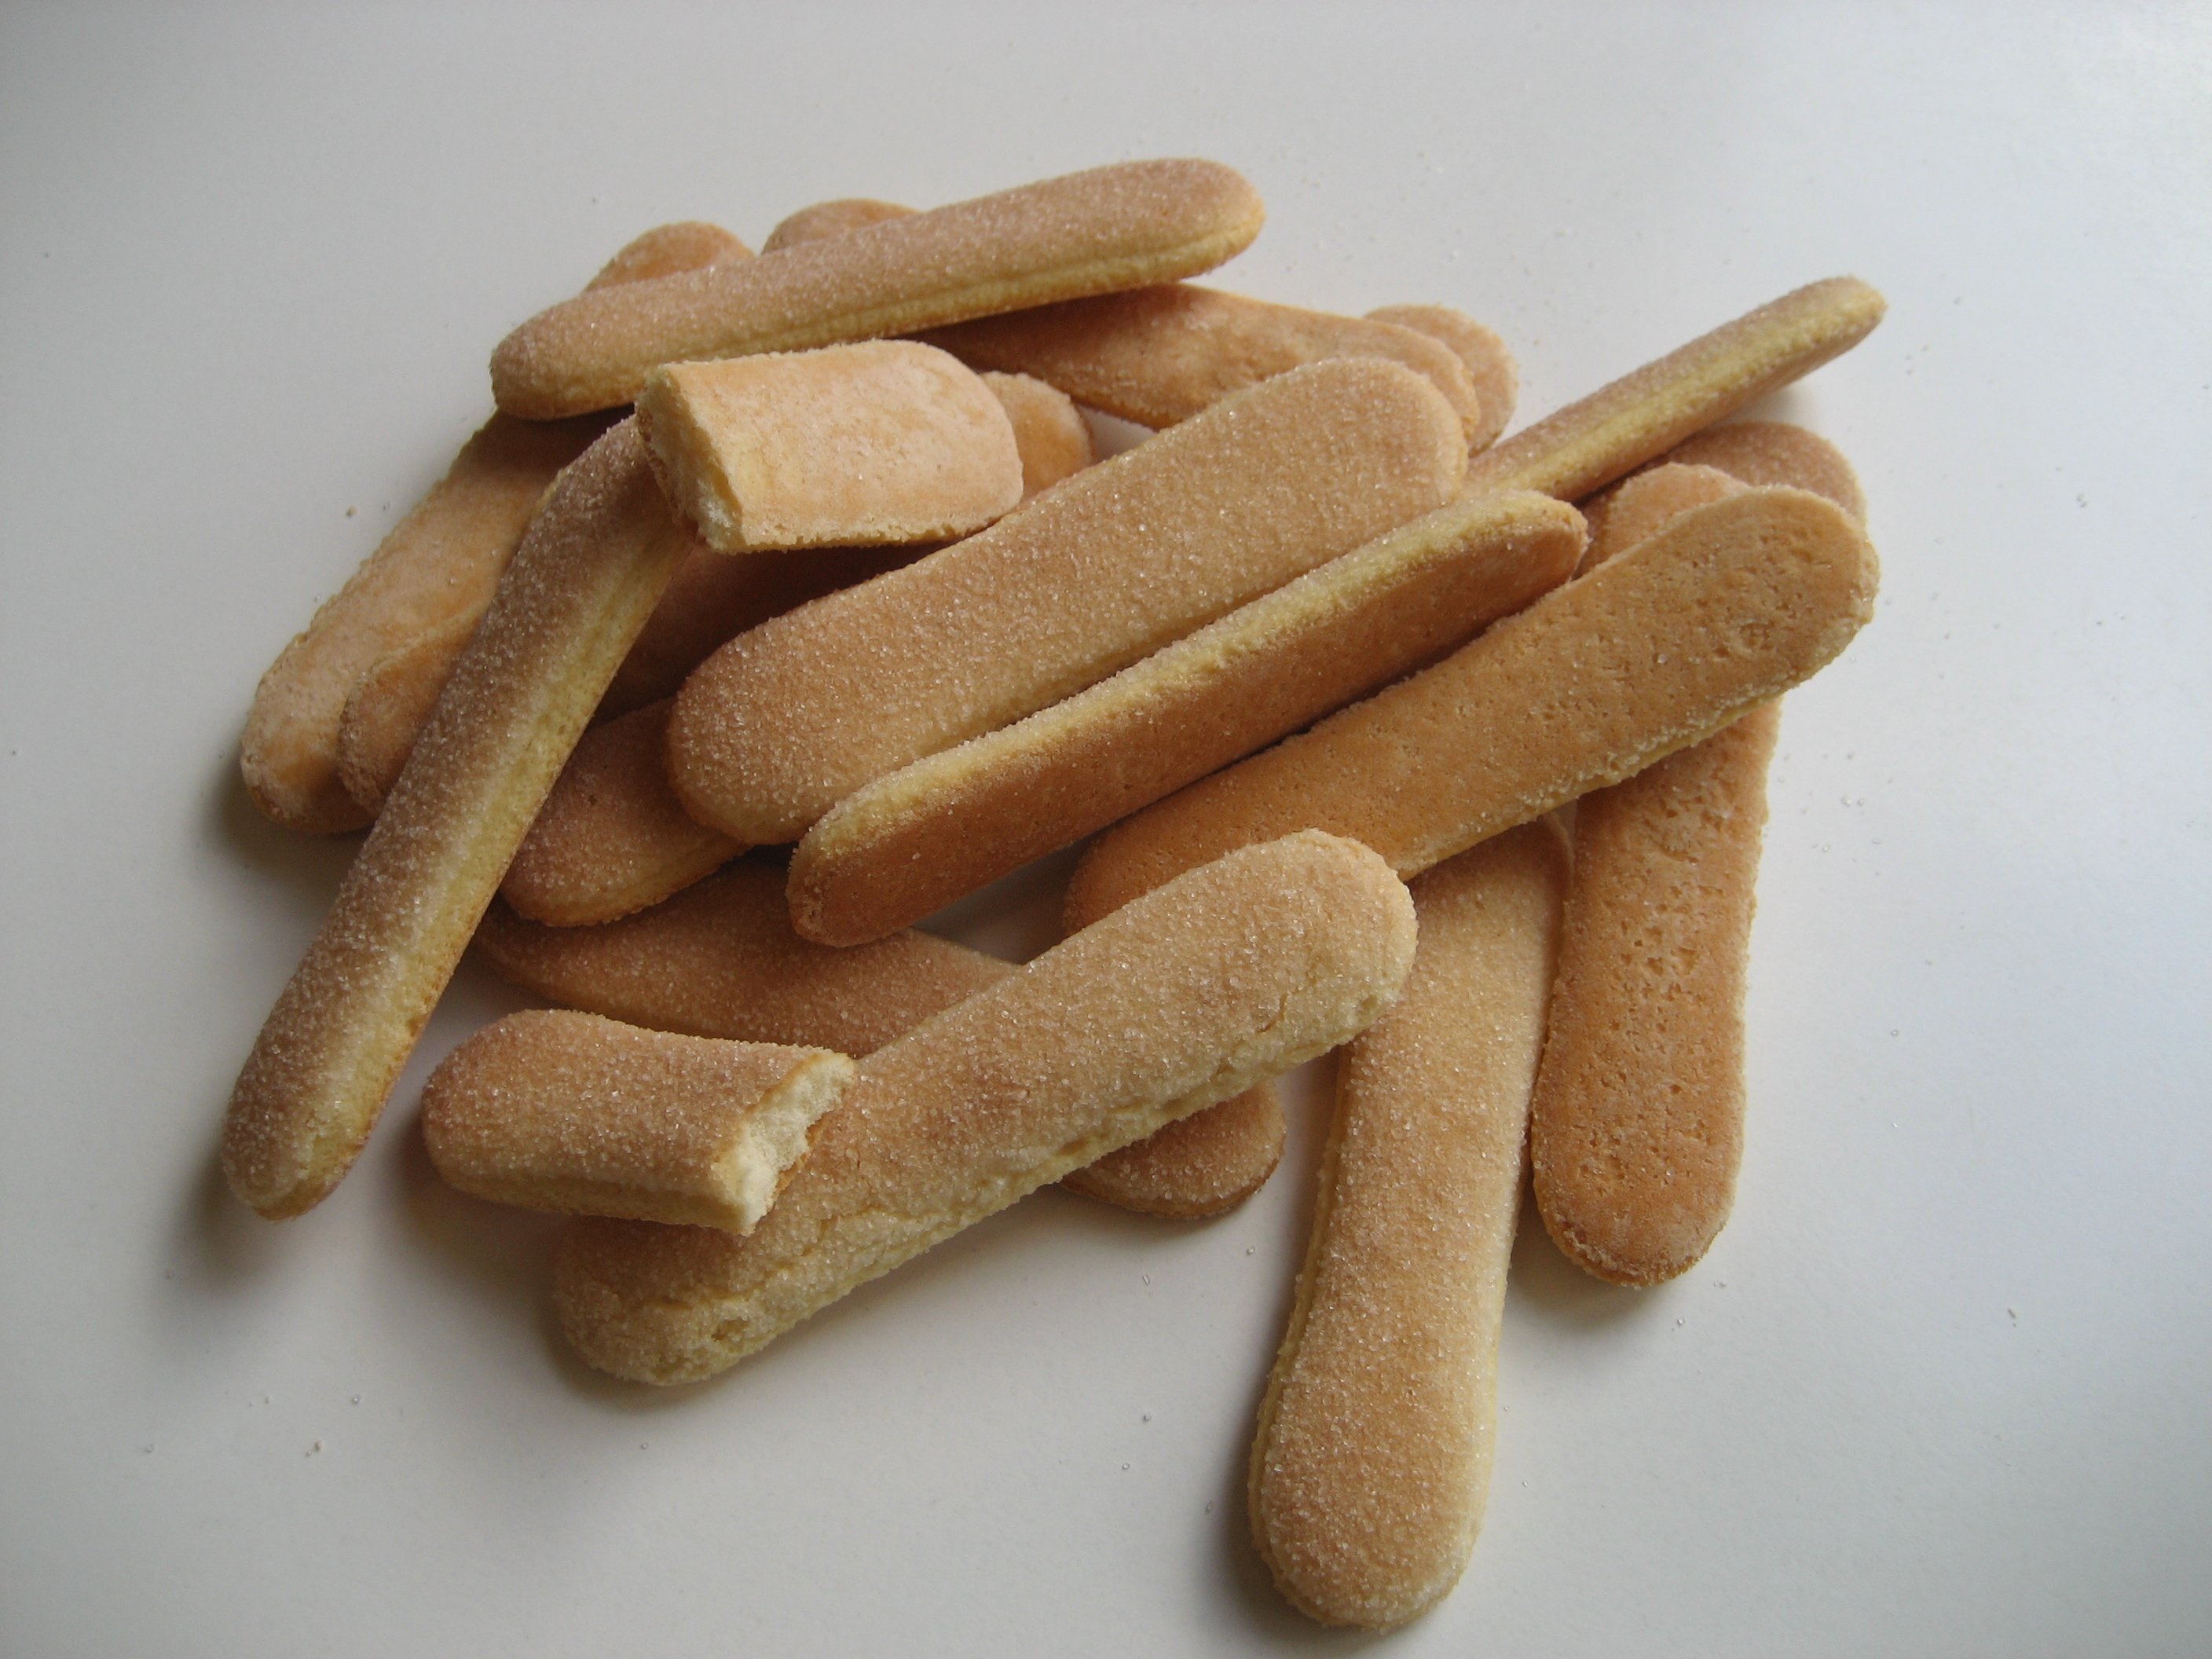
Lady Fingers

This is just a nice soft little cake that can be used to make a trifle or even your version of Hostess Twinkies.

Traditional

INGREDIENTS

  • lady-fingers3 eggs  – separated
  • 1/2 C granulated sugar
  • 3/4 tsp vanilla
  • 1 TBL melted cooled butter
  • 6 TBL corn starch – sifted
  • 6 TBL AP flour – sifted
  • 1/2 tsp salt
  • 1/2 tsp baking powder

STEP BY STEP

  1. Mark your parchment with three inch lines
  2. Turn paper over so you are not cooking on pencil
  3. Wipe parchment paper with melted butter
  4. Cream together egg yolks and half of your sugar
  5. Add vanilla
  6. Sift together corn starch and flour
  7. In a clean bowl, beat egg whites
  8. Add the rest of your sugar and salt to egg whites
  9. Continue to beat until soft peaks – not firm or stiff
  10. Combine by hand the yolks and whites
  11. Sprinkle flour mixture into the egg mixture
  12. Put into piping bag and pipe into three inch fat sausages
  13. Bake at 400º for about 12-15 minutes
  14. Let them cool, and then they are ready for whatever use you would like
  15. If you plan to use them just like this, sprinkle them with powdered sugar

Easy but Not Too Quick

    • Simple Shortcake
  • 1 C AP flour
  • 2 TBL cornstarch
  • 1/2 tsp baking soda
  • 1/2 tsp baking powder
  • scant salt
    SIFT TOGETHER ABOVE INGREDIENTS
    MEANWHILE, CREAM TOGETHER THE FOLLOWING
  • 4 TBL softened butter
  • 1/4 C room temp sour cream
  • 2 eggs
  • 1/2 tsp pure vanilla
    Add wet ingredients to the dry, then gently mix
    Line a 9×9 glass baking dish with parchment paper and then spray

    Pour mixed ingredients into pan
    Bake for 30 minutes at 350º
    Let cool 5 minutes before removing
    Cut into 1/2 x 1 inch rectangles

    • Prepared Strawberries
  • 1 large grocery-store box of strawberries (1 quart)
    Stem removed and halved
  • 1 C sugar mixed with 3 TBL corn starch in 1 C water
  • Heat to nearly boiling
  • Add strawberry gelatin or Jello
  • Pour over strawberries
  • Let rest 30 minutes
    • Yogurt Cream
  • 1/2 C heavy whipping cream – beat until it starts to thicken
  • 1/2 C plain Greek yogurt – Greek is thicker
  • 2 TBL granulated sugar
  • 2 TBL brown sugar
  • 1/2 tsp vanilla
    • Basic Whipped Cream Topping
  • 1 C COLD whipping cream – beat until it starts to thicken
  • Add 2 TBL sugar and continue beating
  • 1/2 tsp vanilla
    • Assemble
  • Put down a thin layer of yogurt cream on the bottom of a CLEAR dish
  • Stand shortcake rectangles up on end surrounding the sides
  • Add a layer of strawberries, then a layer of yogurt cream
  • Add a flat layer of shortcake, yogurt cream and then strawberries
  • Top the strawberries with the remainder of the yogurt cream
  • Add strawberries or blueberries in a decorative pattern on the top


Poached Chicken

This is actually the base for dozens (if not hundreds) of recipes.  It is actually very easy, but it takes a bit of time, so start this before you start on any other portion of a recipe.  It is always better to let it cool after poaching so you don’t burn yourself.

INGREDIENTS

STEP BY STEP

  1. Bring 3 C of water to a boil
  2. Add 1 TBL salt
  3. Cut your chicken into pieces so it compactly fits into your pot
  4. Add water just to barely cover your chicken
  5. Add 1 bay leaf, 1 TBL peppercorns (whole) , 3 cloves garlic (whole) and 1 onion (pieced)
  6. Bring to a full boil, then reduce heat
  7. Cover and simmer for 20 minutes
  8. Drain and set aside to cool
  9. Discard the chicken skin, bay leaf, peppercorns, garlic and onion
  10. Retain the chicken stock for use in other recipes
  11. After it can be safely handled, use two forks to shred it into pieces/strips

Brown Butter

Also called buerre noiset, brown butter has a subtle nuttiness and enhances some recipes.  If you go too far, you get buerre noir, which is black butter.

One of the important points is that the milk solids are used.  When making clarified butter the clear solution is poured off, and the solids are discarded.

STEP BY STEP

  1. Melt 1 stick of butter in a sauce pan over low heat until the milk solids turn brown
  2. Pour through a fine sieve.  Some solids are OK, but there are large chunks which you don’t want
  3. Add 1 tsp vanilla

This brown butter is used for a lemon tart  in my Desserts book.


Whipped Cream Topping

Ingredients

  • 1/2 C Heavy Whipping cream
  • 2 TBL corn syrup, simple syrup or Karo
  • 1/2 tsp Vanilla
  • 1 1/2 tsp sour cream
  1. Beat whipping cream with electric beater, mixer or Kitchen Aid with a whisk attachment for about 2-3 minutes
  2. Add vanilla, sour cream and corn syrup
  3. Cool while you prepare your dish upon which it will be used
    Suggestions:  Crepes, pancakes, strawberries
  • You want firm peaks.
  • Too soft, and the peaks slump over.  Beat 10-20 seconds more.
  • Just right and the peaks stay upright.  Fluffy, but firm.
  • Too long and you get sweet butter.  Great on biscuits, but not as whipped cream.

Buttercream Frosting

Easy Buttercream

Ingredients

  • 1/2 cup (115 grams) unsalted butter (softened)
  • 1.5 cups (180 grams) powdered sugar
    For a sweeter frosting, mix in an additional 1/4 C
  • 1 egg yolk
  • 2 tablespoons (30 ml) heavy cream or heavy whipping cream
  • 1/2 teaspoon pure vanilla extract
  • Tiny pinch of salt

Instructions

  1. In the large mixing bowl, combine the butter and powdered sugar.  Mix with a hand-held mixer until smooth and fully combined.
  2. Add the heavy cream, vanilla extract, and salt
  3. Continue mixing on medium speed until everything is well combined.
  4. Pipe the frosting onto cupcakes or frost a cake.
 

Note

Frosting can be made 1 to 2 days in advance, cover tightly and transfer to the refrigerator. Remove from the refrigerator and bring to room temperature before frosting cupcakes/cakes.


Heavy Cream: You may replace the heavy cream with milk, but the frosting won’t be quite as creamy.


Recipe Variations

  • Vanilla: For a vanilla buttercream frosting, double the vanilla.
  • Chocolate: Sift 1/4 cup of unsweetened cocoa powder and mix it into the frosting base until well combined.
  • Caramel: Mix in 1/4C  caramel ice cream topping.
  • Strawberry: Add a 1-ounce frozen strawberries to the bowl at Step 2 above.

American Buttercream

  1. Combine
    • 2 sticks softened butter
    • 1/2 C shortening
    • scant salt and 1 tsp vanilla
  2. Combine with
    • 12-14 oz confectioner sugar
  3. Beat everything using your paddle attachment
  4. Add
    • 1/4 C buttermilk
    • 2 TBL (1 oz) sour cream
  5. Blend until combined
  • Ice round cakes on a lazy susan
  • You can elevate the cake by putting a flat mixing bowl on the lazy susan at the beginning
  • Put a blob of icing on the cardboard cake round to “hold” the cake still
  • Cut the puffy top off so that layered cakes will sit evenly.
  • Using a long knife or long saw blade, cut even layers
  • Cut a notch in the side of the cake to help with alignment later
  • Ice between layers
  • Create a “crumb coat” of icing that will be covered up later.
  • Put the crumb coat into the fridge for 20-30 minutes to harden
  • Apply the final outside layer of icing.
  • To create “writing chocolate” combine 1 C chocolate chips and 2 tsp canola oil.  Stir together, then microwave for 60 seconds.  Stir to mix, then put into a piping bag or squirt bottle.  As you are writing, back up and the end of each letter.

Royal Icing

Ideally use an electric mixer or Kitchen Aid with the whisk attachment.

  1. Beat 3 large egg whites and 1/2 tsp cream of tartar on medium high till foamy (about 1 minute)
  2. Reduce speed and add 1 LB confectioner sugar (about 4 cups) 1 cup at a time, stirring until incorporated
  3. Increase speed to high and beat until glossy peaks form (5-7 minutes)
  4. Pipe with a pastry bag

Bolognese Marinara Sauce ~~ 5


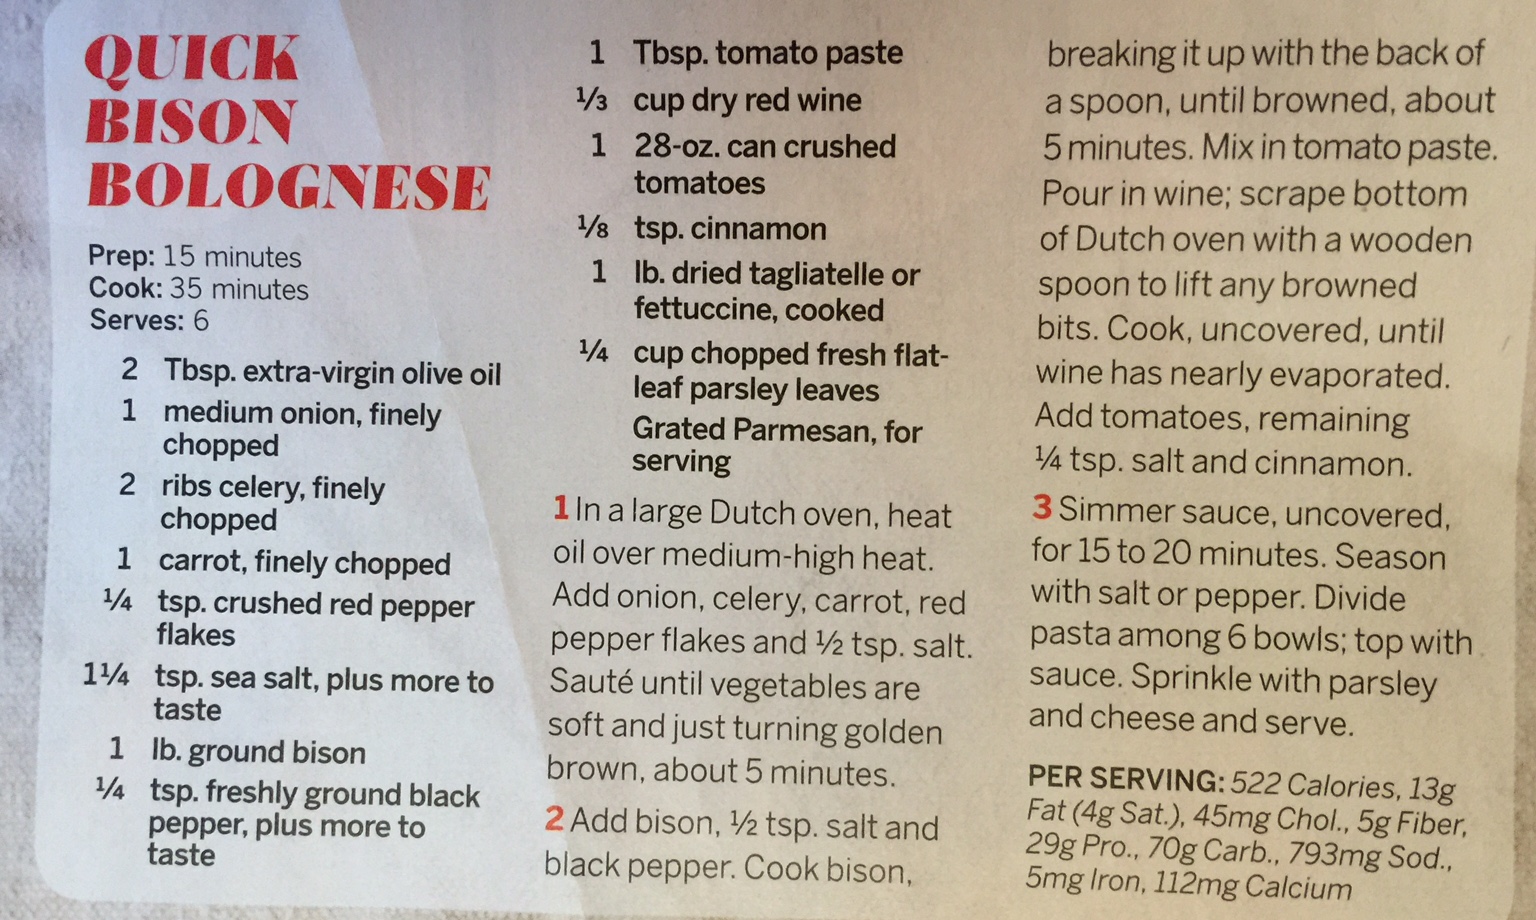
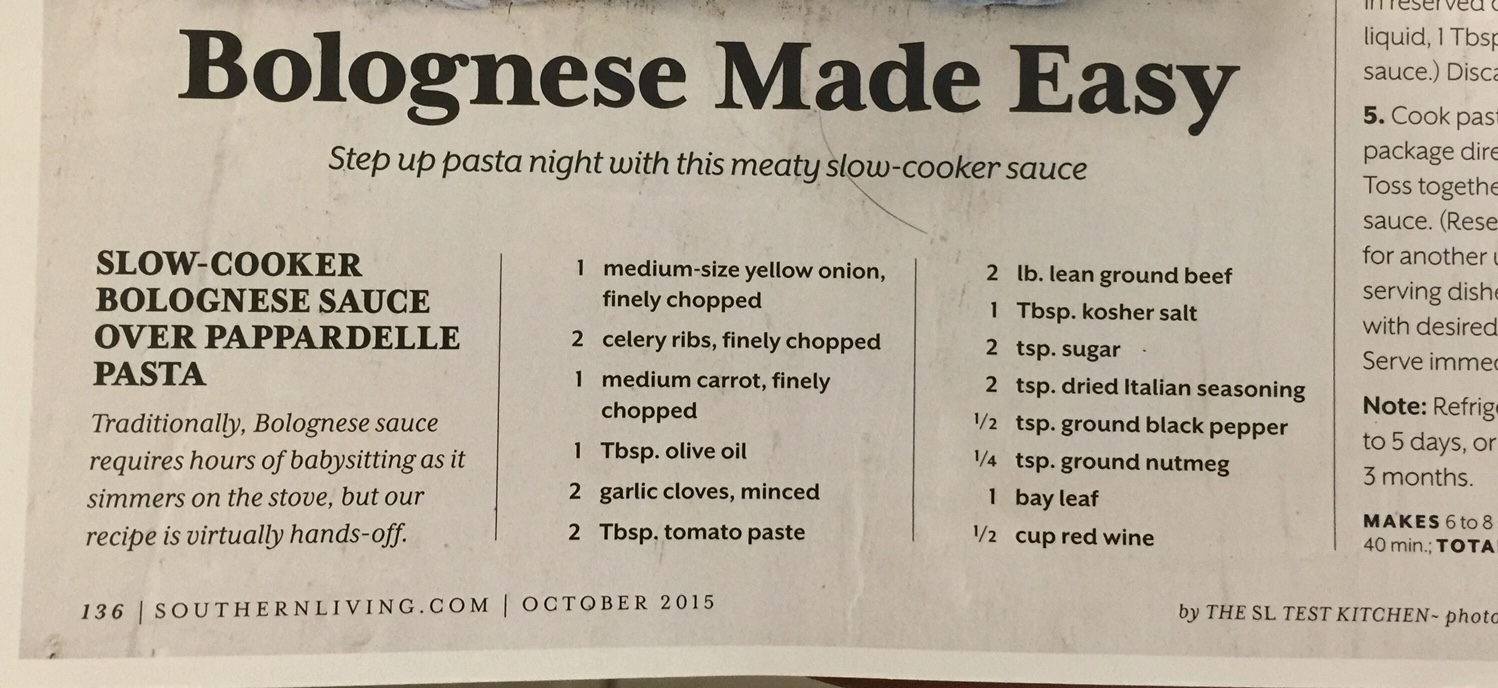
Quick Bison Bolognese


This recipe says to use bison, but I prefer half ground pork and half 80/20 ground beef.


Bolognese Made Easy

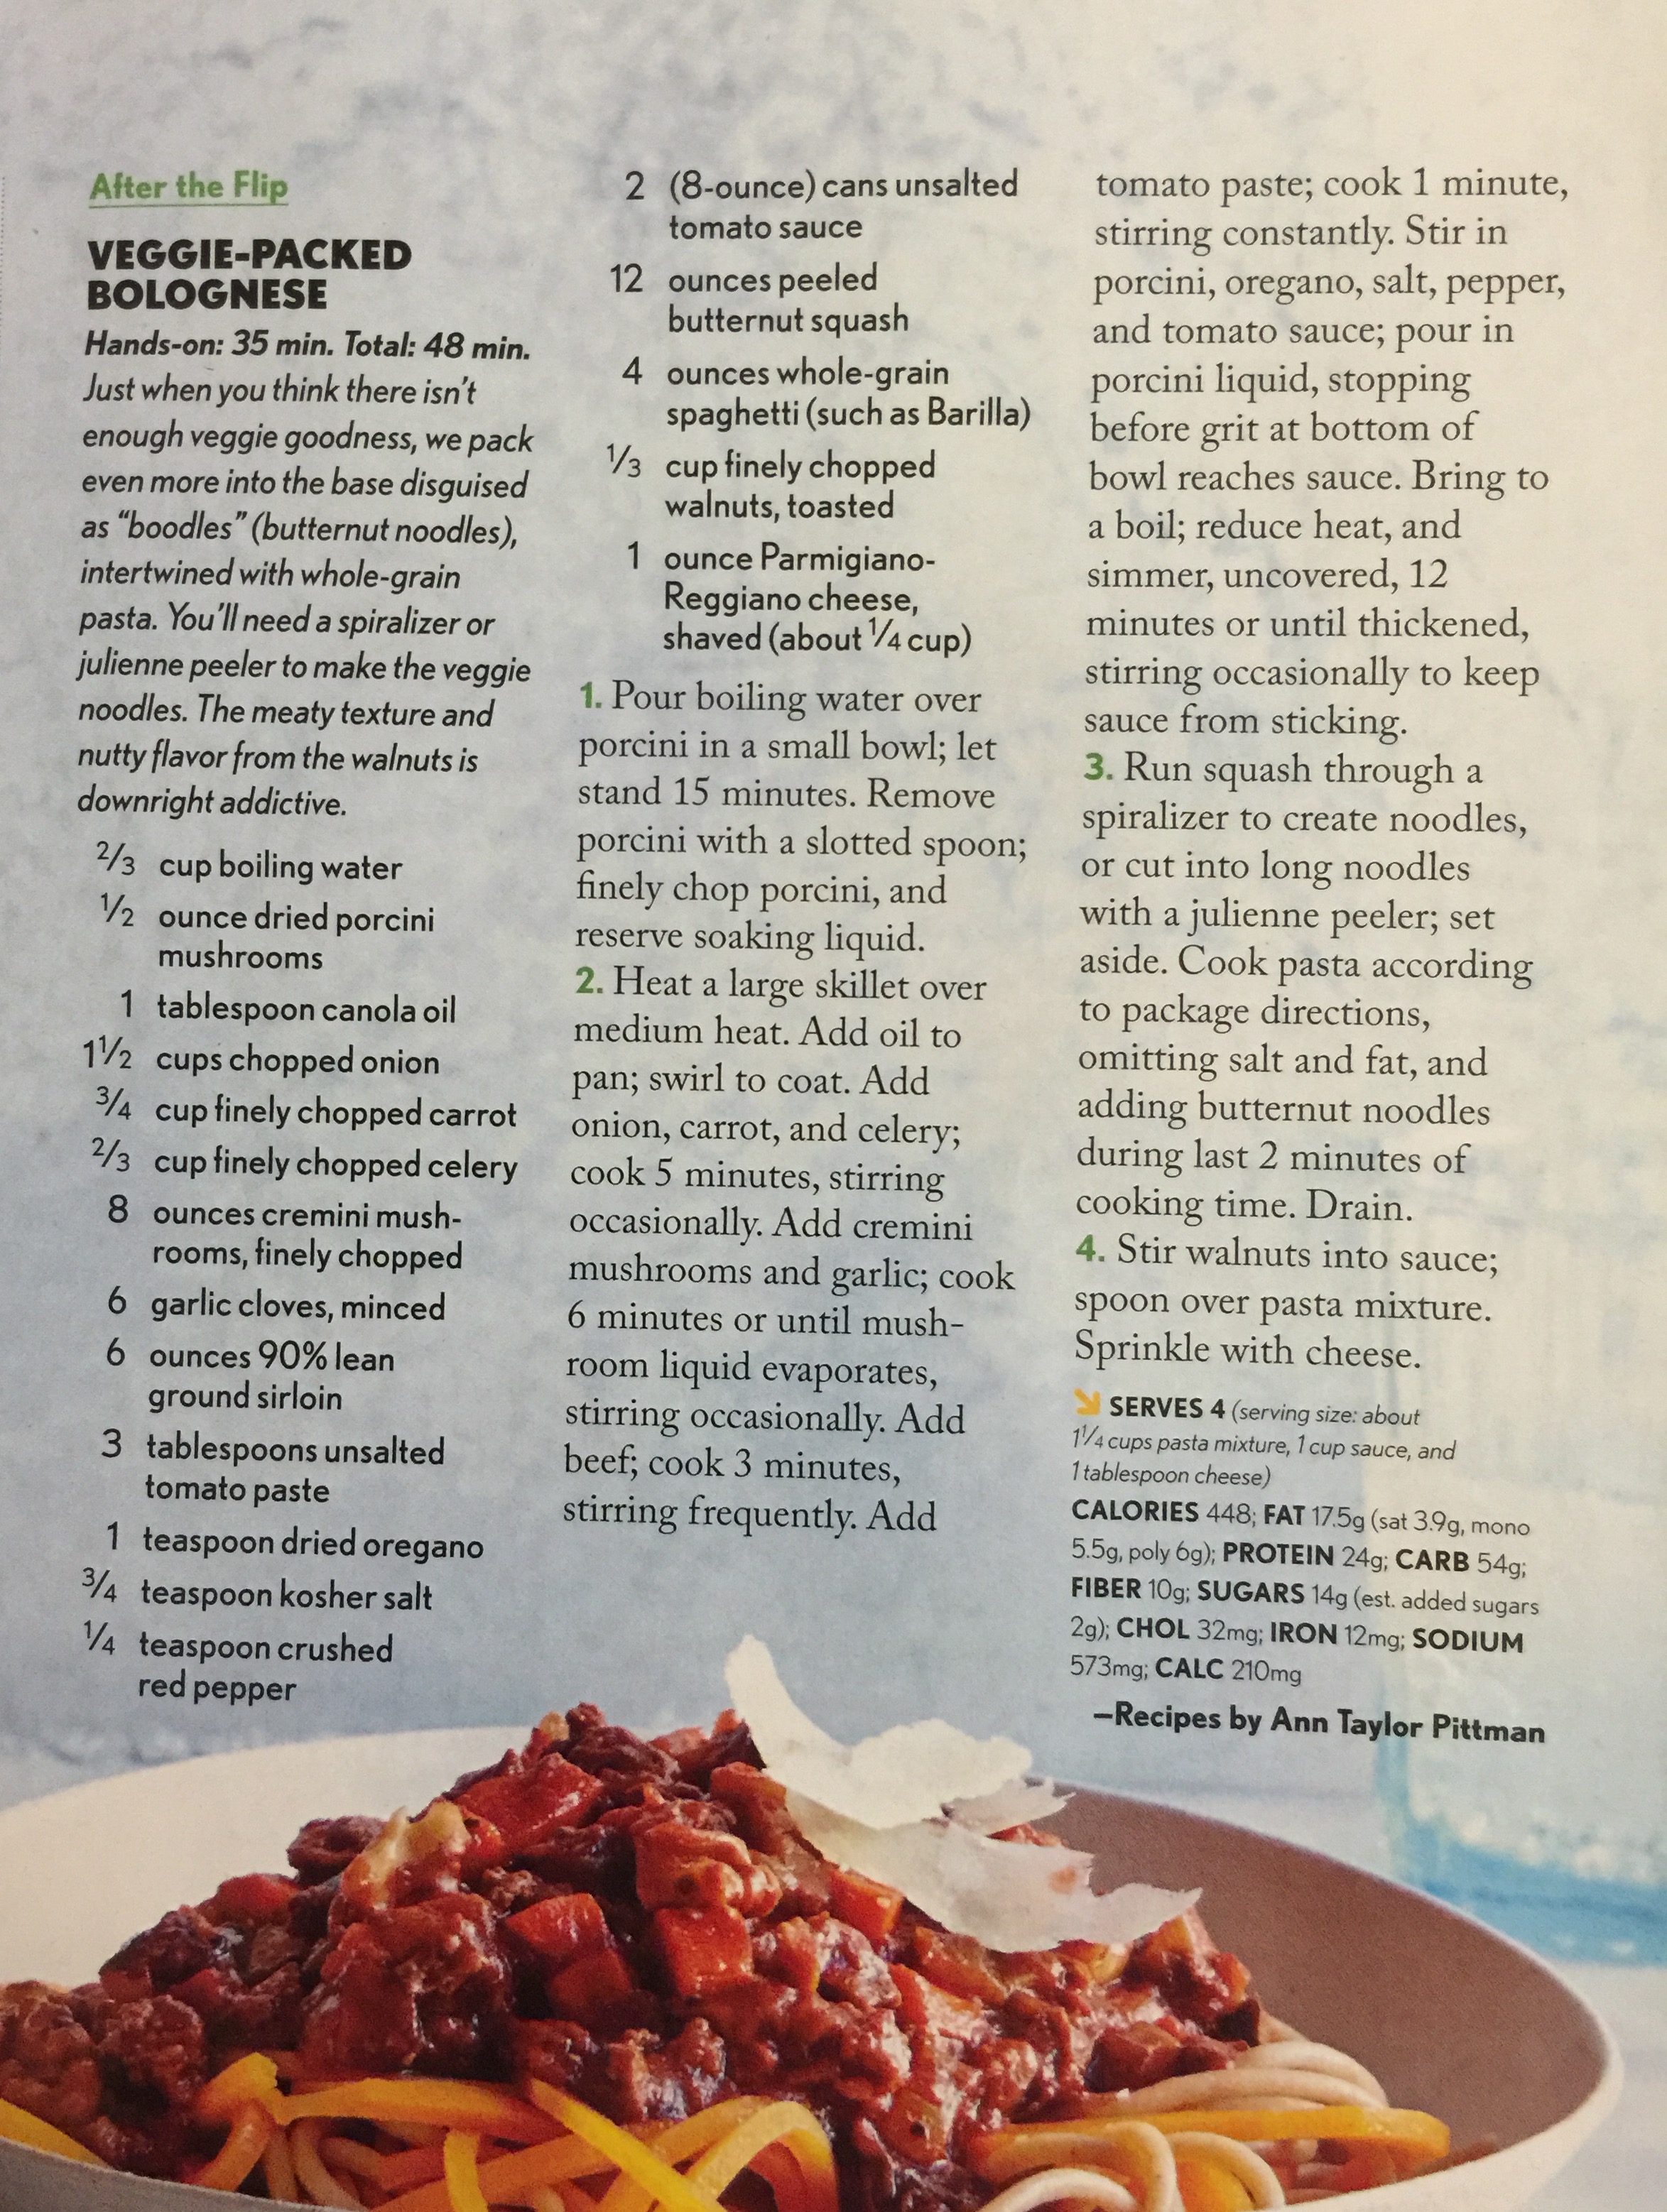
CLICK EITHER IMAGE FOR AN ENLARGEMENT


Basic Bolognese


CLICK IMAGE FOR AN ENLARGED AND CLEARER IMAGE.


Veggie Packed Bolognese


Grandpa’s Bolognese Sauce

  1. Heat 2 TBL EVOO in baking pot
  2. Add 1 grated onion
  3. … Salt, Bay leaves
  4. … Celery and julienne strips of carrots
  5. … Mix 1 LB your choice of raw ground meat with 1 cup white wine
  6. Add ground meat into pot
  7. Break it up, season and stir occasionally
  8. And a pinch of cinnamon
  9. After meat has browned add one large can crushed tomatoes
  10. Add equal parts tomato sauce and water to make it as soupy as you prefer
  11. Let simmer 30 minutes
  12. Cook fettuccine
  13. Strain lightly and put back into cooking pan
  14. Put into tablespoons butter, do not stir yet
  15. Put in as much sauce as you like
  16. Mix all together
  17. Place up and top with grated Parmesan cheese

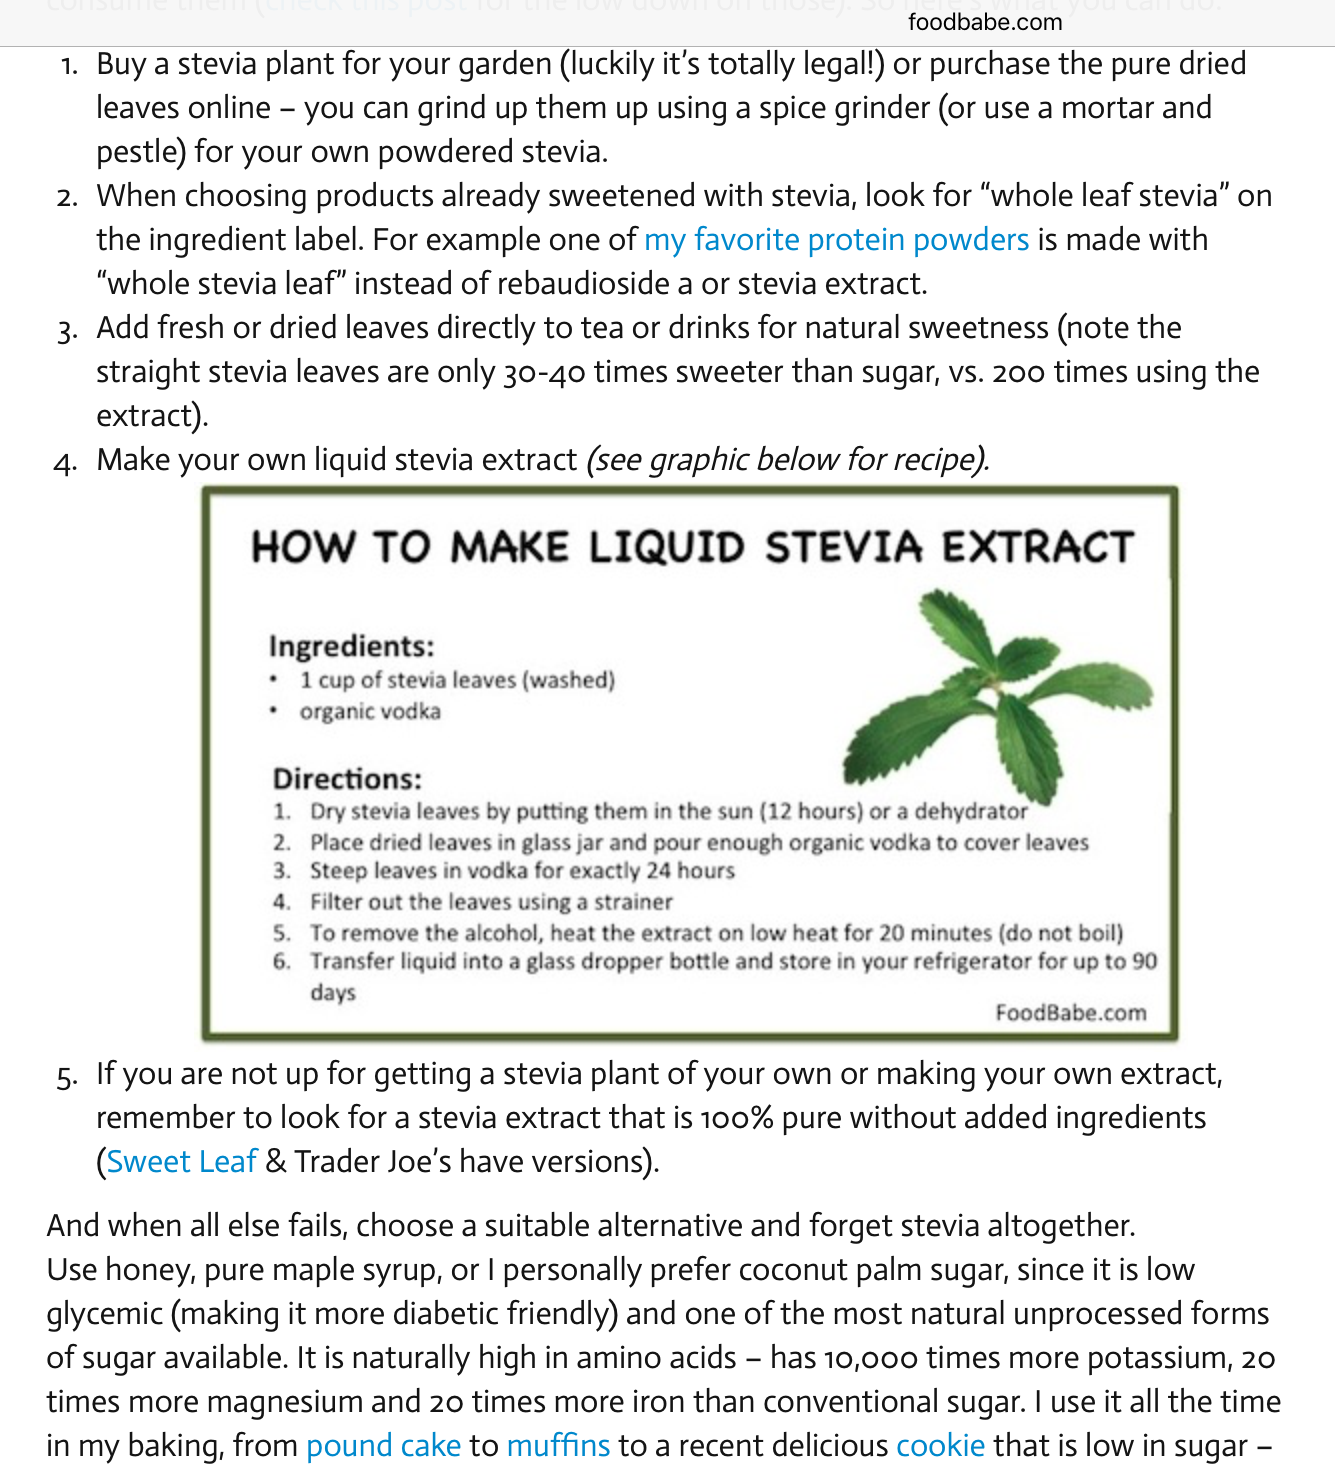
Make your own Stevia

From the FoodBabe.com –

Stevia is a sweetener made from a plant, so theoretically it should not be bad for you, but keep in mind that arsenic is made from apple seeds. Also, I would not want to eat poison ivy or hemlock, which are also plants, but alas I digress. The FDA has deemed stevia (after my lobbying) an acceptable artificial sweetener. That being said, I’ve decided to use it for myself. I eat much of my own food, and the result is I am starting to swell up like a tick. Yech! I need to lose weight. I bought some from Amazon.com to give it a try. After that is gone, perhaps I will try this method. Meanwhile, if you want to read more about stevia, you can read all about it on Wikipedia.

2015-11-20 08.41.01

Make your own Ricotta Cheese

Taste test on Am Test Kit shows BelGioioso Ricotta con Latte whole milk as the #1 winner, and Galbani Ricotta as the runner up.  Here are a few other recipes as well.

Ricotta should be velvety, luscious, and smooth and should NOT have curds in it like cottage cheese.  It should have a barely sweet taste.

Whole Milk Ricotta

INGREDIENTS

  • 1 1/2 quart whole milk . Organic is better . Homogenized and Pasteurized is OK . ULTRA Pasteurized is not OK
  • 1 pint heavy cream
  • 12± leaves of basil, thyme or cilantro – whole
    Separation Agents
  • 1/3 C lemon juice and 1/3 C vinegar  (or 1/2 C rennet)
  • After removed from heat:  1 tsp salt

STEP BY STEP

  1. Heat milk mixture on medium high until it simmers – about 150º
  2. Add 1 C heavy cream
  3. Lower heat and continue cooking until temperature hits 190º or higher.  Never ever more than 200º
  4. Add lemon and vinegar (or rennet) – preferably lemon
  5. Add whole basil leaves (not flakes) to the milk
  6. Stir to incorporate and simmer 3 more minutes
  7. Remove from heat
  8. Stir occasionally for the next 15 minutes.  This will precipitate out into milk solids
  9. Let rest for 5 – 10 minutes – Remove basil leaves
  10. Spoon into cheese cloth
  11. Use your best judgement: Let it drain until the whey has drained from the edge of the cheese, but the center is still very moist.  This will take AT LEAST 8 minutes.
  12. For a denser ricotta, let it drain until the center is also no longer wet (about 15 more minutes)
  13. (Alternate:  Refrigerate and drain 8-12 hours)
  14. Turn out into a bowl – a bit of residual whey is OK.
  15. Add salt and mix by hand – Add a touch of cream for a smoother consistency – Not too much though, you don’t want it to get runny.
  16. Let rest for at least 2 hours in the fridge before using
  17. Will keep for up to 7 days (covered) in the fridge
    • For a SWEET RICOTTA for desserts
  18. Mix in 1/2 C powdered sugar
  19. 1 tsp vanilla extract
  20. 2 tsp Cinna Sugar
    • To finish, and actually prepare your dessert . . .
  21. Heat up 1/4 C white sugar, 1/4 C brown sugar and 2-3 tsp lemon juice
  22. Bring up to a boil
  23. Add Strawberries and maple syrup
  24. Toss together and bring back to a simmer
  25. Remove from heat
  26. Put Sweet Ricotta onto brioche French toast
  27. and top with Strawberry mixture

The following two recipes are from CheeseMaking.com

Here are others:

Whey Ricotta

Ricotta is produced from a mixture of heat and acid. It can be made from whole or skim milk. Raw milk can be used when making Ricotta, since the heat treatment during curd formation more than meets heat requirements for pasteurization.

When made from a mixture of milk and whey it is called Ricotone.

Heat Whey & Add Salt

When making whey Ricotta, use leftover whey from a batch of cultured cheese. The fresher the whey the better.

Heat the whey, without agitating. Once it reaches 160°F, if desired, you can add 5-12% of fresh milk can be added to improve the richness and yield.

Continue heating to 170°F then add 1/2 tsp of salt for every gallon of whey, mix in quickly.

Continue heating without agitation to 185°F and hold at this temp until the ricotta rises.

Note: Some people heat to jsut below boiling (200F), this is not necessary, but it will not be a problem if the whey heats well into the 190’s.

Add Citric Adic

This step is optional

Mix 1/2 tsp. of citric acid per gallon of liquid. The citric acid should be dissolved in 1/2 cup water. Add quickly the pot and stir briskly for 5-10 seconds.

Watch the curd forming small flakes and gradually larger curd masses. Add a bit more more citric acid solution if necessary.

Note: If too much acid is added, the curds will sink to the bottom and the cheese will not be sweet. The correct amount of acid will produce a clear separation of white curds and bright green whey.

Gently Move Curd

As the curds rise, use a perforated ladle to gently move them from the sides to the center of the pot. These clumps of curd will begin to consolidate floating on top of the liquid.

Let the curds rest for 10-15 minutes. This is important because it is the point where the final Ricotta quality is assured.

Drain Ricotta

Ladle the curds gently into draining forms (No cheese cloth should be needed if you were patient in the previous step). Let the curds drain for 15 min up to several hours.

For a fresh light ricotta, drain it for a short while (until the free whey drainage slows) and chill to below 50F. For a rich, dense and buttery texture allow it to drain for an extended period of time (several hours). before chilling overnight

Move to a refrigerator or cold room. Consume within 10 days.

Another Whole Milk Ricotta


Prepare Citric Acid

Add 2 tsp of citric acid per gallon of milk used and dissolve this in 1 cup cool water.

Add 1/2 of the Citric Acid solution to one gallon of milk, save the rest of the citric acid.

Stir the milk briskly for 5-10 seconds.


Heat Milk

Add 1 tsp of salt to the milk then heat the milk slowly on low to med heat, stirring well to prevent scorching


Extra Citric Acid, if Needed

At 165-170F watch for small flakes forming in the milk and the separation into small flaky curds.

If after a few minutes you do not see the flakes forming, add more of the Citric acid until they form. Do this in 1 Tbsp increments, to avoid over acid milk.

At this point, when you see the curds, A slower stirring is essential to avoid breaking up the small bits of curd that have formed. Excess stirring will cause smaller and very granular curds to form. I tend to just roll the milk slowly with a bottom to top stirring motion.

Gently Move Curd

Continue heating to 190-195F then turn the heat off. The thermal mass of the whey will hold at this temp for quite some time. The higher temp is used here because of the additional proteins found in whole milk vs whey.

As the curds rise, use a perforated ladle to gently move them from the sides to the center of the pot. These clumps of curd will begin to consolidate floating on top of the liquid.

Let the curds rest for 10-15 minutes. This is important because it is the point where the final Ricotta quality is assured.

Drain Ricotta

Ladle the curds gently into draining forms. No cheese cloth should be needed if you were patient in the previous step. Let the curds drain for 15 min up to several hours.

For a fresh light ricotta, drain it for a short while, until the free whey drainage slows, and chill to below 50F. For a rich, dense and buttery texture allow it to drain for an extended period of time (several hours). before chilling overnight

Move to a refrigerator or cold room. Consume within 10 days

Christopher Collins Sweet Ricotta

  1. 2 C heavy whipping cream
  2. 2 C whole milk
  3. Heat until it reaches 200º
  4. 1/4 white vinegar
  5. 1/4 lemon juice
  6. 1 tsp salt
  7. Heat until they start to separate
  8. Ladle through a fine strainer – Keep the solids and discard the whey
  9. Put into a fridge overnight to continue to drain (12 hours)
  10. Mix 1 C powdered sugar, 1 TBL vanilla, and 1 tsp nutmeg
    • In a separate pot
  11. Heat 1/2 C white sugar
  12. 1/2 C Brown sugar
  13. 2 TBL Lemon juice
  14. Bring to a boil and dissolve
  15. Add in 4 C pieced strawberries
  16. Add 1/4 C maple syrup
  17. Heat at a low simmer for 45 minutes
    • Plate the brioche
  18. Toast slices of brioche bread
  19. Put a large dollop of ricotta on the bread
  20. Top with Strawberry preserves


Roberto’s Flour Tortillas – Use for Burritos

INGREDIENTS

  • 3 CU flour (optional – substitute 1/2 CU wheat flour)
  • 1/2 CU Crisco
  • 1 CU hot water
  • 1 tsp salt
  • 1 tsp garlic or onion powder (Optional)

STEP BY STEP

  1. Pulse all dry ingredients in a food processor
  2. Cut Crisco into flour mixture and pulse
  3. With processor running, add 1/2 C water all at once, then drizzle in more water until the dough comes together.
  4. Knead and mix adding additional water if necessary to make “play dough” consistency.  You “shouldn’t” need this step.
  5. Pinch off balls about the size of a tennis ball
  6. Cover with damp towel, and let stand 15 minutes to let moisture spread throughout ball
  7. Meanwhile, cut out squares of waxed paper to prevent sticking of flattened tortillas after stacked.
  8. Spread dough out into flat round circles on lightly floured surface
  9. Roll flat turning 90º each time
  10. Cook on non-greased cast iron griddle at 350 degrees, 30 seconds on each side
  11. Wrap in plastic, and store in the fridge for up to four days.

Special Steps
Variations Amounts for just two tortillas:

  • 3/4 CU flour
  • 2 TBL Crisco
  • scant salt
  • 1/4 warm water

Tips: Frying Food

Before we begin…

  1. Very little oil gets absorbed if done properly.
  2. Frying in cast iron increases potential to go rancid.
  3. Dutch oven is good fry vessel because it is heavy and holds the heat
  4. Unless you plan to do a LOT of frying, don’t invest in a dedicated fryer
  5. Have an ABC fire extinguisher on hand (and a lid)
  6. Spider strainer is good for removing fried foods
  7. You will also need a good pair of metal long-reach tongs – no plastic
  8. Try to get pieces to uniform size
  9. Since temperature is critical, a candy thermometer is important – about 315-365º depending on what you are frying.  DO NOT DEVIATE from fry recipe temperatures.  Do not go above 365 or your oil will go rancid.
  10. You need a wire rack so that things won’t get soggy after being removed from the fryer
  11. Canola oil and Peanut oil both have a high smoke point
  12. Fry in small batches because the temperature will change when you put things into it.
  13. Season when your fried food is still hot
  14. When you are done, let it cool before you do anything. Don’t save oil when you fry strong flavors such as fish. Then strain it into a glass jar. Use for up to three times, but then discard. Do not mix new oil with reused oil.
  15. Food to be fried should be patted dry with a towel, or spun in a salad spinner.  Any amount of water will create spatter risks.
  16. Fry in small batches to maintain temperature of oil
  17. Initial sizzle is steam being forced out.   When steam is going out, oil can’t go in.  When steam stops, oil is absorbed, so remove as soon as sizzle stops.

Ingredients to feed 4 people

BASIC FRY MARINATE (4-24 hours)

  • 1 Pieced chicken
  • 1 C Buttermilk
  • 1/4 C cayenne sauce
  • 3 eggs

BASIC FRY DREDGE

  • 1 tsp Salt
  • 1 tsp Garlic powder
  • 1/2 tsp Black pepper
  • 2 CU AP flour
  • 1 TBL baking powder
  • 1 tsp salt
  • 1/4 tsp cayenne pepper
BASIC FRY BATTER

  • 1 C Buttermilk
  • 1/4 C cayenne sauce
  • 3 eggs
  • 1 tsp Salt
  • 1 tsp Garlic powder
  • 1/2 tsp Black pepper
  • 2 CU AP flour
  • 1 TBL baking powder
  • 1 tsp salt
  • 1/4 tsp cayenne pepper
  • enough cold beer to thin your batter

Oh, one more thing…

  • Saturated Fats are BAD.  Althought they have a long shelf life, they are bad for your health.
    (eg) Butter, beef tallow, lard, palm oil. Saturated fats are solid at room temperature
  • Mono Unsaturated Fats are : BETTER for you.  They have a shorter shelf life
    (eg)  Olive oil, nut oils like almond, walnut and hazlenul – Low smoke point.
  • Poly Unsaturated Fats are actually GOOD for you.  They have a short shelf life, so keep refrigerated
    (eg) Canola, peanut, safflower and grapeseed oil. Mild flavor. High smoke point.
  • FRENCH FRY TIP FOR CHICKEN:   Fry twice…
    First for 2-3 minutes to cook, then drain on rack and cool then another 2-3 minutes for final fry to crispen
    Put on drain rack and season, then pop in oven at 200 degrees for 10 minutes

This is a recipe that has been created or modified by Robert (Grandpa) Andrews.
CLICK HERE for a free sample copies of Grandpa's Cookbooks. © 2016, 2017, 2018.

Graham Cracker Crust

Ingredients

  • 1.5 cups graham crackers (20 rolled fine)
  • 1/4 C almond meal (or corn meal)
  • 1 egg white
  • ¼ cup sugar
  • ¼ cup softened butter (do not melt)

Step by Step

  1. Preheat oven to 400 degrees
  2. Thoroughly blend dry ingredient
  3. Add softened butter or margarine.
  4. Combine wet and dry ingredients mixing quickly to moisten
  5. Press firmly into an even layer against bottom and sides of a 9 inch pie plate.
  6. Bake empty crust at 375° for 8-10 minutes.
  7. Cool before filling with your favorite pudding which you have prepared according to package directions.

Pastry Dough

You can use a pastry cutter, but it is easier to use your food processor.  Just make sure you do not overprocess your dough, or it will be tough.

INGREDIENTS

  • 4 CU flour
  • 1/4 CU granulated sugar
  • 1/4 CU dark brown sugar
  • Juice and zest from one lemon
  • 1 stick butter (cold) pieces
  • 1 tsp salt
  • 1 egg plus 1 yolk
  • Pulse above together, then add ice cold water
    Pulse only long enough to bring dough ball together

STEP BY STEP

  1. Cut all ingredients together or pulse in food processor
  2. Add water with food processor running only to incorporate – DO NOT OVERPROCESS
  3. Wrap dough in plastic, and refrigerate for 30-60 minutes
    Freezes well too.
  4. Roll dough flat, but not too thin, then transfer to pie pan or parchment paper.  Roll onto your rolling pin to transfer to keep it from breaking apart.
  5. Dock crust so that dough doesn’t puff up
  6. Sprinkle lightly with a bit more brown sugar
  7. Cover with foil, and bake at 375° for 20 minutes
  8. Remove foil and bake 5 more minutes

NOTES

  • Fill with savory or sweet filling.
  • If you are making a rustic free-form tart, put fruit in just after step four
HTML Snippets Powered By : XYZScripts.com