Tips: Equivalents – COLLECTION

See also: SUBSTITUTIONS

Milk conversions and substitutions

Use this link for different types of MILK CONVERSIONS.


Chemicals

  • Citric Acid Powder – 1/4 tsp – You can substitute 1 TBL bottled lemon juice – Cannot substitute Ascorbic Acid
  • Lemon Juice – 1 TBL – You can substitute 1/4 tsp citric acid powder – Cannot substitute Ascorbic Acid
  • Ascorbic Acid – You can substitute lemon juice or citric acid powder, but not the other way around

Liquid Measurements / Volume

  • 1 Gallon = 4 QT = 8 PT = 16 C =128 OZ = 3.8 L
  • 1 QT = 2 PT = 4 C = 32 OZ = .95 L = 950 ml
  • 1 PT = 2 C = 16 OZ = 480 ml
  • 1 C = 8 OZ = 240 ml
  • 1 OZ = 30 ml = 28.5 gm
  • 100 ml = 3.4 OZ = 1/2 C minus 1 TBL
  • 250 ml = 1 C plus 2 TBL
  • 1 IMPERIAL Gallon = 1.2 US Gallons = 4.5 L

Dry Measurements

  • 16 TBL = 1 C
  • 1/3 C = 5 TBL + 1 tsp
  • 4 TBL = 1/4 C = 12 tsp = 2 OZ = 60 ml
  • 2 TBL = 1 FL OZ = 30 ml
  • 1 TBL = 3 tsp = 1/2 FL OZ = 15 ml
  • 1 tsp = 5 ml = 1 CC

Weight / Mass

  • 1 OZ = 28.4 gm
  • 1 KG = 2.2 LB =
  • 1 LB = .45 KG
  • 100 gm = 3.5 OZ
  • 250 gm = 8.8 OZ

Temperature

  • Degrees Celsius to Fahrenheit :: Multiply by 1.8 (or 9/5) and add 32º
  • Fahrenheit to Celsius :: Subtract 32º and multiply by 0.55 (or 5/9)
  • Fry temperature = 350º – 370º F :: Lower than 350 your food will be greasy.  Above 370º and it will burn.
  • Burnt Sugar = 350º F = 177º C – Becomes bitter
  • Brown Sugar – Liquid Caramel = 338º – 350º F
  • Clear Liquid Sugar Concentrate (Karo) = 320º – 335º F
    – High Fructose Corn Syrup – The chemical chain is not good for us, but tastes REALLY good.
  • Hard Crack Stage = 300º – 310º F (eg) Hard Tack, Lollipops
  • Soft Crack Stage = 270º – 290º F (eg) Taffy
  • Hard Ball Stage = 250º – 265º F (eg) Gummy Bears
  • Firm Ball Stage = 245º – 250º F (eg) Caramels
  • Soft Ball Stage = 235º – 240º F (eg) Fudge
  • Thread Stage = 230º – 235º F
  • Jams and Jellies = 220º – 225º F
  • 212º F = 100º C – Steam – has more kinetic energy than the water – will cause severe and more painful burning.  Will have the same effect as 230º liquid.
  • 212º F = 100º C – Hot water – will cause burning
  • 162º F – Skin will be destroyed on contact – scarring will occur
  • 131º F – Second degree burning will occur
  • 125º F = 52º C – Painful burning will occur
  • 108º F = 42º C – Hottest bath that is marginally safe
  • 98.6º F = 37º C
  • 68º F = 20º C
  • 32º F = 0º C
  • -40º F = -40º C – Not useful, but interesting!
  • -109º F = -78º C = Temperature of Dry Ice – Causes tissue damage in 5 seconds
  • ABSOLUTE ZERO = –273.15° C = –459.67° F

For Speed and Length Conversions CLICK HERE.

Tips: Non-Stick Skillets

This includes teflon, ceramic, and all surfaces that claim to be non-stick.

Please also review my post:  Care of your Cast Iron Skillets

Teflon Tips

Teflon, Ceramic and other non-stick finishes need to be taken care of.  Here are some tips that you may find useful.

  1. Wash and rub a little canola oil into it before first use.
  2. Don’t heat the pan empty.  At least put a little oil into the pan.
  3. Don’t use cooking spray.  There is a propellant that will build up and destroy your pan.  If you must, get a spritzer bottle and put canola into it.
  4. Don’t let the temperature EVER exceed 450.  Ideally, I never even exceed 400º  This Thermapen is one of the best investments you could make.  You will use it nearly every single day.
  5. Don’t let food dry on the surface of your pan.  When the temperature has dropped to 250º (or below) wipe it off with a wash cloth and hot water.  I usually don’t even like to use soap on mine.
  6. If you can’t clean it immediately, at least fill it with water to minimize the chemical effects of the remaining cooking oil residue.
  7. If you do use soap on your pan, occasionally wipe in a little canola oil  (See Tip #1)
  8. Never ever EVER use abrasive cleansers or pads on your pan.
  9. Never put your teflon or ceramics into the dishwasher.  The hot water is OK, but the drying cycle will kill your pan.
  10. For stubborn stains, use a mixture of baking soda and water.  mix and apply the paste.  Leave for an hour, then wipe off.  Repeat if needed.
  11. If your pan has a wooden handle, season it VERY occasionally by wiping with canola oil
  12. Season a hot pan (250º) occasionally with a paper towel and olive oil (See Tip #1)
  13. Never use metal cookware (spatula, whisk, spoon, etc) when cooking with your non-stick pan

THE PENNY TRICK – If you are boiling water, put a penny in the bottom of your pan.  If it boils dry (which will ruin your pan) the penny will start to rattle because of the boiling water beneath the penny.  The rattling will tell you your pan is nearly empty (usually) before your pot is destroyed.

Tips: Peppers

  • Before working with peppers, coat your hands with just a bit of olive oil.  This will protect your skin, and then you can just wash your glove off afterwards
  • The seeds and vein contain most of the heat in a pepper
  • Most of the seeds will be near the stem
  • Green jalapeños will turn red if left on the vine
  • Green bell peppers are just unripe red bell peppers
  • Hatch chilies have the best flavor out of many similar peppers
  • A pepper gets “hotter” if it is stressed during growth
  • A dried pepper should still be slightly pliable
  • When cutting a bell pepper, use the outsides and keep the core intact.  It will stay fresh for 3 days longer.


Tips: Frozen or Canned Food

Most food is flash frozen at the peak of ripeness.

Berries – These have a very short season, so frozen is the best way to get ripe strawberries, blueberries, raspberries 10 months out of the year.  Thaw them overnight in the refrigerator.

Spinach – Greens freeze very well.  You can thaw these in the fridge overnight, or place them in a bowl of water for 30 minutes.  Leaf for leaf, frozen spinach costs quite a bit less than fresh as well.

Tomatoes – These don’t freeze well so should be canned, or bought canned or sun dried and placed in oil.

Vegetables – Frozen peas are much better frozen than canned.  They are frozen at the peak of ripeness.  The canning process can tend to make them mushy.  Thaw them overnight in the fridge in a bowl of water.

Lemon juice – Don’t buy that plastic lemon shaped container, or even the green bottles of juice.  Squeeze lemons yourself and then freeze in water bottles.  Thaw in the refrigerator.  There may be some separation of the juice and the pulp, so shake before using it.

Grapes – These don’t freeze or can well.  Raisins can be rehydrated overnight in water.

Broccoli – This does not freeze well.  It becomes mushy.  It is marginally OK to use in a stir fry, but fresh is so much better.

Salmon – Of course it is better fresh, but it is also very expensive.  Canned salmon is not THAT bad, and is about a fifth of the price of fresh.  If budget is no matter, go fresh.  For most of us canned salmon is good enough for most of what we do.

Steam Juicer

Thanks to Living HomeGrown for some tips and feedback on using my steam juicer.

I’ve used my steam juicer for my soft fruits such as grapes, raspberries, etc. We last a huge branch of our lime tree last night, so today will be trying this on citrus (yet untested) and I am not sure how well it will work. I know the zest juice will be viable, but am not sure about the lime juice itself.

If all of the water evaporates, you can damage your juicer, so a trick that I use is to put two pennies in the bottom of the pan. They will start to rattle when the water gets low and steam forms underneath the pennies.

Tips: Tuna

  • A sashimi knife called a yanagi-bocho or yanagi knife is sharpened only on one side.  This allows you to slice the sashimi with minimal bruising or mashing.
  • Tosha Soy is generall used for sashimi dipping.  You can make an acceptable substitute using soy + sake + mirin + bonito flakes.  Boil the mixture, then cool, then strain.
  • Create a carrot wave, but slicing a carrot very thin, then wrapping it around a chop stick.  Immerse it in ice water for 5 seconds, and the form will stay in place.
  • NOTE:  White tuna – Kanpachi or Amberjack – is a heartier fish and will hold up better for many recipes, but it does not offer the presentation that RED tuna offers.
  • A typical recipe for Amberjack is to carve very thin slices on the bias, and then skewer them with a thin lemon medallion.
  • When cutting tuna, let the knife do the work and be patient.  DO NOT push the knife through the meat, but rather let the moving knife gently slice through the meat.
  • Put your finger on top of your carving knife to stabilize it and keep it from moving from side to side.
  • Start your slicing movement before you even touch the surface of the fish.
  •  

Tips: Dietary Water

In these dog days of summer here in Phoenix, where the temperature frequently peeks over the high side of 120º it is important to stay hydrated.  Dietary Water is more beneficial than just drinking tap water, as it gives your body nutrients that tap water does not offer.  Here are some choices that you can eat, or put into a blender.

  • Watermelon
  • Cucumber
  • Mint
  • Cantaloupe
  • each
  • Pineapple
  • Honeydew
  • Plums
  • Orange
  • Lemon
  • Lime
  • Berries
  • Mango
  • Pineapple
  • Mint leaves, by themselves, offer little water, but help flavor the above items when blended as a beverage
  • Gatorade – While not exactly natural, Gatorade helps your body retain its electrolytes.  Just don’t drink more than a couple, or it will put your whole body chemistry off balance.

It is also helpful to use EVOO rather than butter through these hot months.

You can also create a cooling device that will help lower your temperature for about thirty minutes.

  1. Take a sock and fill it with dry rice, lentils or dried beans.
  2. Sew up the open end and put it into the freezer.
  3. On the nights where it is too hot to fall asleep, put this cool sock under your neck or along side of your Adam’s apple to help your body cool down.

Tips: Gardening

  • Store your seed packets in a photo album for easy review and retrieval.
  • Bake crushed egg shells at 350º for 20 minute to kill bacteria, then spread across your soil to slice the underbelly of snails.
  • For those that you like, put a canning jar lid full of beer.  They will drink themselves to death.
  • Use Acrylic or Oil paints to create informal arts plant ID rocks
  • Not the artsy type, use plastic forks and a Sharpie to create plant markers
  • Coffee grounds in your soil helps repel pests AND fertilizes your garden.
  • Soak your seeds for 24 hours to give them a germination jump start
  • Put colored bottles around your garden for a bit of whimsey
  • Use a shipping palate to create a vertical garden
  • A rain gutter makes a garden trough along the top of your fence.  Use spaghetti tubing for irrigation
  • A gauze strip will wick water into your house plants while you are on an extended vacation
  • Use a toilet paper roll as a seedling pot
  • Create a water bottle sprinkler using duct tape and your garden hose
  • Use cinnamon as a rooting compound to repel fungus.

Tips: Substitutions

See also EQUIVALENTS

Why Substitute?

  • Emergency:  If you don’t have a needed ingredient, there are usually options.
  • Health Related:  Eliminating peanuts, for example :: Most allergies are with milk, egg, peanuts,  shellfish, soy, wheat
  • Creative:  Tarragon rather than oregano, for example

Allspice

1 teaspoon = 1/2 teaspoon cinnamon + 1/2 teaspoon ground cloves

Apple Pie Spice

1 teaspoon = 1/2 teaspoon cinnamon + 1/4 teaspoon nutmeg + 1/8 teaspoon cardamom

Baking Powder

•  Single Acting:  1 teaspoon = 1/4 teaspoon baking soda + 5/8 teaspoon cream of tartar – 1/2 tsp of cornstarch if you are not using it right away
Confectioner sugar ?!?
•  Double Acting:  Releases gas twice – Hard to do in the home

Baking Soda

There is NO substitute for baking soda

Basil

Substitute peas

Bread Wheat Flour

Xanthan Gum – Helps do the task that gluten does

Other gluten-free wheat flour substitutes are garbanzo beans, teff, sorghum and quinoa flours

Butter

•  Replace half the amount of butter in your recipe with applesauce; if the recipe calls for one cup of butter, use half a cup of butter and half a cup of applesauce. If you don’t mind a denser, more moist bread, replace all the butter with applesauce to cut even more calories and fat.
•  Use Greek yogurt cup for cup to replace all or part of your butter
•  Canola oil can be used in place of melted butter.

Buttermilk

1 cup = 1 tablespoon lemon juice or vinegar plus enough regular milk to make 1 cup (allow to stand 5 minutes in the fridge)

Chili Sauce

1 cup = 1 cup tomato sauce, 1/4 cup brown sugar, 2 tablespoons vinegar, 1/4 teaspoon cinnamon, dash of ground cloves and dash of allspice

Chocolate, Unsweetened

1 ounce = 3 tablespoons cocoa plus 1 tablespoon butter or regular margarine or vegetable oil

Cornstarch (for thickening)

1 tablespoon = 2 tablespoons flour
You must cook longer than you would with cornstarch.

Cream

•  1 C = 1/3 cup melted unsalted butter + 3/4 cup milk.
•  1 C = 1/3 cup melted unsalted butter + 3/4 cup low-fat milk + 1 TBL flour or cornstarch.
•  1 C = 1 cup skim milk + 2 TBL cornstarch.
•  1 C = 1/6 cup melted butter + 7/8 cup half-and-half.

Egg:  1 whole egg

•  1 egg = 1/4 cup egg substitute
•  3 TBL powdered flax

Mayonnaise

1/2 C = One egg yolk to 1/2 cup of oil. Plus 1 tsp Dijon and salt

Miso

Soybean allergy: 

Parmesan – from Italy

Substitute American Parmesan if mixed

Peanut Butter

Substitute cashew butter,

Pine Nuts

Substitute walnuts

Sugar, Confectioners’ or Powdered

1 cup = 1 cup granulated sugar plus 1 tablespoon cornstarch; process in a food processor using the metal blade attachment until it’s well blended and powdery.

Tahini

Ground up sesame seeds

Tomato Juice

1 cup = 1/2 cup tomato sauce plus 1/2 cup water

Wine, Red

Any amount = The same amount of grape juice or cranberry juice

Wine, White

Any amount = The same amount of apple juice or white grape juice

Tips: Terminology

  • Temperature
    • Low heat: 225°F to 249° F – (107°C to 120°C)
      – Boiling, simmering, poaching
      – Unrefined canola oil
    • Medium low heat: 250°F to 324°F – (121°C to 162°C)
      – Slow cooking, stews, stocks, reductions
      – Unrefined corn oil
    • Medium heat: 325°F to 374° – (162°C to 190°C)
      – Gentle cooking temperature, also for finishing food started at high heat
      – Extra virgin olive oil and butter – Low temperature frying
    • Medium high heat: 375° to 449°F – (190°C to 232°C)
      – Pan fry and quicker general cooking of foods
      – Refined canola oil – High temperature frying
    • High heat: 450°to 650°F – (232°C to 343°C)
      – Saute, sear, Wok stir fry
      – Refined sunflower and peanut oil – Very high temperature quick frying
  • Braise
  • Sauteé
  • Sear

Good Housekeeping has quite a comprehensive dictionary of cooking terminology.


TERMINOLOGY

  • TEMPER – If you combing your egss and hot liquid all at once, you will cook some of your eggs, resulting in lumps. To temper your eggs and liquid together means that you take just a little tiny bit of your hot liquid and whisk it into your eggs, then a bit more, then a bit more. Once they are combined, about 50/50 you can mix the entire thing together.
  • CLARIFIED BUTTER – Melt butter slowly, and the milk solids will settle on the bottom. Pour off the clear oil, leaving (and discarding) the milk solids.
  • ZEST – Use a microplane and shave off the colored part of an orange, lime or lemon. Try not to get the pith.
  • MICROPLANE – Essentially the same as a file, but this is for food. You SHAVE off tiny pieces of citrus, nutmeg, etc and use it as part of your flavoring.
  • PITH – The white part of citrus that is just under the colored skin. Usually very bitter.


Tips: Steaks (Beef)

See also Tips: Burgers and Tips: Steaks and Cow Parts

Buying your Meat

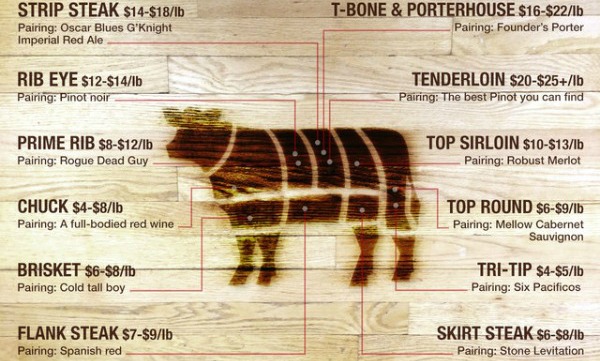
  • Don’t skimp on buying a steak.  You would spend $40 on a really good steak at a restaurant, consider spending nearly that much on a quality piece of meat with good marbling.  See the chart below from Food Beast for price ranges of different cuts of meat.
  • Buy an aged steak.  More developed flavor.  Better yet, buy a nice cut and dry age it yourself.  Put on a rack and salt both sides.  Put in the refrigerator for 48 hours uncovered.
  • The ONLY time you should press down on your steak is when it is first put on the grill.  Put the “serving side” onto the heat first, then press it down to get maximum contact.  Don’t press down again after you flip it.
  • Consider buying and cooking one thick steak (2 inches is a nice thickness) to serve multiple people.  The overall quality will be better.
  • Bone in cuts of meat will generally have a more complex flavor.

Prepping your Meat for Cooking

  • Searing your Meat:
    • Get a good sear on your meat.  Sear means flavor and appearance will be enhanced.
    • Tie your meat up with a string around the perimeter to hold and shape your meat.
    • Steaks must come up to room temperature before you start to cook it (30-60 minutes)
    • Salt your meat liberally.
    • Salt it the night before, and refrigerate it overnight
    • Dry Age Your Meat:  Place on a wire cooling rack in the refrigerator for 24-36 hours before cooking.  This will allow the moisture to be removed from the surface of the meat.  If you are marinating your meat, just be sure to press it VERY dry before searing.
    • Before searing, add pepper
    • Sear at medium-high (about 400º) for about two minutes per side on a cast iron skillet.  Sear the presentation side first.  Sear even the sides of a thick steak.

Cooking your Meat

  • GENERALLY SPEAKING thin cuts of meat will cook quickly over high heat, while thicker cuts will cook slowly over low or medium heat.
  • When grilling a steak, consider a 2-3 inch thick Rib-eye on the bone steak. This will feed 4-6 people.  Take bone off before serving.  Cut against the grain in thick slices – about 3/4 inch.
  • Cook all FOUR sides on the hot side of the grill, then move to the indirect side of the grill and cook until internal temperature is 125º
  • Start over high heat.
  • Try to get steak to medium rare throughout the entire steak.  About 250º for six hours or until internal temp is about 120º
  • Rest for ten minutes before cutting
  • I consider two thermometers critical for any serious chef, even if they will remain an amateur chef for their entire life.  I purchased both of mine at ThermoWorks.
    • The first is an internal temperature Instant Read ThermaPen.  It is about $80 but I have had mine for about ten years.  It needs a new battery about every three years.
    • This one is less expensive, but I find that I use it more than the internal probe.  I usually use it for seeing if my skillet is up to heat, but it is also good to see if the blacktop will burn the paws of my dog.  It’s also a lot of fun to play with at night.  It is an Industrial Infrared Thermometer and is about $50.
    • If you can only buy one, buy the Infrared Thermometer.
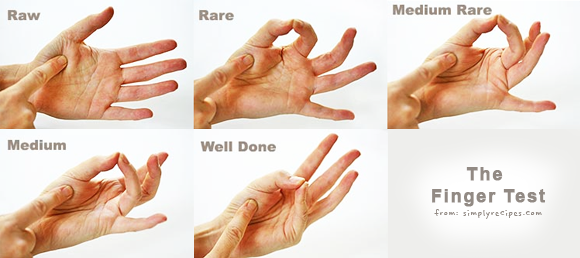
    • If you ABSOLUTELY can’t afford to buy one, here is a way that you can test your meat reasonably well.  Use the finger test.  This wonderful photo is from WattaLyf.

finger-test


cow-breakdown

This graphic is from Food Beast

Click for an enlargement.

Notes about cuts of meat

  • Boneless Rib Eye-more fat, more flavor
  • Ribeye – more marbling and more flavor
  • Filet Mignon – very tender, but not as much flavor
  • Porterhouse-filet
  • Del Moneo – no filet
  • Tenderloin-most tender
  • Sirloin-good for grill
  • London Broil-top round
  • Flank Steak-marinate 24 hrs & grill – Fairly lean and needs fat
  • Brisket-first cut-slow cooker
  • Brisket-second cut-fat-hamburger
  • Top Round-good for oven roast @ 350
  • Bottom Round-pot roast-slow cooker
  • Skirt steak – outside chest toward ground – thougher
  • Hanger steak – behind skirt steak – much more tender

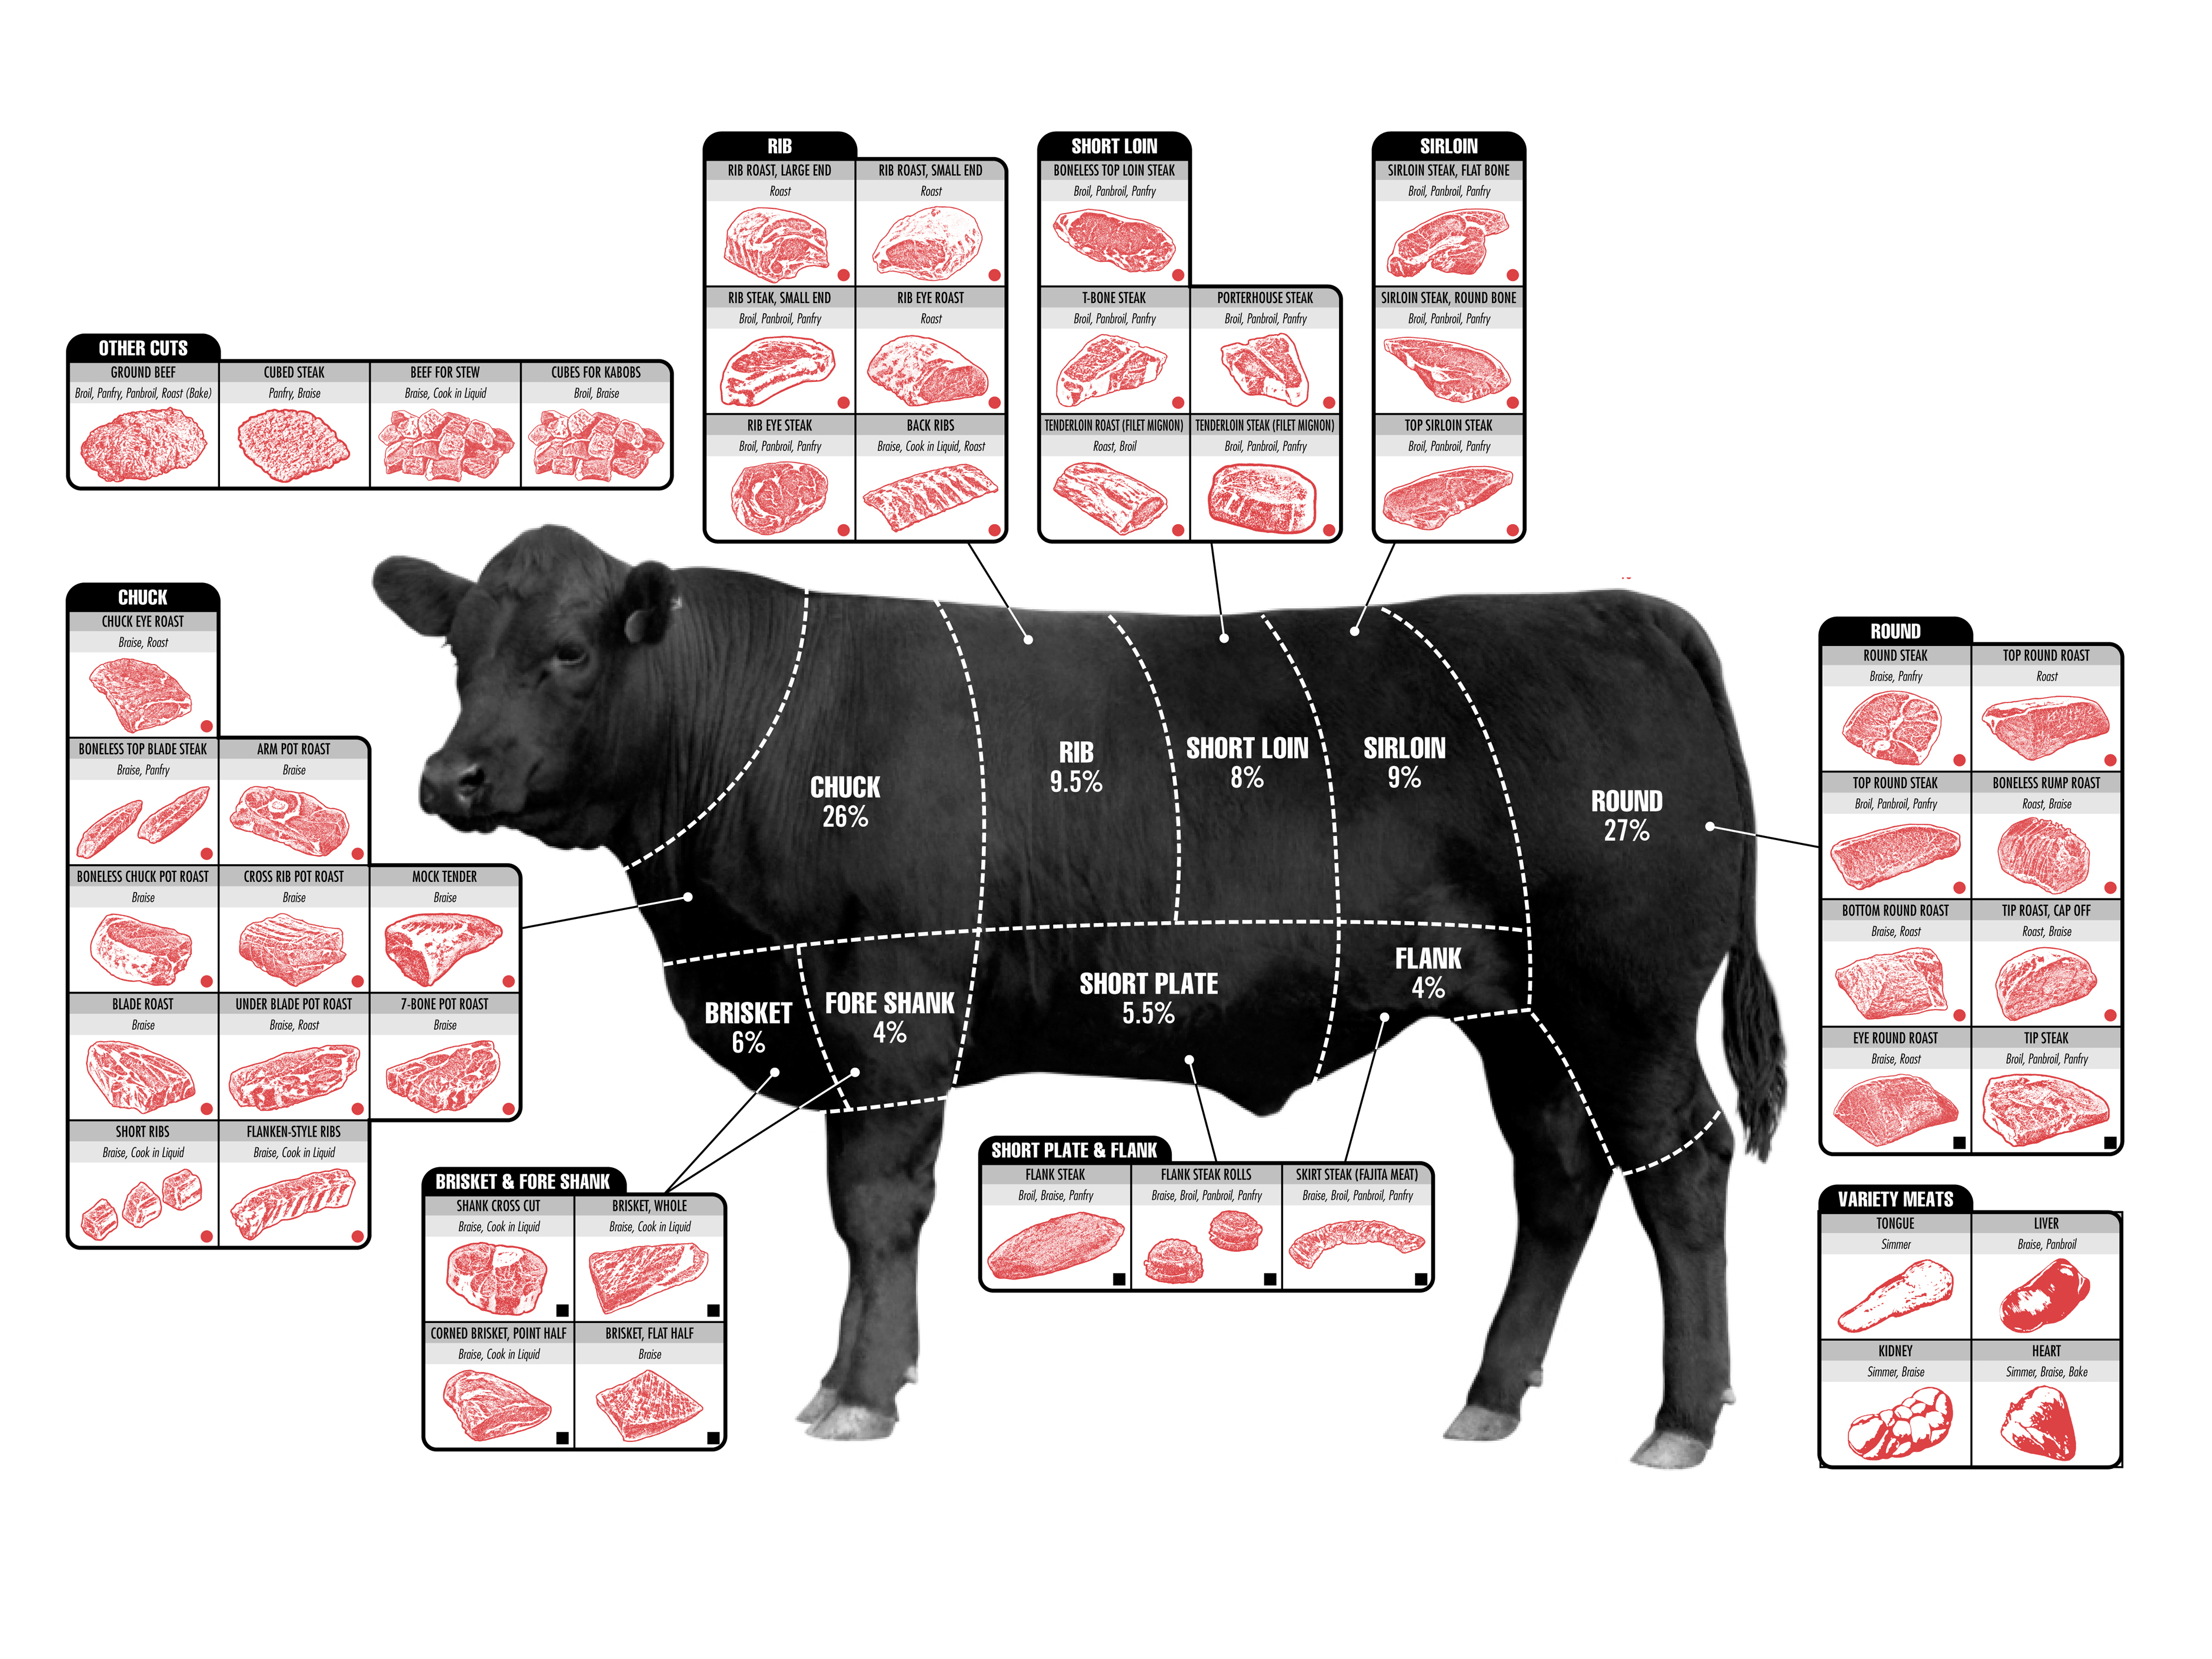
Here is another good chart.  Click to read the details.

cuts-of-beef

Tips: Avocado

Purchasing Your Avocado

  • When selecting an avocado, if you are planning on eating it right away, get one from which the stem falls off easily, but is still somewhat green underneath.  If the underneath has turned brown they are overripe.  If the stem does not come off, it is good to sit on your counter for a few days until it ripens.
  • If you can only find an unripe avocado you can have it ripe by tomorrow if you place it in a bag with a banana and let is rest for 24 hours.  The gas produced by bananas ripen produce.  Because of this, don’t store bananas with your fruit if you don’t want them ripened.

Peeling, Slicing and Dicing Your Avocado

  • Halve the avocado. You may have seen people hack the seed with their knife. Be very careful if you do this, because it is very easy to get your finger too.
  • I prefer to slightly squeeze the avocado, and the seed will nearly pop out.
  • You can score the avocado right in the skin, then just scoop it out with a spoon. Here is a video by Expert Village.
  • If you are making a lot of guacamole, after you halve the avocado, press it through a bread drying rack that has metal struts going both directions creating a grid. Just press the avocado through this into a bowl.
  • You can also scrape an avocado against the side of a glass. Here is a video by Crazy Russian Hacker.

Misc Avocado Information

  • I am from Ohio. Back east avocados are called mangoes. Bell peppers are also called mangoes. Here in Arizona mangoes are called mangoes, avocados and called avocados and bell peppers are called bell peppers.


Tips: Potluck Safety

Keeping Hot Food Hot

  • If you have a casserole, you can keep it hot by wrapping it in a couple of bath towels.  If it is something that might spill, use a towel that will not be ruined by a stain.
  • If you have a crock pot or hot plate that will need to be plugged in, it is YOUR responsibility to bring an extension cord, not your hosts.  A heads-up ahead of time would be considerate as well.

Keeping Cold Food Cold

  • You can create a double boiler cooler by putting ice in the bottom of a large baking pot, and then putting a steel dish on top of it.  It is even better if you can put a lid over top.
  • You can also simply place your item in a tray of ice.
  • Wrapping up your item in a towel with an ice pack works, almost as well as bringing your item in a cooler.
  • The benefit of the first two items is that they will stay cold even on the serving table.

Spoilage

  • This is the greatest fear of potluck attendees.  If you have something that used mayo, eggs or some other easily spoil-able ingredient, for God’s sake be sure to take adequate precautions.

Sharing

  • If you are a beer drinker, don’t bring a six-pack just for yourself – bring a case to share.
  • Bring enough food to share.  Don’t bring a half pint of potato salad and fill up your plate three times.

Food Choices

  • This is not the place to experiment.  Forget about your spicy chicken lips.  Stick with something that is a tried and true favorite.
  • People tend to bring meaty dishes to share.  Consider bringing a vegetable plate.
  • If you bring soup, don’t expect the host to have bowls and spoons.  Part of your contribution includes utensils that are probably not otherwise available.

Left Overs

  • It is a nice gesture to leave food behind, but it is actually not the norm.  Usually people will “help clear up” and take the food home with them.  Each situation can be evaluated on a case-by-case basis.  Here are three examples that happened to us:
    • Amy is on a diet, but LOVES to cook and bake.  She made cookies and a trifle and brought them to our potluck.  She left them behind so she would not eat them and ruin her diet.
    • Tim is a single guy who brought baked chicken and fried chicken.  Only half of it was eaten.  I asked him “Would it be OK to combine them into one box.”  This gave him the opportunity to say “Oh, you just keep them all.”  His reply was “That would make it much easier for me.  Thanks.”
    • Tina brought a 48 pack of misc chips.  She put it under the table saying that she would bring it out if it was needed.  She then ate and left early, taking the chips with her.  This was just tacky.

Social Etiquette

  • A potluck, by definition, is a party to which each guest brings something to share.  An entree, a salad, a desert, or some other part of the meal.  Condiments do not count as a contribution.
  • You can, however, ask the host if you should bring a dish to share, or it if would be more helpful to bring a couple stacks of paper plates and some cups.  You should, however, coordinate this substitution with the host.
  • If you are told that you don’t have to bring anything, this is technically a dinner party, not a potluck.  It is still common courtesy to bring something.  A potted plant, a bottle of wine, or a loaf of bread.
  • Hosts: Don’t ask that guests bring a pot to share, plus a couple of bottles of wine to share.  It is OK to ask people to bring whatever they want to drink, but don’t be stingy about it.
  • Rather than being the first in line, as the food starts to come out, ask your host if there is anything you can do to help.  You won’t starve to death if you don’t get up to the buffet table in the first fifteen minutes.
  • If the host asks you to bring something for which you are known, try your best to accommodate their request.  If you can’t, let them know ahead of time.
  • Do not criticize food that you feel is below par.  The person that prepared the dish could be sitting right next to you.
  • Don’t pig out just because you can.  This is a social dining experience, not preparation before a fast.
  • Don’t bring something that will require additional cooking time without informing the host of your requirements far ahead of time.  They may have alternate plans for their stove.
  • Wait for everyone to have firsts, before you go back for seconds.  Frequently the host will not even get a chance to eat.
  • After everyone has finished eating, ask if you can help clean up – or just start carrying some of the dishes into the kitchen, following the example of your host.
  • Host: Be sure to return all of the CLEANED dishes brought to your potluck.  Make a note somewhere of what belongs to whom so you can be sure to return them.
  • If you can’t follow these simple rules and behave, just offer a reasonable reason you cannot attend and stay home.

Tips: Life Hacks

Tips are coming soon.  For now, you can BROWSE HERE.


Links to Third Party Sites

More Hacks

  1. Chip bag – no bowl – bit a hole in the face of the bag and tear a spiral until you have a bowl
  2. No charcoal? chips work here too. Light and use a a substitute for charcoal. Finishes quickly though.
  3. Corn chips are more along the lines of petro chemicals, so if you need something to start a fire on your camping trip, try Doritos.
  4. Sterilize your sponges by putting a damp sponge into the microwave for two minutes
  5. CD Case – Use for transporting bagels
  6. Website for using leftovers – www.MyFridgeFood.com
  7. Repair scratches on a table:
    – Rub with a walnut – get all of the oils into the crack
    – Rub the oils in with your finger
    – Clean with a soft cloth
  8. Elevator – Easter Egg – Close and your floor at the same time – Straight up
  9. Nervous – Chew gum – Body has nothing to fear or wouldn’t be eating
  10. Use a dab of honey for pimples or a cut. Use toothpaste for a bee sting.
  11. Slow sink ? Use a toilet plunger
  12. When buying a used car, NEVER pay the asking price on a car lot.  Have a price in mind, but start at about 20% lower than what they are asking.  Find a couple of flaws, or some things you don’t like about the car.  Also, carry cash to the lot, and they will start foaming at the mouth.  Don’t be afraid to walk away – also don’t fall prey to their guilt trips.
  13. Coffee Filters – Use for pinch pots or splatter guard in microwave
  14. Lock screen on phone or iPad – “if found, please return to”
  15. V to keep waxed paper or saran wrap roll in dispenser
  16. Bagel freshener – wrap in wet paper towel and microwave 15 seconds
  17. Juice bottle for power failure – See tip and picture this website
  18. Book: How to Rebuild the world from scratch by Lewis Dartnell
  19. Separating eggs: Put all eggs into a bowl, then use a water bottle.  Squeeze, touch yolk, release.
  20. Dicing an avocado for guacamole:  Halve the avocado and remove the pit.  Push into a cross hatch bread rack.
  21. Cutting a Kiwi: Halve the kiwi and scoop out meat with a soup spoon.
  22. Pitting a strawberry: Use a (firm) soda straw.  Push through the tip and shove up to the leaves.
  23. Peeling Garlic:  Cut the entire head around the “equator” and put them both face down.  Smack it with your cleaver.
  24. Use a spice grinder to make your own rice flour or bean flour
  25. Cut a hole in the plastic top of your spaghetti storage container to get the right amount every time.
  26. Dip your hot skillet bottom into batter for a perfectly formed crepe
  27. Place a wooden spook across your pot to prevent boil-overs
  28. Use binder clips to help keep cables organized
  29. Fix wobbly furniture by gluing a penny to the bottom of one of the legs
  30. Eat your hamburger upside down.  The tops are more durable.
  31. Use a n emptied chap stick tube to hold your emergency money
  32. Use a needle nosed pliers to hold your nail to get it started
  33. To help clean your microwave, boil 1 C water for 5 minutes.  The steam loosens everything.
  34. Use a can opener to cut open some ridged plastic packaging
  35. \

Tips: Pizzas

Preparing your Dough

  • Many pizza places will sell you a ball of their dough for a couple of bucks.
  • Alternately, you can get oven-ready dough at the supermarket
  • It is not too difficult to make your own dough.  CLICK HERE for several of my recipes
  • Here is my good friend, Steve, that owns Grande Pizza PREPARING HIS DOUGH for an overnight rise.
  • Albert Grande shows you a basic dough recipe and some of the proper techniques WITH THIS VIDEO.
  • Dough that is risen without sugar will take longer, but will have a more fully developed flavor

Flattening your Pizza

  • A rolling pin may seem like a good idea, but it squeezes many of the air pockets out of the dough.  Your pizza will taste more like cardboard
  • Use your finger tips and palms to flatten your pizza
  • Turn it (flip it) often during the flattening

Toppings

  • Sauce is a good thing, but too much will give you a soggy crust.  Serve your pizza with a sauce side for dipping instead.
  • I have a lot of recipes for RED SAUCE and for MARINARA.  I really like pizza!
  • Put onions and pepperoni on the top so they fully cook
  • Generally speaking, try to hold your pizzas to about five toppings (not counting sauce or cheese)

napolitana


Baking

  • Pizzas should be cooked at high heat fairly quickly.  500º for 12 minutes is pretty good for the home oven.
  • Use a baking stone if you have one.  Bring it up to temperature with your oven.  Never put a cold baking stone in a hot oven – it will crack.
  • Never use soap to wash your baking stone.

Reheating

  • Use a baking stone for reheating your left-over pizza.  The microwave will make it kind of soggy.
  • No baking stone?  Put it on a cooling rack and slide that into your oven.  Put a pan under the cooling rack to catch drips.
  • Grandma and I both like different toppings, so we get an extra large cheese pizza and keep it as a base for later toppings.
  • To reheat, we bake at 400º for 8-10 minutes.


HTML Snippets Powered By : XYZScripts.com