Tips: Cow Parts – Dissection

CLICK HERE for cuts from other animals


See also Tips: Burgers and Tips: Steaks and Cow Parts
Meat Grades
• Longue ?
• Sterling . Restaurant Quality . More expensive than Prime, but worth it.
• Prime . Omaha Steaks . Very expensive . Best for home chefs . Lots of marbling . About $3 more than choice
• Private – Might just be Fry’s Foods
• Choice . Most common . Fairly inexpensive, fairly tasty
• Select . Little marbling . Stay away except for stews, etc.

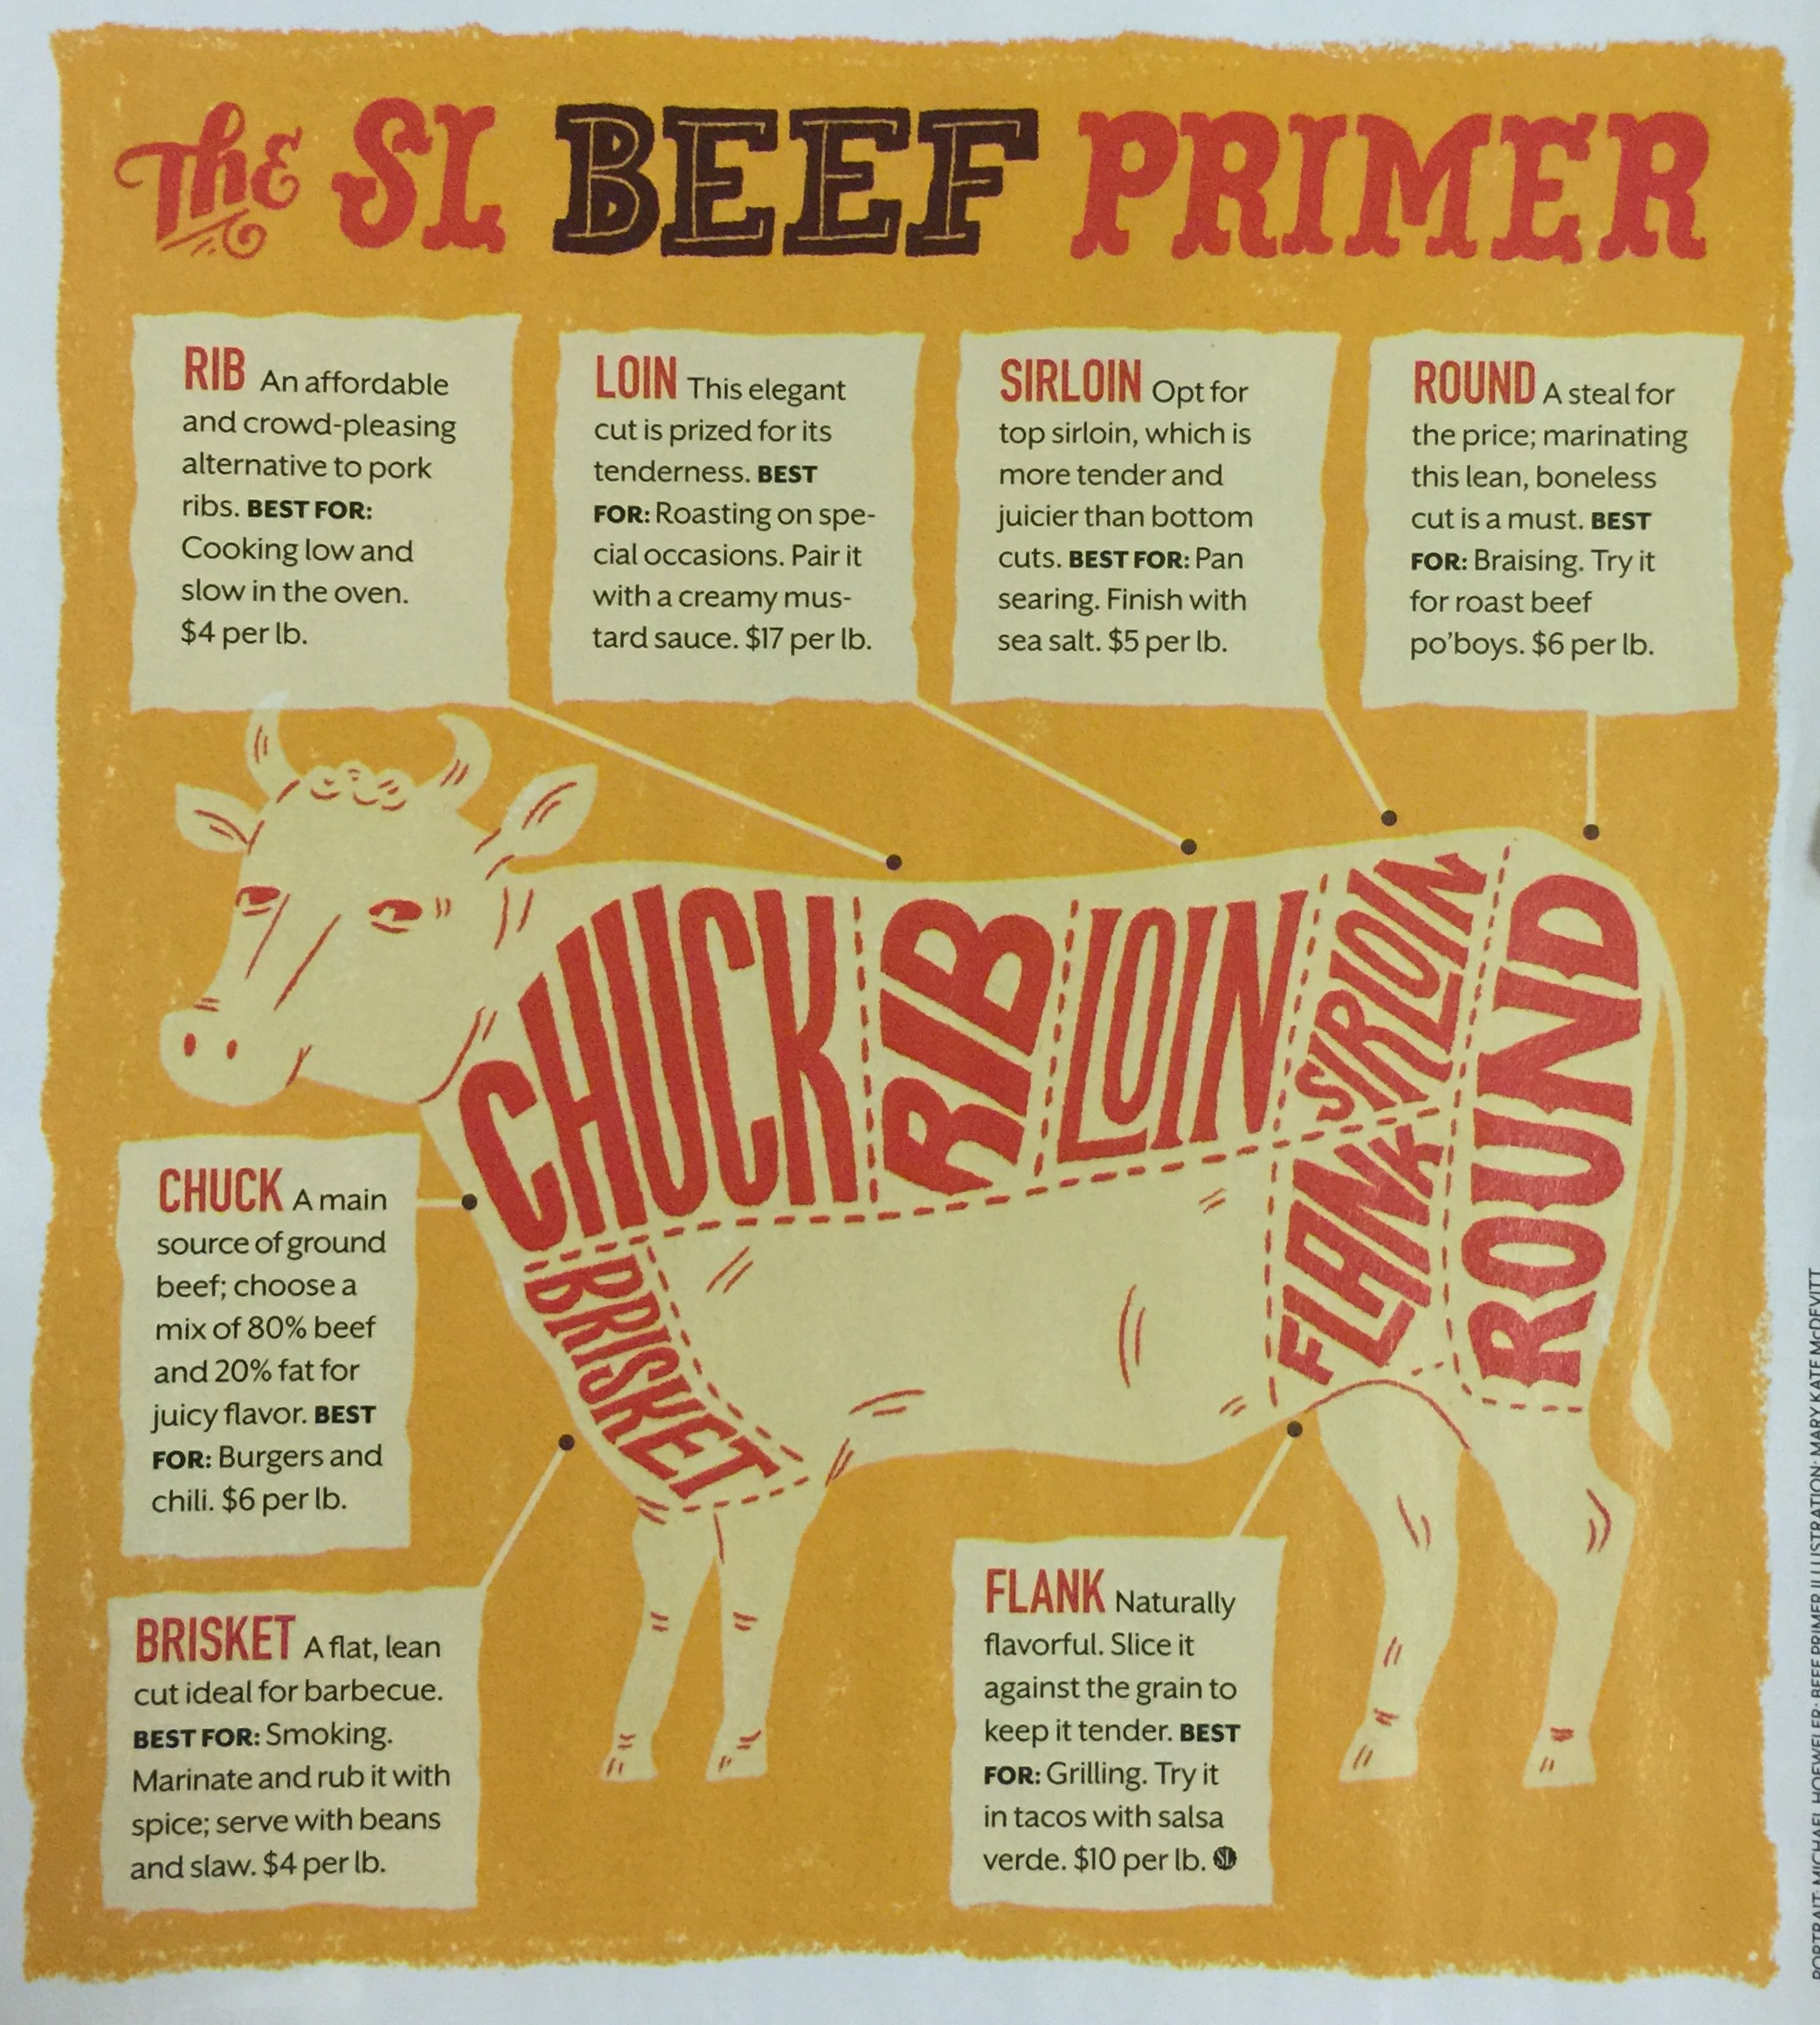
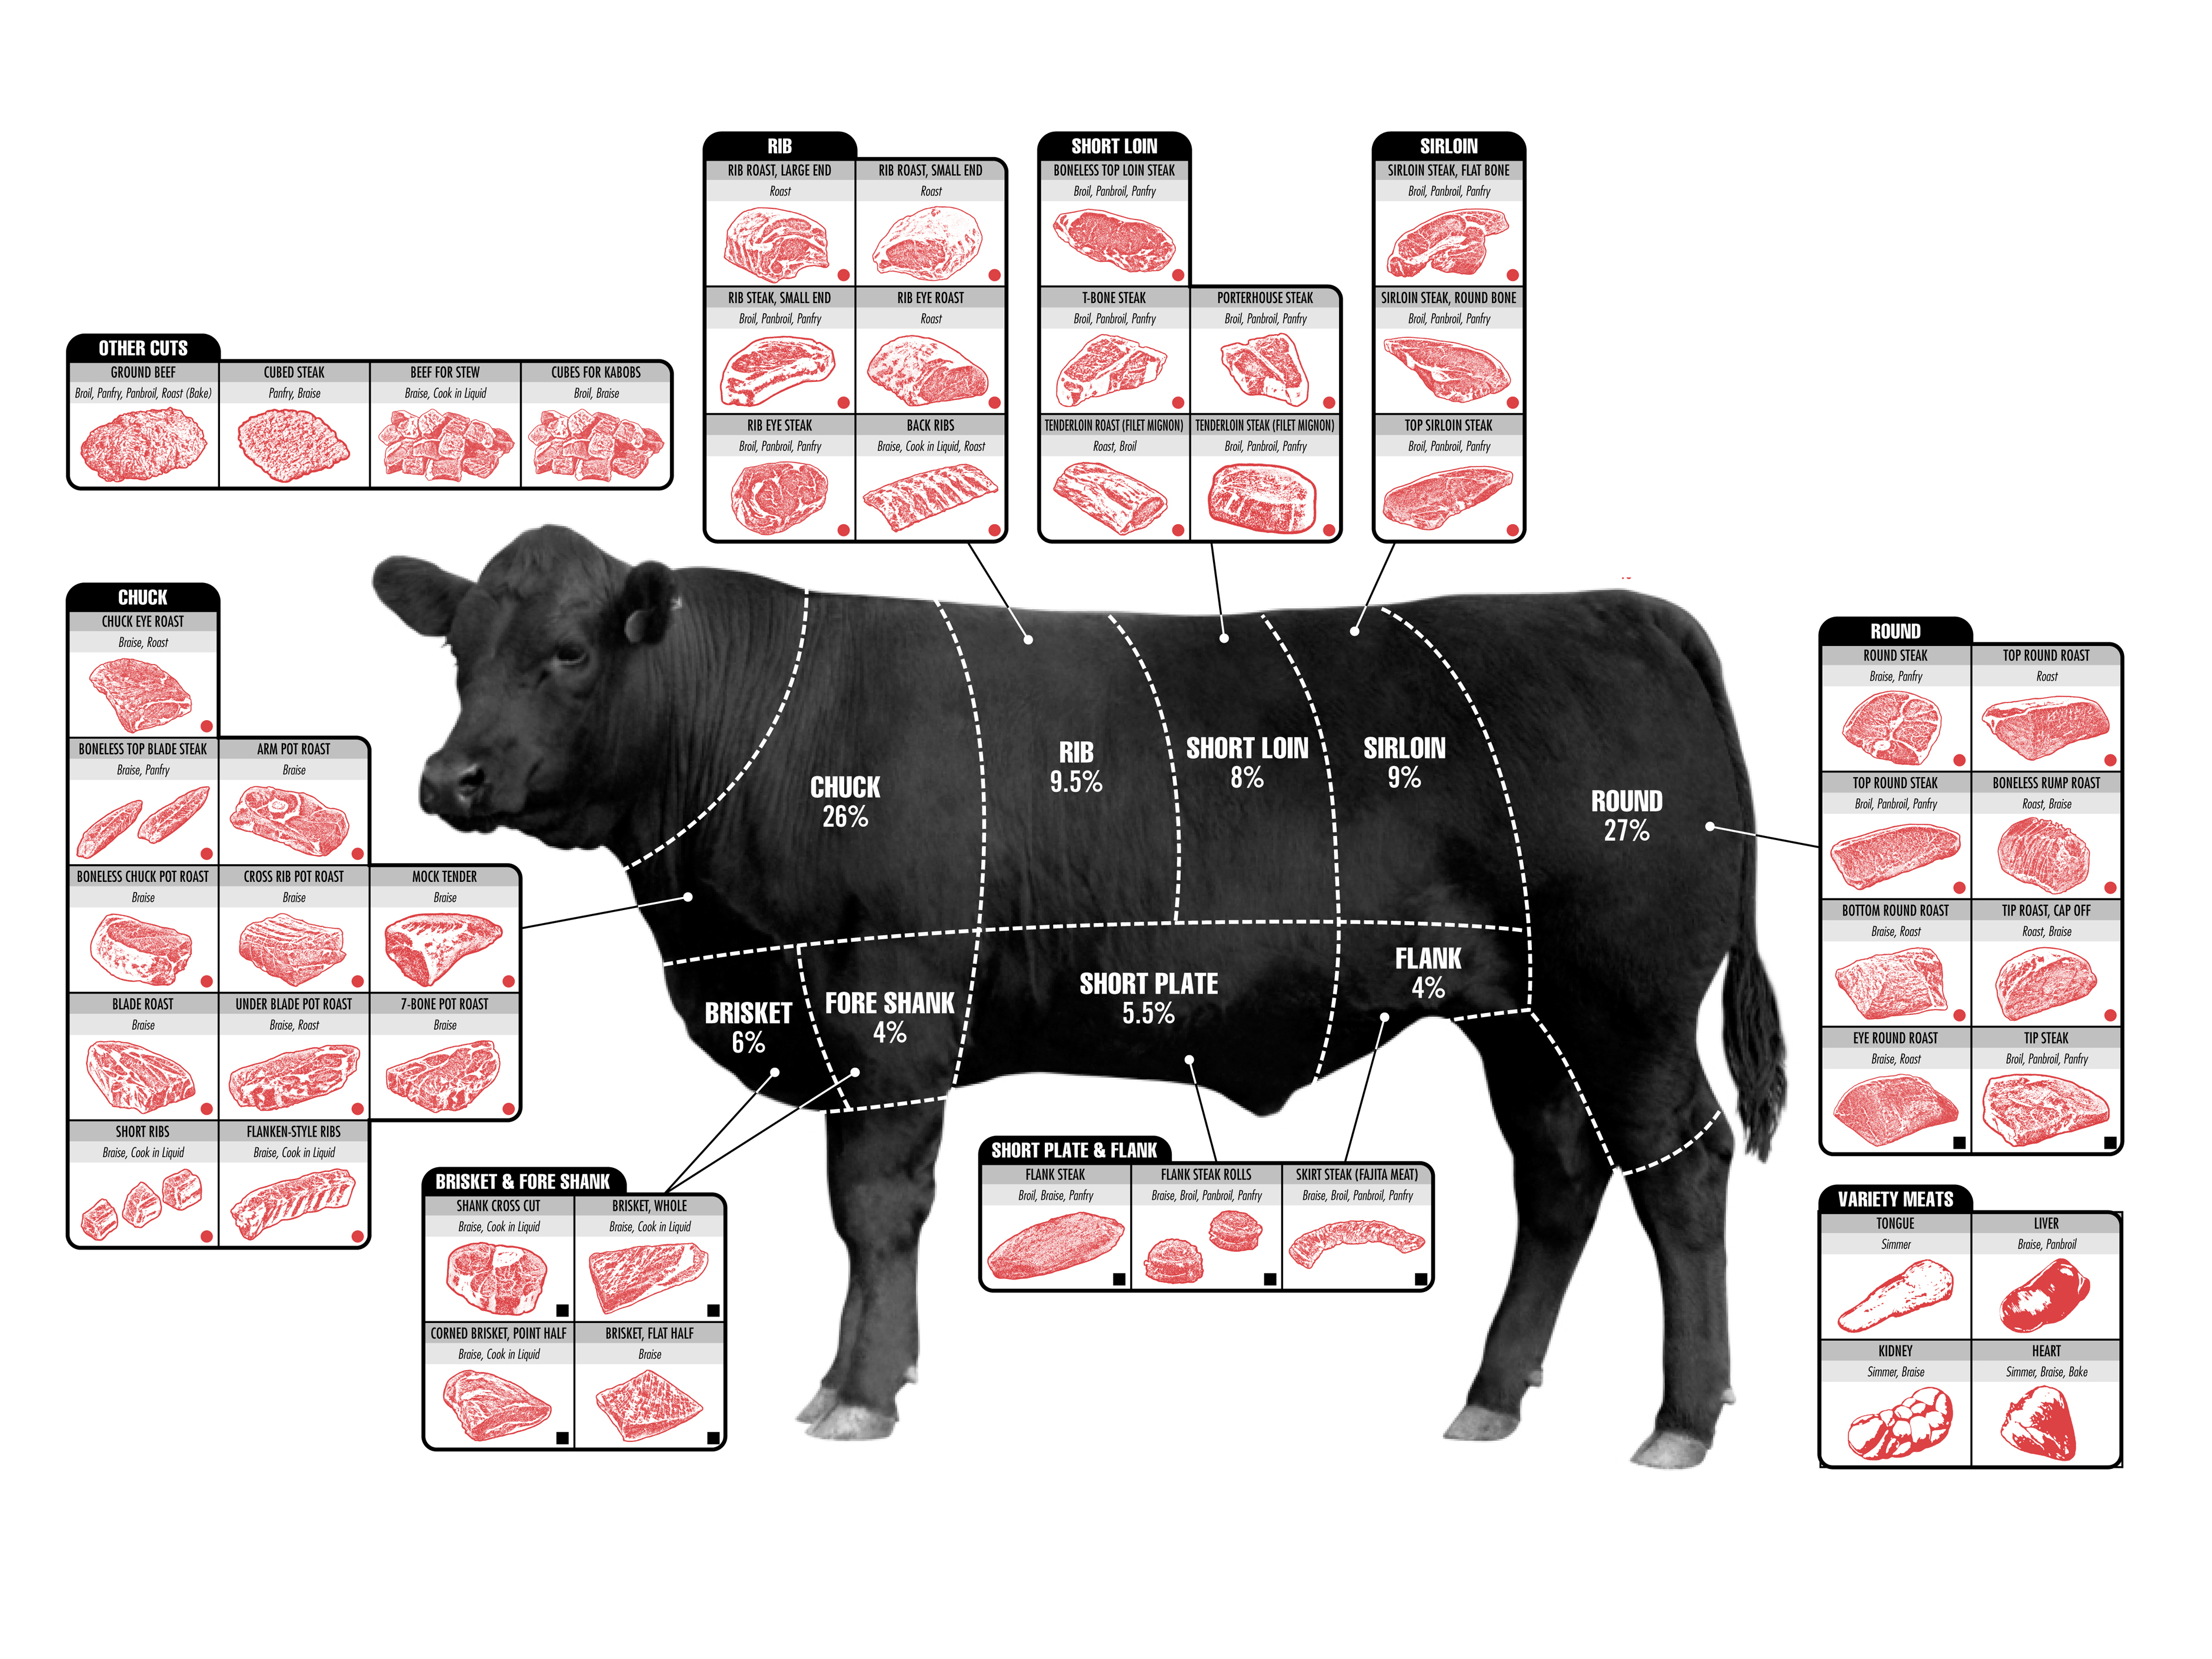
Fore Shoulder . Chuck
. Top blade roast . Above the shoulder blade
. . . A fair amount of fat, and a pretty good choice
. Chuck seven bone roast
. Chuck Eye roast . In the center of the ribs
. . . Lots of flavor, a little bit more fat . Best choice
. Chuck shoulder roast . Cut into ribs sometimes

Ribs . Just behind the chuck and in front of the loin

Back Side . The Round
. Top Round Roast
. Bottom Round Roast
. Bottom Round Rump Roast
. Eye Round Roast
inexpensive, but not a lot of fat and not a lot of flavor
these are fairly tough, and require a long cooking time and lots of spices

.
.

Loin . center back of cow
.

Brisket front breast of cow . above fore legs
.
.
.

Sirloin . Just behind loin, in front of round
. Rib Roast . 1st cut
. Rib Roast . 2nd cut
. Tri-Tip Roast
. Top Loin Roast
. Tenderloin
. Top Sirloin Roast . Lots of flavor . Cooks more quickly
cuts-of-beef


Tips: Pig Parts – Dissection

CLICK HERE for cuts from other animals


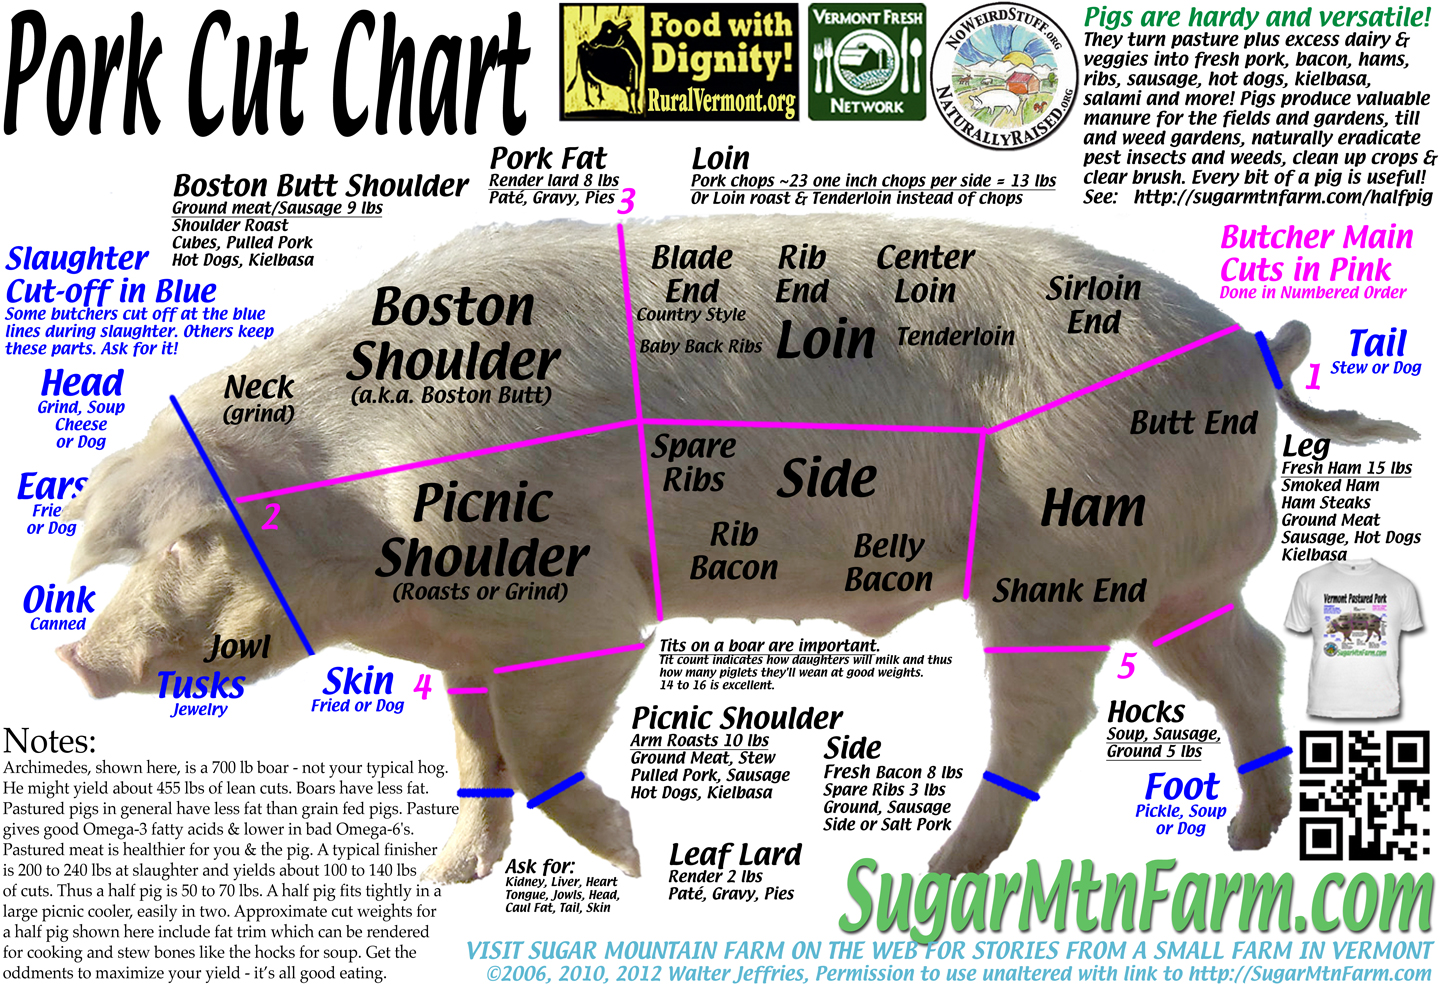
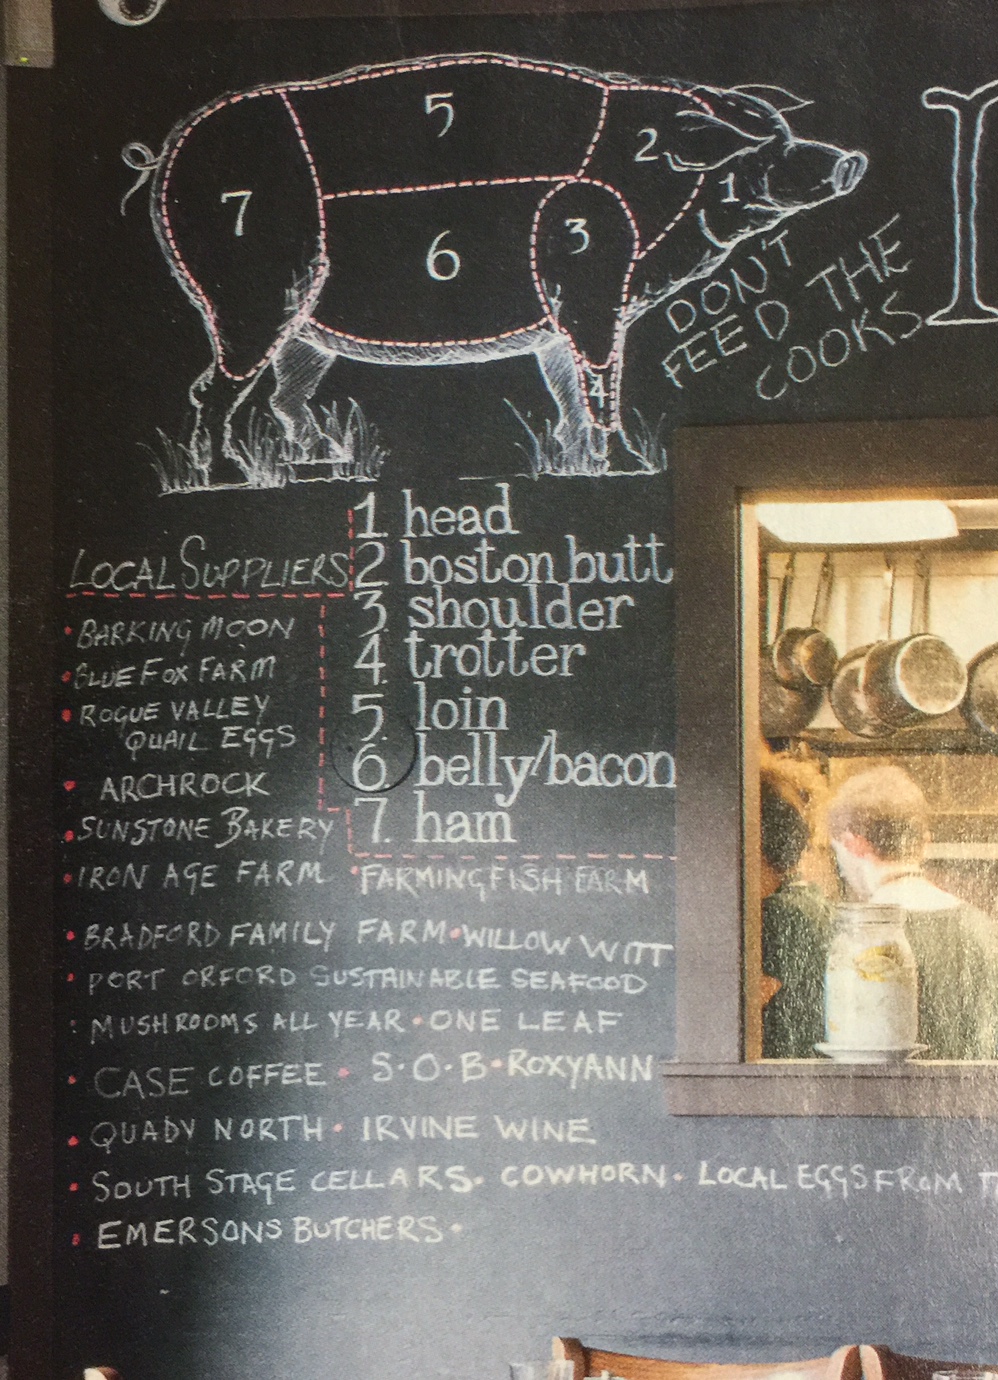
pork-chart


From America’s Test Kitchen and Sugar Mountain Farm.

Ever wonder where Ham Hocks come from? What’s the difference between the ribs and the spare ribs? What’s the difference between the loin and the center loin?

Here is a picture and an explanation of the Pig Parts and how to use them.

  • The buttocks are salted and pressed in order to eventually produce ham.
  • The ribcage meat is salted and smoked in order to get bacon.[6] Salt is rubbed thoroughly into each piece of meat and all surfaces are covered. Some formulas also include lots of black pepper. The bulk of the meat is cut and ground to produce various sausages, which are traditionally wrapped into the intestines of various sizes.[6]

Schematic representation of the main pork cuts.

The bulk of the fat is cut into small pieces. Some of it is fried to produce cracklings. Lard is made by rendering – heating fragments of fat in a large iron pot over a fire until it is reduced to simmering grease which congeals when cooled.[6] Lard is then stored in lard tins with tin covers. The typical tins in the US are five gallons.

The intestines are stripped by drawing them through a clenched fist. They are then washed, cut into short pieces, and fried to make chitlins.

The various “leftovers” are put into various forms of headcheese jelly, etc. Most parts of the pig are used in this traditional process, even parts of the skin that would normally be thrown away are preserved to be cooked with beans.

The smoke house is essential for the preservation and long term storage of hams, shoulders, bacon sides, and pork bellies. The meat is hung on racks and hooks in the smokehouse; and later smoked. Fragrant hardwood, such as hickory, beech, or cherry is allowed to smolder slowly in a pit below the hanging meat. This gives added flavor and color to the meat as well as serving to dry cure the pork.

Here is another bit of information:

Pork Cuts – Where do they come from?

Where does the meat come from?
Ham – front and back legs up to the haunches
Butt – from the shoulder
Pork loin – the top of the back near the rear of the pig
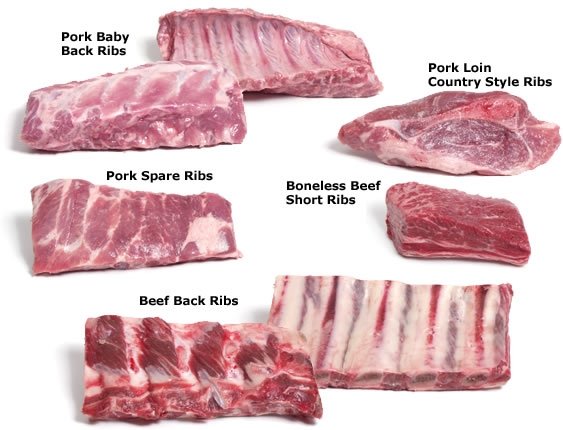
Loin ribs – Same as baby back, but closer to the rear
Baby back ribs – ribs nearest the spine
Spare ribs – ribs just outside the baby back ribs
St Louis ribs – the tips… past the spare ribs

Instructions

Spare ribs are a bit tougher so take longer to cook, but contain more meat.
Baby backs are faster cooking, more tender and take flavors well
Vaccuum packed ribs will keep in the fridge for 2-3 weeks

Info from Alton Brown


Tips from America’s Test Kitchen

  1. Save rind from Parmesan cheese, store in freezer, and add to soup for extra flavor.
  2. For a quick cooking meats such as fish, sprinkle a bit of sugar over the top so that it will instantly caramelize when it hits the hot pan.
  3. For a bit of a meaty mystery taste, add a little soy sauce or anchovy. Something with umami .
  4. Season things to be served cold more aggressively. Use vinegar, salt, pepper, sugar, lemon juice, etc. just before serving.
  5. Don’t over cook things with a chocolate base. As soon you start to smell them consider taking them out of the oven, or turning the oven off.
  6. Sautéed meat when it has been dried. If there is liquid, that will turn to steam and cook the meat, but will not brown it. This is called the Pallard reaction.
  7. Herbs fall into two categories. Those added early, and those added late. Herbs that are added early are things such as rosemary, Thyme… Full flavored herbs. Herbs that are added near the end are things such as basil, parsley, cilantro, and chives.
  8. If you are cooking something that uses butter or oil and other spices such as cinnamon, nutmeg, etc., melt your butter and put the spices into the hot butter to more fully develop the flavor of the spices.
  9. When sautéing chicken, heat your skillet up to about 450° before putting the meat into it.
  10. When sautéing onions, use 1/2 tsp of baking soda to speed up the process.


Tips: Safety

Safety tips

When weighing any meat, use a plastic bag to protect the surface of your scale.

To sanitize your sink and counter area use 1 tablespoon of bleach and 1 quart water.

To avoid cross-contamination, put all your seasonings into a small bowl and mix before putting on to your meat. Discard what you don’t use.

Cool hot items such as a casserole on a cooling rack for an hour before putting in the refrigerator.

To clean bacteria from fruits such as apples, use a solution of one part white vinegar to 3 parts water. Rinse off underwater when you are done.

Grandpa’s alternative: use one part lemon juice and two parts water. Spray on to your fruit, and that’s it.

Robert@RobertAndrews.NET

Tips from Grandpa

Not everything is about skill.  Many of the magic done by great cooks is knowing how to do something.  Browsing these Tips and Trips will bring you closer to being a better cook or chef.

This is the only one of my books that goes comically above the 30 or so recipes that are in all of the others.  There are so many good times, and things that I really want you to know…

  1. Learning to Cook
    FIRST THINGS FIRST
  2. Kitchen Safety
  3. Knife Skills
  4. Food Storage
  5. Food Safety
  6. The Danger Zone
    EQUIPMENT
  7. Slow Cookers and more
  8. Kitchen Tools
  9. Temperature
  10. Gadgets
  11. Electric vs Gas
  12. Dishwasher
  13. Care of Non-Stick Skillets
  14. Care of Cast Iron Cookware
  15. A Good Thermometer
    GETTING THE RIGHT FOOD
  16. Mail Order Food
  17. Canned Food
  18. Expiration Dates
  19. Bread Wrappers – Color Coded Tags
  20. Grocery Store Shopping
  21. Beef and other red meats
  22. Chicken and other poultry
  23. Pork and other white meats
  24. Seafood in general
  25. Potatoes
  26. Avocados
  27. Onions and Garlic
  28. Peppers
  29. Tomatoes
  30. Noodles and Pasta
  31. Yeast
  32. Cheese
  33. Snacks
  34. Dietary Water
  35. Edible Colors
  36. Eggs
  37. Vegetables
    PLANNING YOUR MEALS
  38. Terminology
  39. Grinding, Grating and Peeling
  40. From Chopped to Minced
  41. Food Preparation
  42. Garnish
    COOKING YOUR FOOD
  43. Microwave Cooking
  44. BBQ and Grilling
  45. Fry Tips
  46. Grilling Food
    PREPARATION COMPONENTS
  47. Starch Thickeners – Differences
  48. Butter and Oil
  49. Substitutions
  50. Spices
  51. Salads
  52. Dough
  53. Sauces
    AFTER THE MEAL
  54. Cleaning Up
    REHEATING YOUR FOOD
  55. Reheating Food
  56. Brown Bag Safety
  57. All about Mold
    HEALTHY EATING
  58. Healthy Eating
  59. Cutting Down on Salt
  60. Cutting Down on Sugar
  61. Eliminating Potentially Dangerous Foods
  62. Recipe Rehab – Eating Healthier
    PRESERVING YOUR FOOD
  63. Storing Fruits and Veggies
  64. Pickling and Canning
  65. Freezing Food
    OTHER THINGS TO THINK ABOUT
  66. Garden Tips
  67. Other Life Hacks
  68. Composting
  69. Roaches
  70. Travel Tips
  71. Potluck Safety
  72. Grinding your own Meat
  73. Tailgate Safety

Download Tips and Tricks for only 99¢. Select any FIVE BOOKS for only $2.99 and start cooking as soon as possible. It is worth “the price of admission” just to browse these time and money saving tips.

Tips: Cheese

SOFT CHEESES
Cover is light mold.
Mozzarella, provalone, or fontina cheese are fairly interchangeable

HARD CHEESES
Rind will be hard. It is actually not bad for you and can pack lots of flavor.  Use the crust of parmesan cheese rind to flavor and thicken your pasta sauce.  Remove it before serving.  Cheese is squeezed and compressed. Nutrition is about 14
times more than the milk used to make it.

Parmesean Cheese – Grate your own, don’t use the round green box either.

Eg: Cheddar, machengo, parmesean, gruyere

Lower fat content means stringier cheese.

KEEP AND CARE OF CHEESE
Likes cool moist environment, but not COLD and not WET
Likes to breathe
Soft and medium in plastic container with a slice of apple.
Hard cheeses lightly wrapped in waxed paper secured with rubber band or aluminum foil.

MEDIUM CHEESES
Reddish or brown rind is more natural
Milk is pasturized at 145 degrees for 30 mintues
At 160 degrees for 15 seconds kills everything. Applies to most cheeses.
You can use dental floss to cut soft cheeses

FREEZING CHEESE
You can wrap cheese in Saran Wrap and then put it into a zipper lock bag. This will keep it for about three months.

GOOEY CHEESE
The melty stringy cheeses are those with a lower fat content.  That’s why low moisture, low fat mozzarella cheese is so great for pizza.  Mozzarella, provalone, or fontina cheese are fairly interchangeable

Tips: Pork

ribs2ribs1Chops- Bone like porterhouse, Pork tenderloin, Pork filet, Pork roast (fresh ham),
Smoked ham, pork ribs (baby backs most tender), dry rub, the same Chinese style ribs.


Ribs

$$ Spare ribs are meaty, rich and big – 3-4 ribs per guest

$$$ St. Louis cut ribs are just trimmed spare ribs – you pay extra for their work – Easy to eat, and they cook evenly

$$$$ Baby Back ribs are lean, tender and short – 6-7 ribs per guest


Tips: BBQ

BBQ Tips

Ingredients:
1 lb salmon filet
1 lb chick breast
1 lb flank steak
soy
mirin
rice vinegar
turmeric
five spice
chili flakes
coriander
grapeseed oil
lemon grass
molasses
asparagus
mint
sprouts
watercress

Instructions:
Chicken rub – coriander, turmeric, five spice, chili flakes

Slice salmon into strips, marinate in soy & rice vinegar for10 mintues, mint and sprouts on plate.

Chicken breast w/o skin, cut into strips, put between plastic and pound flat, skewer on lemongrass. Plate w/watercress.

Flank Steak – cut into strips across grain, pound flat, pastry brush-apply molasses, wrap around asparagus, brush w/oil & put on grill. Plate w/baby lettuce or any small leaf. (cut at angle).

+++++++

BBQ and other Meat Tips

Ingredients How different can BBQ be?

In South Carolina they use mustard-laced shredded pork.
In North Carolina they use pepper and vinegar.
In Kansas City, a tangy tomato-based sauce is used.
In Memphis, Worcestershire is added to the sauce.
In Texas, beef brisket is preferred over pork

In Arizona, my recipe is the best ! ! ! !
See “Robert’s Quick n Tasty BBQ Ribs” under “Main Courses”

Instructions
1. Meat / Butcher tip @ http://www.xml3.com/family/Recipes/Tips_2.pdf
2. Marinate meat in a plastic bag. This allows for easy agitation.
3. Put meats into freezer for 30 minutes to make them firm before slicing

+++++++++

BBQ Tips

1 lb salmon filet
1 lb chick breast
1 lb flank steak
soy
mirin
rice vinegar
turmeric
five spice
chili flakes
coriander
grapeseed oil
lemon grass
molasses
asparagus
mint
sprouts
watercress

Instructions
1. Chicken rub – coriander, turmeric, five spice, chili flakes

2. Slice salmon into strips, marinate in soy & rice vinegar for10 mintues, mint and sprouts on plate.

3. Chicken breast w/ o skin, cut into strips, put between plastic and pound flat, skewer on lemongrass. Plate w/ watercress.

4. Flank Steak – cut into strips across grain, pound flat, pastry brush-apply molasses, wrap around asparagus, brush w/ oil & put on grill. Plate w/ baby lettuce or any small leaf. (cut at angle).

Tips: Butter

Butter Taste Tests

Butter – Saturated fat increases bad cholesterol and increases good cholesterol.

Margarine – Trans-fat, hydrogenated decreases good cholesterol raises bad cholesterol.

Artificial margarines – Gums & tropical oils, 80% fat=margarine (hard) like butter,

Taste Winners – Land O’ Lakes, soft baking butter with canola oil – Olivio, Olive oil spread – Land O’ Lakes, Sweet Cream unsalted butter.

Chicken Tips and Tricks

Chicken Breasts
Tight seal on package, keep on bottom shelf near back for up to 3 days.
Avoid cracked packaging & any pink discoloration spots.
Pooled juice in bottom of container can mean it’s been on the self for a while.
Check expiration date.

White skin = grain fed
Yellow skin = corn fed
Taste is the same.

Generally better to buy chicken with the bone in.

Cutting a whole chicken

Turn up side down, Crack breastbone w/knife, push down & lift out breastbone. Separate rib meat, follow down rib w/sharp knife – remove ribs. Use bones for stock.

Use bones for stock.

Tips: Fish from Alton Brown

1. Lube your fish up then rub with salt and pepper inside and out
2. Wrap VERY tightly in foil and cook at 500 degrees for 30 minutes or (better yet) internal temperature of 120 degrees, but DON’T OVERCOOK
3. Plate on top of bed of fresh parsley and dill, and garnish with lemon slices

Try to hide your fish, layering the ingredients like this:

Parsley
Dill
Onion
Lemon
Fish
Lemon
Onion
Dill
Parsley


Tips: Frying Food

Before we begin…

  1. Very little oil gets absorbed if done properly.
  2. Frying in cast iron increases potential to go rancid.
  3. Dutch oven is good fry vessel because it is heavy and holds the heat
  4. Unless you plan to do a LOT of frying, don’t invest in a dedicated fryer
  5. Have an ABC fire extinguisher on hand (and a lid)
  6. Spider strainer is good for removing fried foods
  7. You will also need a good pair of metal long-reach tongs – no plastic
  8. Try to get pieces to uniform size
  9. Since temperature is critical, a candy thermometer is important – about 315-365º depending on what you are frying.  DO NOT DEVIATE from fry recipe temperatures.  Do not go above 365 or your oil will go rancid.
  10. You need a wire rack so that things won’t get soggy after being removed from the fryer
  11. Canola oil and Peanut oil both have a high smoke point
  12. Fry in small batches because the temperature will change when you put things into it.
  13. Season when your fried food is still hot
  14. When you are done, let it cool before you do anything. Don’t save oil when you fry strong flavors such as fish. Then strain it into a glass jar. Use for up to three times, but then discard. Do not mix new oil with reused oil.
  15. Food to be fried should be patted dry with a towel, or spun in a salad spinner.  Any amount of water will create spatter risks.
  16. Fry in small batches to maintain temperature of oil
  17. Initial sizzle is steam being forced out.   When steam is going out, oil can’t go in.  When steam stops, oil is absorbed, so remove as soon as sizzle stops.

Ingredients to feed 4 people

BASIC FRY MARINATE (4-24 hours)

  • 1 Pieced chicken
  • 1 C Buttermilk
  • 1/4 C cayenne sauce
  • 3 eggs

BASIC FRY DREDGE

  • 1 tsp Salt
  • 1 tsp Garlic powder
  • 1/2 tsp Black pepper
  • 2 CU AP flour
  • 1 TBL baking powder
  • 1 tsp salt
  • 1/4 tsp cayenne pepper
BASIC FRY BATTER

  • 1 C Buttermilk
  • 1/4 C cayenne sauce
  • 3 eggs
  • 1 tsp Salt
  • 1 tsp Garlic powder
  • 1/2 tsp Black pepper
  • 2 CU AP flour
  • 1 TBL baking powder
  • 1 tsp salt
  • 1/4 tsp cayenne pepper
  • enough cold beer to thin your batter

Oh, one more thing…

  • Saturated Fats are BAD.  Althought they have a long shelf life, they are bad for your health.
    (eg) Butter, beef tallow, lard, palm oil. Saturated fats are solid at room temperature
  • Mono Unsaturated Fats are : BETTER for you.  They have a shorter shelf life
    (eg)  Olive oil, nut oils like almond, walnut and hazlenul – Low smoke point.
  • Poly Unsaturated Fats are actually GOOD for you.  They have a short shelf life, so keep refrigerated
    (eg) Canola, peanut, safflower and grapeseed oil. Mild flavor. High smoke point.
  • FRENCH FRY TIP FOR CHICKEN:   Fry twice…
    First for 2-3 minutes to cook, then drain on rack and cool then another 2-3 minutes for final fry to crispen
    Put on drain rack and season, then pop in oven at 200 degrees for 10 minutes

This is a recipe that has been created or modified by Robert (Grandpa) Andrews.
CLICK HERE for a free sample copies of Grandpa's Cookbooks. © 2016, 2017, 2018.

Breadsticks – Several Recipes and Tips

{Olive Garden Breadsticks}


From:   http://readableeatables.blogspot.com/

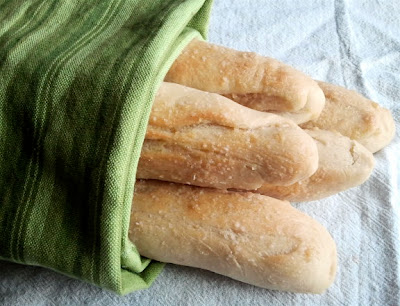
Oh man, I loved these! These would just complete any meal really. Pasta, soup, salad…you name it. Make these when you get a chance. Make sure you serve them hot out of the oven.

*These are a little more dense than Olive Garden’s. But the flavor is incredible and pretty right on with the garlic butter. I also updated the picture, because the other one was too dark. Enjoy 🙂

Dough:
1 1/2 cups warm water
2 Tbs sugar
1 Tbs yeast
1 Tbs salt (yes, the recipe calls for 1 Tablespoon, which I use every time and they turn out great.)
2 Tbs butter, softened
4-5 Cups flour

Topping:
3 Tbs butter melted
sea salt
1 tsp garlic powder

For the dough, pour the water into a stand mixer with the sugar and yeast, let that sit and froth for about 10 minutes. Add salt, butter, and 2 cups of flour. Mix the dough on low. Add the rest of the flour a half cup at a time, until dough scrapes the sides of the bowl clean. Mix the dough about 5 minutes on medium speed, until its soft and easy to work with.
Let the dough rest in the bowl until doubled in size, about 1 hour and then roll it out. Roll the dough out into a long log, spray a knife with cooking spray and cut the dough into 12-14 pieces. Roll those pieces into about 6 inch long snakes. Spray 2 large cookie sheets with cooking spray, ( I usually only use one) and lay the breadsticks out leaving about 2 inches between each one.
Place them in the oven with the temperature turned to 170 degrees. Let them rise for about 15 minutes, or until doubled in size.( I have also let them sit at room temp until they are doubled in size and then bake them in the oven)
Once risen, brush them with the 1 1/2 T of melted butter and sprinkle them with salt. Now preheat the oven to 400 degrees and bake them for 12-14 minutes or until golden brown. While they are baking combine the rest of the melted butter with 1 tsp garlic powder. When the breadsticks are golden brown, remove them from the oven and brush them with the butter/garlic mixture.


Other Breadstick Notes

Basic ingredients:
Flour, EVOO, Water, Yeast, Milk, Butter

Grissini Bread sticks are thin crisp bread sticks, rather than the chewy ones shown above.
Good flavor enhancers and combinations for this type of bread stick (from Greatest British Cooking Show) follow:

  • Nigella seed and Parmesan cheese
  • Poppy seed, caraway seed and Kalamata olives
  • Lemon and rosemary
  • Ras el hanout is a flavor from Africa
  • Garlic, Parmesan cheese and Bleu cheese
  • You can also entwine two different colors

Knead your dough until you achieve the Window Pane Stage, where it can stretch so thin that light goes through it.
A slow bake will drive out the moisture, making it crispier.

Grissini

    • 1 1/3 C water (warm)
    • 2 tsp yeast
      • Let rest 5 minutes
    • 1/4 C EVOO
    • 1 C AP flour – whisk to combine – this removes lumps
    • 2 C more flour
    • 1.5 tsp sea salt
      • Put on Kitchen Aid with paddle attachment
    • Change to dough hook
      • Add 3/4 C more flour
    • Mix 3-5 minutes with dough hook on medium-slow speed
    • Finish on counter, kneading by hand
    • Stretch dough into a rough rectangle
    • Put dough on surface oiled with EVOO
    • Continue to stretch until it is relatively flat
    • Roll using rolling pin to about 1/2 inch thickness
    • Brush the top with sesame oil
    • Cover with plastic wrap while still on counter
    • Cover plastic with a towel for about 90 minutes
      • You will have only one rise
      • OPTIONAL:  Sprinkle with sesame seeds or caraway seeds
    • As time nears, oil a large baking sheet with sesame oil
    • Cut into half (lengthwise) with a pizza cutter
    • Cut dough about the width of your fingers and move fingers to the baking sheet, stretching to width of baking sheet
    • OPTIONAL:  Stretch far, then twist into a spiral breadstick
    • Bake at 400º for 18-20 minutes
      • Cook until golden/tanned

Tips: Around the Kitchen

Kitchen Tools and Gadgets

  • A thermometer helps you repeat success and avoid repeating failures. I have two from Thermoworks:
    >   An immersible/insertable thermometer: Good to take the core temperature of meats
    >   An infrared thermometer: Great for everything from preheating your griddle to acting as a candy thermometer.
  • Use tongs to help squeeze limes or lemons.  Gives you leverage.

Cooking tips

  • When cooking pasta, reserve a cup of pasta water for thinning your pasta sauce. Put at least a ladel back into the sauce to make it stick to your pasta better.  Also, you can use the water with a bit of cheese to make a nice creamy sauce.  Also, don’t rinse your pasta after cooking.
  • Use screaming high heat for searing meat, preferably in a cast iron pan.
  • Select the pan which is best suited for your recipe.  (eg) Don’t use an aluminum pan with anything cooked with acidic ingredients.  Cook pancakes in a non-stick pan, but don’t use metal utinsels.
  • Blanche and shock fresh vegetables (boiling water, then ice water) to make them greener and set the flavor.  If doing two, start with the lighter vegetable and work onto the darker vegetables.
  • Let your oven completely preheat before putting your food in.  You will get uneven heating, and even incomplete chemical reactions.

Kitchen Design

  • When replacing your counter consider ceramic tile or porcelain stone tile. Lay with a thin grout line.

Keeping it Clean

  • Stain Removal: Voted best overall was Oxi-Clean. Very inexpensive, very effective. Soak for about an hour. Removed blueberry, mustard, chili, chocolate, red wine, beets and coffee.
  • CAMEO was voted best Aluminum and Stainless Steel cleaner
  • Never ever put cast iron in the dishwasher, or clean it with soap.
  • Barkeepers friend is good for cleaning steel pans
  • The five second rule is bogus unless the item is totally hard and dry.  If it is the least bit moist, you are probably putting feces into your food or mouth.  Yech.

Preserving Food

  • To freeze fresh berries spread out on cookie sheet and freeze 4 hours. Put into freezer zip locks.
  • Store vegetable oils and most seed oils in a cool dark place to minimize spoilage

Safe Kitchen Tips

  • When cutting cherry tomatoes put them between two cottage cheese lids and slice a bunch of them in half at the same time.
  • Use water bottle with a sports top as your barbecue sauce dispenser
  • Don’t pour bacon grease down the sink.  Instead, pour into a can and let it solidify, then just throw it away.

Entertaining

  • When you are preparing a menu for an important event, always test the recipe before the day of your event. Never use your guests as guinea pigs.


Onion Tips

Vidalia Onions – Sweet and Mild

White Onions – Sweet with a bit of a sharp taste

Yellow Onions – no info

Red Onions – Good, hearty, sweet

Spanish Onions – no info

1. Red Onions are good for things like French Onion Soup
2. When cutting onions, cut in half THROUGH the root. Cut horizontally, then vertically. Finally chop as you would normally, and what you end up with are small pieces

#########

Onion Soup, Madera

Ingredients

2 Vadalia Onions
Grapeseed Oil (high smoke point)
1.5 CU Madera Wine
2 CU Chicken Stock
Chives
Butter
Thyme
Bread Crumbs

Instructions

1. Shave onions as thinly as possible.
2. Heat oil to very hot.
3. Carmelize onions for about 15 minutes
4. Add thyme and Madera Wine
5. Cook another 15 minutes
6. Add chicken stock and butter, and bring to boil
7. Cook till browned
8. Pour into soup tureen
9. Garnish with minced chives, garlic, thyme and bread crumbs


Tips: Noodles

UDON – 100% wheat flour – From Osaka area

SOBA – 20% white, 80% buckwheat – from Tokyo area – nutty, low gluten, a good lunch noodle

SOMAN – wheat, thin, angelhair, good summer pasta – Cook and chill

RAMEN – wheat, water, egg, soy, vinegar, mustard

Cook noodles separately because it will make water starchy

Tips: Chicken

Ingredients When buying chicken in the store, look for the following characteristics…

When storing, follow these guidelines…

Instructions

1. Tight seal on package
2. Keep on bottom shelf near back for up to 3 days
3. Avoid cracked packaging & any pink discoloration spots.
4. Pooled juice in bottom of styro container can mean it’s been on the self for a while.
5. Check expiration date.
6. White skin = grain fed… yellow skin = corn fed… taste is about the same.
7. Generally better to buy chicken with the bone in.

Use an instant read thermometer:
Chicken –e.g. 140 F = underdone, needs to be 165 F
Cook chicken to 160 F. If to 180 F it gets tough

Tips: Cast Iron Skillets

This page was created for my brother Steve.

Please also review my post: Care of your Non-Stick Skillets


Starting to Rust?

Steve,

You said that your cast iron was starting to rust.  Also, food probably sticks to it when you use it.

Seasoning Your Cast Iron

  1. You will want to do this with a new cast iron pan as well.
  2. Wash it in warm, soapy water and scrub all rust off of it using steel wool or other abrasive surface.  Towel dry immediately.
  3. Put into your oven and turn heat to 350º.
  4. Using peanut oil, canola oil or corn oil pour oil and smear it in with a paper towel, rubbing it into the iron.  Both sides, including handles, etc!  Be careful not to burn yourself.
  5. After it has been coated with oil turn off the oven, put in upside down on a baking sheet, and let rest for 1 hour
  6. Let it cool completely, then wipe excess oil off it.  Reseasoning your pan only has to be done once unless it burns or you use soap on it.  Also, don’t cook acidic things like tomato sauce

Cooking with Your Cast Iron

  • If it has been weeks (or more) since using your cast iron, rinse it before starting to heat the pan.
  • Always rub a bit of Canola oil on your pan when it begins to heat up
  • Spread the oil over the surface
  • Use medium to medium-high heat
  • Always let it preheat completely before cooking in it.
  • NEVER cook over 500º
  • Always use potholders or mitts.  The handle will be hot.
  • Never use in a microwave
  • Never allow liquids to completely boil away.
  • If cooking on a ceramic or halogen cooking surface always lift the pan, do not slide it.  Sliding it will damage your cooking surface.

THE PENNY TRICK – If you are boiling water, put a penny in the bottom of your pan.  If it boils dry (which will ruin your pan) the penny will start to rattle because of the boiling water beneath the penny.  The rattling will tell you your pan is nearly empty (usually) before your pot is destroyed.

Cleaning Your Cast Iron

  • Never put water onto the cooking surface until it is UNDER 250º in temperature
  • Let the hot water tap get as HOT as possible.
  • If you want, boil water on the stove.
  • Pour the hot water over the cooking surface.
  • Scrape with a metal spatula if necessary.
  • NEVER use soap on it, that will remove the coating.
    If you DO use soap on it, you must season it again from the beginning.
  • Dry immediately and completely with a towel before putting it away.
  • If I’ve used the oven, I put it into the warm oven to help it thoroughly dry.
  • Never use bleach
  • Never use oven cleaner
  • Never clean in a dish washing machine
  • Never use a Brillo pad without seasoning it afterward.
  • Do not store your pan with the lid on, as it inhibits air flow, or if you do keep the lid on it, place a towel in between the pan and the lid.

Why you Never Want to use Soap

  • The oil eventually creates almost a Teflon surface on the skillet.
  • It was the hot oil time after time after time that gave scientists the idea for Teflon, but cast iron is better because there are no chemicals.
  • If you use soap, it cuts the oil and your pan starts to rust again.
  • If you ever HAVE to wash it in soap, repeat the entire seasoning process again.


HTML Snippets Powered By : XYZScripts.com