Chicken with Sour Cream

http://www.youtube.com/watch?v=vQE-MAOAzvU

Actually, I usually don’t POST from Chuckwagon Cowboy, but I DO watch most of his clips.  Usually very simple, and tasty-sounding.  As he puts it, his recipes are YEE HA GOOD.

Anyway, this recipe in particular has several tips and techniques that are very useful.  While I can’t vouch for the entire recipe watch these things in particular:

  1. Putting the crispy coating on his chicken
  2. What he USES for his crispy coating
  3. Making a roux – The sour cream is a little over the top, but you could also use condensed milk

Anyway, enjoy… Yee ha!
 

Tips: Steak

All Steaks in General

  • Buy in October/November because price drops. They are “out of season” cause Grilling Season is over.
  • You can also buy roast beef and cut your own steaks.
  • Freeze them overnight, then seal them in a vacuum bag and they will be good for another 8 months.

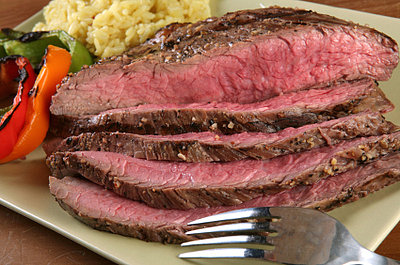
Flank Steak

asdf

Filet Mignon

asdf

Porterhouse Steak

asdf

Sirloin Steak

asdf

Steaks in General

asdf

Disection Charts

asdf

flank-steak

I

Tips: Tomatoes

PRINTABLE GREEN TOMATOES GARDEN CLUB HANDOUT

  • Do not use over-processed tomatoes for tomato sauce.
  • Use whole tomatoes or diced tomatoes in sauce, but never stewed or crushed.  Texture is nice.
  • Remove seeds to reduce bitter taste
  • Use canned tomatoes out of season, and fresh within season
    Tomatoes are in season during the summer: April through August
    September until March use canned.  San Marzano is a good choice.
  • To peel a tomato, cut the top and bottom, then quarter.  Cut out seeds.  Slide your knife right along the skin of each quarter.
  • Tomatoes with cracks in them have had uneven watering.  Flavor could be compromised.
  • Tomatoes with a green shoulder got burnt by the sun.  Just cut it off, and it will taste fine.
  • A wrinkly tomato has been in the fridge too long.
  • Oh… and don’t refrigerate your tomatoes.  Use them though before they go bad.


Tips: Pickling and Canning

 Jalapeños

Heat the following in a pan to boiling

  • 3 cups white vinegar
  • 1 cup water
  • 1 cup sugar
  • 1/2 cup salt
  • 1 tsp garlic powder
  • 1 tsp onion powder

Process peppers:

  1. Cut off stem and discard
  2. Cut off tip 1/3 of the pepper, and put in “ready” bowl
  3. Cut remaining 2/3 piece in half and put in “to be processed” bowl
  4. Use a thin knife (fillet knife) to ream out  seeds and veins (put seeds and veins in a “use later” bowl
  5. Move deveined piece over to the “ready” bowl
  6. Complete all pieces until “to be processed” bowl has been emptied
  7. Sterilize jars and lids
  8. Put enough peppers to fill one jar into the hot liquid and let blanch for 2 minutes,
  9. Then move pieces into your jar until nearly filled
  10. Move some of your brine into the jar, leaving 1/2 inch headroom
  11. Set aside for hot water bath canning
  12. Repeat until “ready” bowl has been emptied.
  13. Process in hot water bath

Seeds and Stems – HOT PEPPER OIL

  1. Place seeds and stems in a casserole dish
  2. Cover seeds and stems completely with Canola or Olive oil
  3. Bake in oven at 400 degrees for one hour
  4. Let cool
  5. Drain into oil bottle, discarding remnants
  6. Use oil to spice up any food where oil might naturally be used


Tips: Working with Turkey

BUYING YOUR TURKEY

  • If you have the freezer space, buy your turkey during Thanksgiving or Christmas when they are on sale.
    Make sure they are wrapped well so they do not dry out or get freezer burn.
  • If it is a fresh turkey, piece it out and freeze the pieces.  Use shrink wrap to preserve them for up to an entire year.
  • Cooking for a big crowd?  Consider two smaller turkeys instead of one large one.
  • Buy a FRESH turkey without any added ingredients.  Other great options are organic, kosher, heritage or premium-brand.

THAWING YOUR TURKEY

  • NEVER EVER EVER cut a frozen turkey with an electric knife.
  • Starting from completely frozen, figure about one day for every four pounds of meat
    or
  • Put into sink in COLD water, breast side down, for 30 minutes per pound.
    Keep water running at a trickle for THE ENTIRE TIME that it is thawing
    or
  • Put into HOT water, breast side down, for 15 minutes per pound.
    Keep water running at a trickle for THE ENTIRE TIME that it is thawing
    Refill sink with hot water every half hour
  • For crisper skin, unwrap it during the last day and let it thaw uncovered the last 24 hours.  Even better, use a dry rub during the last day.  This will draw even more of the liquid out resulting in even crispier skin.

PLEASE NOTE:  Only the first method is recommended by the FDA, but it has never worked for me.  My refrigerator though, is set at 34º
I follow the first method, then move to the second until the internal temperature is about 35º and does not have ice crystals.

RAW TURKEY

  • Cross contamination is your biggest enemy.  Wash your hands frequently.
  • After you have rinsed your turkey, wash your sink with soap, and wipe your counters off with bleach wipes.
  • Wash cutting boards with soap and water, then wipe with a bleach wipe.

COOKING YOUR TURKEY

  • Before cooking, let it rest on the counter for an hour so that the heat can come up to room temperature.  This will result in a more evenly cooked bird.
  • The first time I cooked a turkey I had never heard of “a bag of giblets.”  I cooked the turkey with the bag inside the body cavity.  Remember to take this packet of meat out.  You can cook these up and use the broth as the base for your gravy.
  • DO NOT throw out the pan drippings.  They are pure gold.  Use them for making gravy.
  • If you use one of those cheap aluminum roasting pans DO NOT us it alone, but rather place it on a heavy oven baking pan.  Use a foil bed to hold it off the bottom of the pan.
  • Use an internal thermometer to make sure your oven thermometer is properly calibrated.
  • If you are cooking your turkey to be served with other things, and it finishes too soon, cover it with aluminum foil, then a thick bath towel.
  • If presentation is not an issue, piece your turkey out and cook the parts individually.
    White meat to the front of the oven, and dark meat toward the back.  The back gets hotter and will dry out the white meat.
  • For cooking a thawed frozen turkey, plan on 20 minutes per pound in a 350 degree F oven
    plan on 10 to 15 minutes per pound if you are cooking a fresh turkey
  • A turkey will cook more evenly if you do not stuff it.  Fry up the giblets and use the fond and broth to cook your stuffing in a pan using the drippings.
  • Instead, put some garlic, onions, carrots and celery into the body cavity.
  • Never trust the pop up timers that come already inserted into the turkey
  • If you get a late start cooking your turkey, cook it for the first 30 minutes at 425º and then reduce to 375º.  Remove one hour from the overall cooking time.
  • For crispier skin, wipe the outside with olive oil and sprinkle with some herbs and spices
  • Once you get the turkey in the oven LEAVE THE DOOR CLOSED until the time is up.  Resist the urge to peak
  • If it appears to be browning too quickly put a sheet of foil loosely over the top.
  • Likewise, if the fond on the bottom of the pan is dry and starts to burn, put 1/4 C of water in the bottom of your pan to save the drippings.
  • Use an insertable thermometer to check when the center of the breast meat hits a temperature of 165º, or the thigh for a temperature of about 170 degrees.  Get one from Amazon.com
  • The intense heat forces the liquid to the center of the turkey, away from the skin.  After cooking, cover with a foil and then a bath towel and let rest 20 minutes.  This will allow the juices to redeploy and let the temperature continue to rise until it hits about 170 and 175,  This is just about the time needed to make gravy.

GRILLING YOUR TURKEY

  • Use a Weber Grill that has a lid that closes completely
    Put coals on each side of turkey (not directly under)
    Put drip pan under turkey for catching the gravy drippings

DEEP FRYING YOUR TURKEY

  • This is quite the fad, but the benefits do not outweigh the risks.  A nicely seasoned oven-cooked turkey can be just as flavorful as one cooked in a vat of grease that will burn you to the point of scarification in about five seconds.
  • If you insist on doing this
    • …take EXTREME precautions against spilling your container of hot grease
    • … dry your turkey off VERY well before putting it into the fryer
    • … make sure your turkey conveyance mechanism is tight, secure and sound
    • … keep all children and other activities away from the cooking area
    • … have a fire extinguisher immediately available

SERVING YOUR TURKEY

  • Tent foil over the turkey for 20 minutes before carving to allow moisture to redistribute into the meat.  If you need more time to make stuffing, etc. you can keep it tented for about 45 minutes without losing too much heat.
  • View the below video by Martha Stewart Kitchens that shows, in excellent detail, how to carve your turkey.
  • Turkeys start to spoil after only two hours on the serving table.  Have everything ready for refrigerating the left-overs and remove the bird and wrap it while dessert is being served.  This is a task that can be delegated even before you start eating, so that you can focus on being a good host or hostess.  Have them remove most of the meat from the bones and put into a baggie or foil.  Put the carcass in a bag and put in the refrigerator intact so that your guest can return to the party.  You can get the small pieces of meat off later.  Save the bones in the freezer for making stock.

Tips: Cooking on an Electric Range

It saddened me when we had to downsize, and I lost my five-burner gas range. This has caused a rethinking of how I cook. When you turn gas to low, the heat is immediately low. When you turn an electric range from high to low, it takes several minutes for the temperature to adjust. Here are some tips that will help you when cooking with an electric range.

  • When cooking on an electric stove, use two burners. Set one on high to bring to a boil, then move to another burner and set to low for the simmer you know is coming right up.
  • When you broil in a gas oven, you close the door.  This doesn’t work with electric.  You must keep the door ajar slightly in order for the broiler to function properly.
  • The temperature regulator of the stove top will turn the burner on and off, so 350º really just means that it will average 350º
  • One of the best investments you can make will be an IR InfraRed Thermometer by ThermoWorks.  No, I don’t get a kickback.  They are only about $40 and you will use it practically every day.  NEVER heat your teflon pan over 450º and never take cast iron over 550º.
  • Preheat pans with care because electric gets hot very quickly.  Your IR Thermometer will help you with this task.  A drop of water in your pan will help in absence of a thermometer
  • Don’t use abrasive cleaners with a ceramic stovetop.  It will scratch it.  There are non-abrasive cleansers that you must use.
  • Don’t ever run your stove top on HIGH.  It is like flooring your car all the way to work.  Use one notch above high as your high heat setting.
  • You can still use your cast iron skillets as long as they set flat.  You can’t use the ones with a rim around the bottom edge (like a reversible grill pan / griddle) Do not EVER slide your cast iron across your ceramic cooking surface.
  • Also, my cast iron wok does not work very well on the electric stove top.  I bought an inexpensive gas wok that I keep on the patio.  I also use the wok for blackening peppers, which you can’t do on the electric range.
  • I have two heavy cast iron skillets that I keep on the bottom rack of my oven.  It takes longer to preheat, but it maintains a steady temperature better.
  • The burners retain their heat for an inordinately long time.  I set a bread cooling rack on the hot burner as a reminder.
  • If your lid leaks water over the edge of the pot, it will pop and crack as the water hits the coil.  Always a shock.  Boil-overs are pretty awful too.
  • After turning on a burner, pause 10 seconds and put your hand over the burner you THINK you turned on to make sure you got the right one.
  • Resist turning the knob 180º when you turn it on.  Maintain the visual reminder of a burner ON knob turned slightly to the left or right.
  • If you have old pans and skillets with a warped bottom, get rid of them and get some new ones – even if they are second hand.  The warped bottoms do not come in contact with the heating element and will not heat properly.
  • Try to match the size of your pan with the burner that is close to its size.  If the pan is larger, it will heat unevenly with a hot-spot in the middle.  If it is smaller, you could melt your handle or mixing spoon with the heat escaping up the sides of the pan.

Tips: Spring Rolls

Spring Roll Variations plus Other Notes and Information

      • A combination of cooked and raw vegetables creates a nice blend
      • Add tofu, or cooked meat or fish
      • Some fresh herbs and rounds of rice paper are found in supermarkets or Asian groceries.
      • Soften the thin, crisp rice paper rounds by rubbing or immersing in very hot water for 3-5 seconds.
      • Classic Vietnamese recipes blend  lettuce, rice noodles, fresh herbs, shrimp and pork.
      • Soy sauce is naturally fermented and aged up to two years.
      • One trick to Spring Rolls is having ingredients as dry as possible.
      • Shop at local Asian markets for Thai and Vietnamese ingredients. While many can be found in your supermarket, ethnic food shops are adventures and a great way to learn about other cultures. Besides, prices are often lower and items are of quality higher.
      • Cut at an angle and serve w/ ginger peanut dipping sauce.
      • Serve garnished with sprigs of mint and with individual bowls of dipping sauce.
      • Serve with dipping sauce – Variations of this add the final seasoning.
      • Place ingredients within easy reach of everyone at the table.

STEP BY STEP

    1. Prepare all your ingredients ahead of time.  Small, thin and delicate ingredients is a rule.
    2. Moisten rice paper by rubbing or immersing in very hot water for 3-5 seconds.
    3. On the bottom third of the rice paper round, make a small pile of rice noodles, a few shreds of meat, half a shrimp, some lettuce, carrot, and a leaf of each herb.
    4. Roll up the rice paper over the filling, taking it halfway up the uncovered portion of rice paper.
    5. Now fold in the side flaps and continue rolling until you have a tight cylinder.
    6. With rice paper on towel, fill with 2-3 tbl of filling and fold sides in and roll.
    7. Put on a plate and keep covered with a damp cloth.

Tips: Just what is a pinch?!?

These are approximate, but they will help you in… a pinch

  • Four drops equals one pinch
  • Sixteen pinches equals one teaspoon
  • Three teaspoons equals one tablespoon
  • Two tablespoons equals one ounce
  • Four tablespoons equals one forth of a cup
  • Eight ounces equals one cup
  • Two cups to a pint
  • Two pints to a quart
  • Four quarts to a gallon

MINCED, DICED OR CHOPPED?!?!?!?

  • Minced is very very small, followed (in order) by
  • Diced
  • Chopped
  • Julienned
  • Cubed
  • Chunked
  • Pieces

Tips: Buying Good Meat

Buying Good Meat – About Butcher Shops – Cuts of Meat

Cuts of Meat

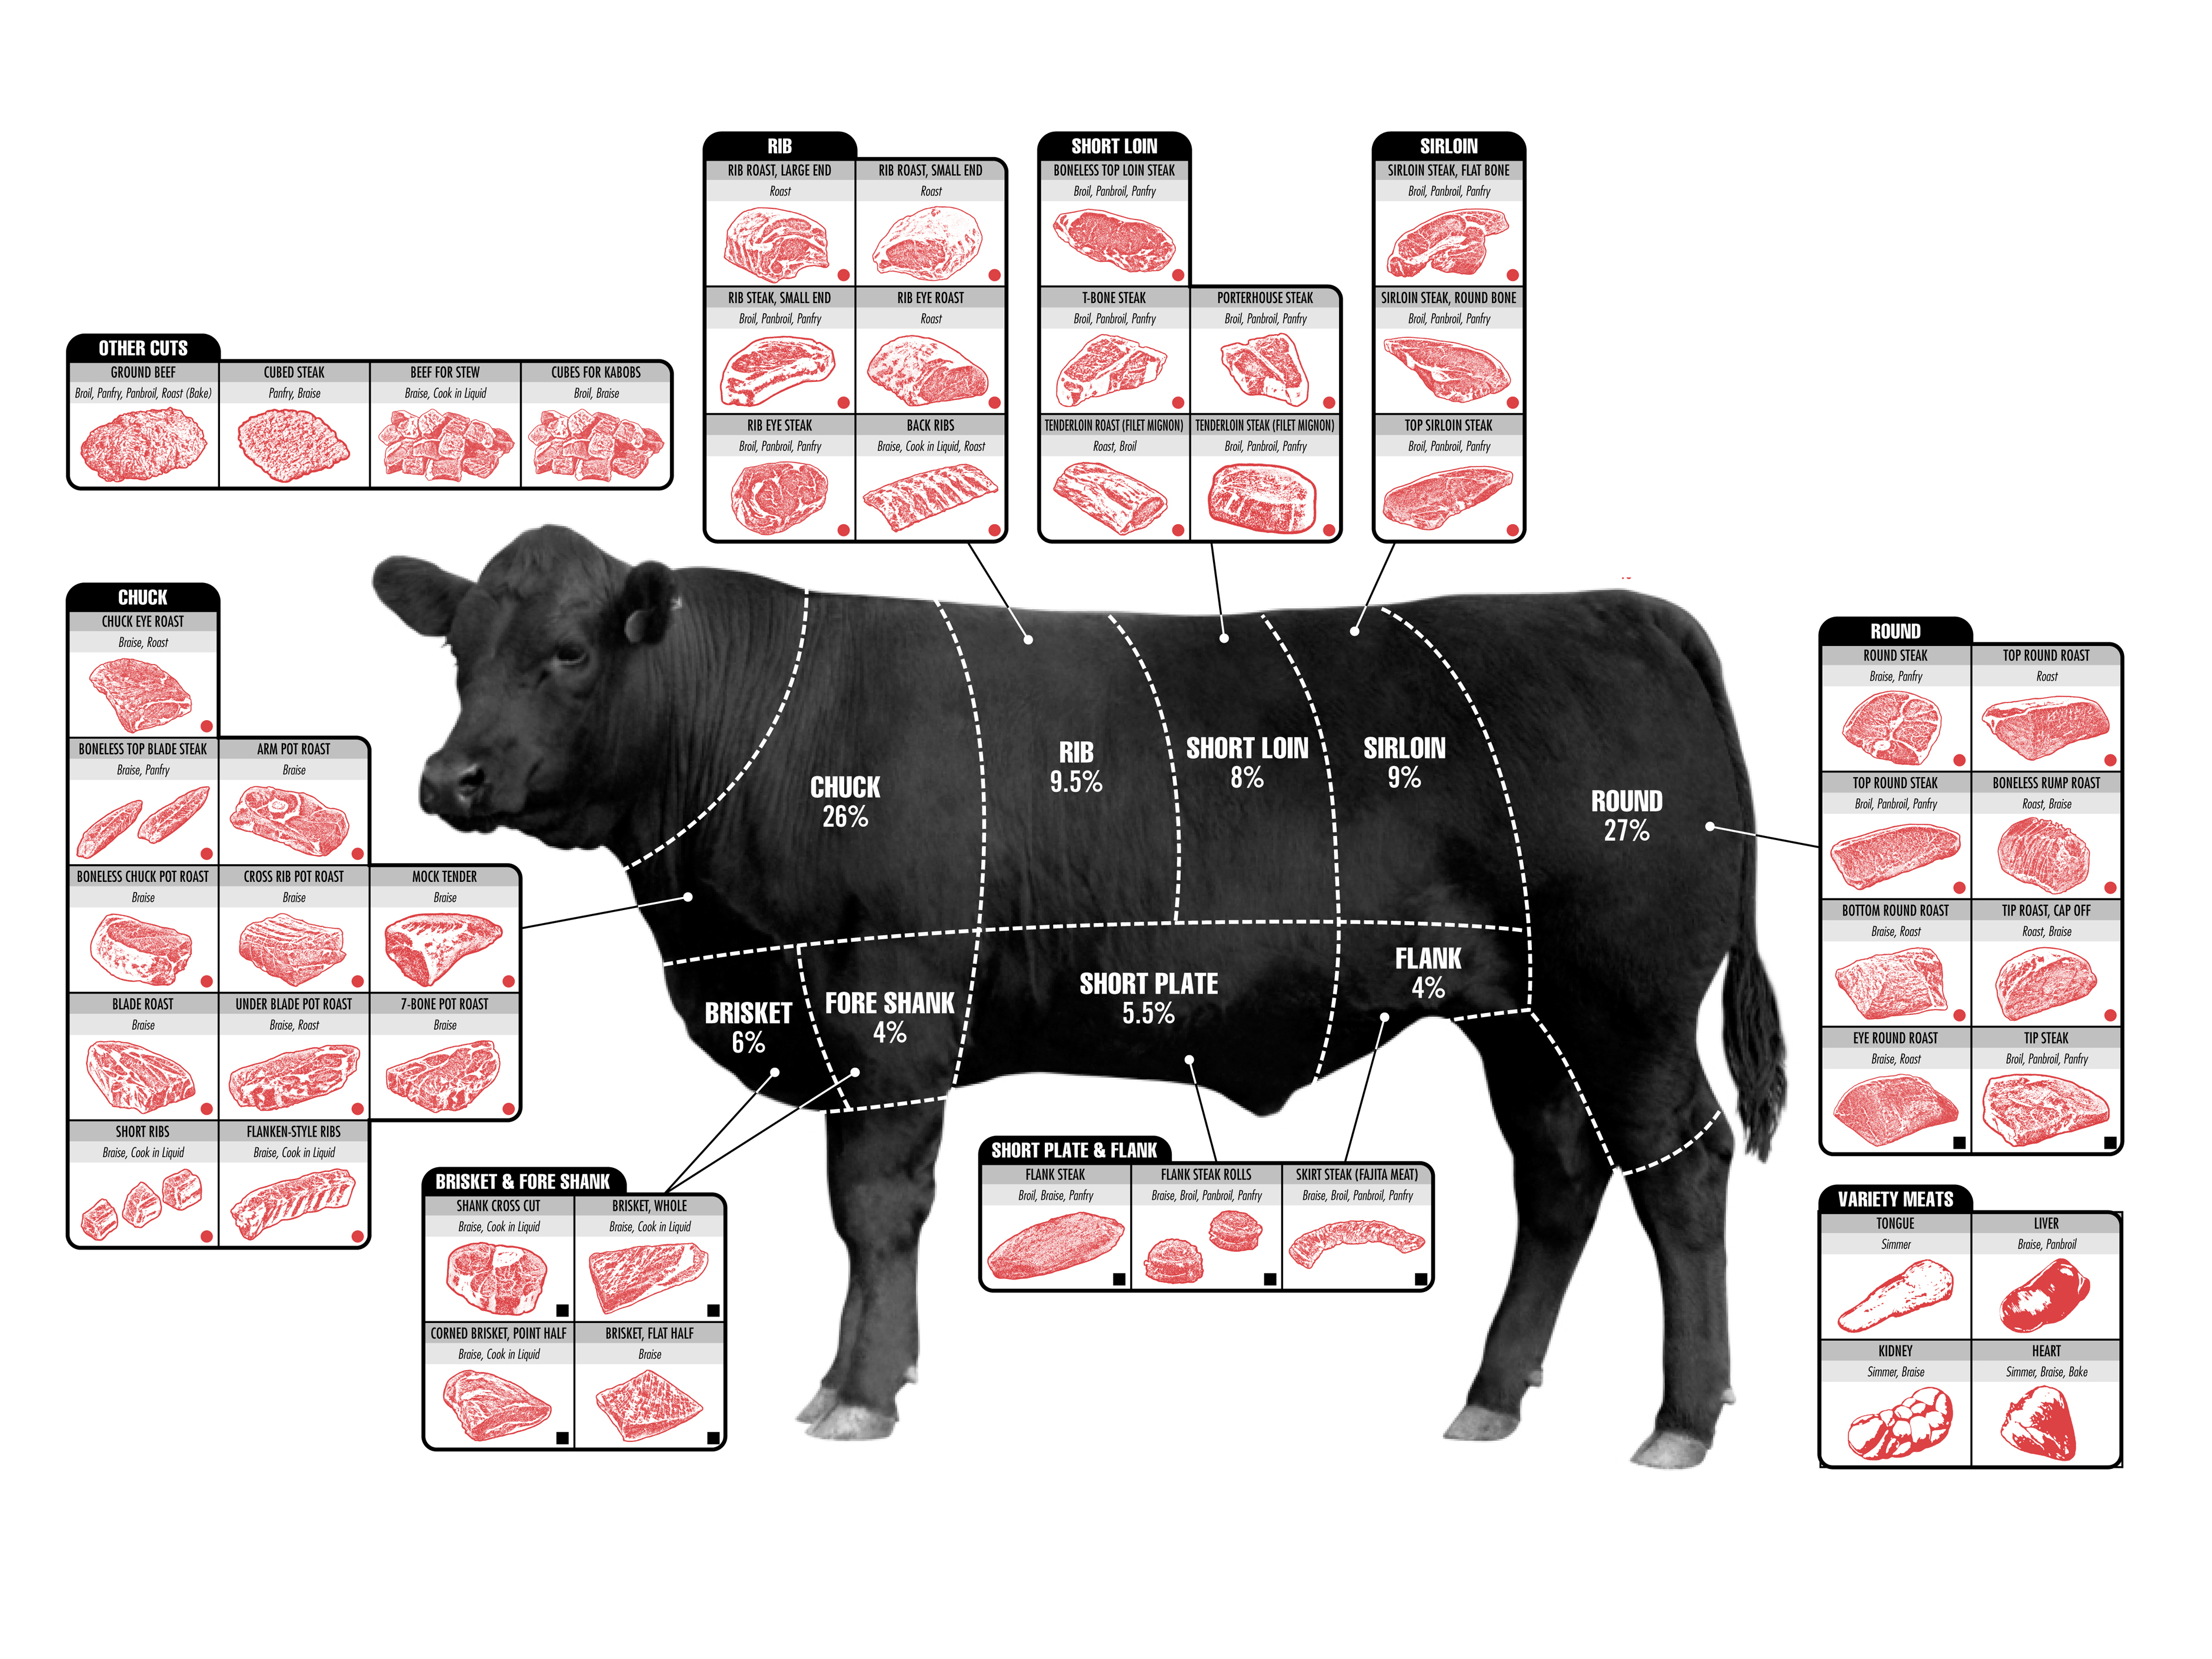
cuts-of-beefHere is a chart of where cuts of meat are from.  Click on the cow to get an enlargement of the graphic.  Click again to browse up close and personal.  Thanks to www.BusinessInsider.com for providing this chart.

Buying Ground Meats

  • You can usually ask your butcher to grind your meat for you.  That way, you know you are getting 100% meat without fillers.  The exception to this could be chicken.  Because of the potential for contamination, small butcher shops may grind chicken only one or two days per week.  Larger shops will have a dedicated grinder.  Call before you go.
  • Ground beef is NOT hamburger.  Beef fat may be added to hamburger, but cannot be added to ground beef.  Ground beef is usually made from the less tender cuts of meat, but the marbling and grade is the same as the higher grade steaks.
  • Chuck steak s a good choice for grinding.  A good hamburger is made using 80/20 ground beef that has been ground on a fairly coarse plate.  It is usually about 78-84% lean.
  • Round steak is OK, and is about 85-89% lean.
  • Sirloin steak is about 90-95% lean and would be better as a steak.  It would not produce a very juicy hamburger.

Buying Quality Meats

  • I think it is safe to say that you have all had a $4 steak from the grocery store, and wondered why it doesn’t taste as great as those that you pay $15 for in a restaurant.
  • The reason is not only atmosphere, it’s quality of product. Here in Arizona, you can go to The Meat Shop to preorder restaurant-quality cuts of meat. Another good source is Hobe Meats at 16th Street and Bethany Home Road.
  • A much more convenient option is to buy from Omaha Steaks.  You will pay a bit more than a quality local grocery store, but your meat will arrive at your front door step the day after you order it.
  • YES, they cost you more than what you would pay at the grocery store, but you are worth it. The old adage You get what you pay for really comes true in this scenario.
  • Sterling Beef is one of the top quality meats available to consumers.  One of the chief factors is the inter-muscular marbling.  Good quality meats will be under 2 years of age.
  • Grading of meat is very important based on how you will be cooking the meat.
  • Steer are young male cows that usually never see three years old.  Older cows and steers are kept for milking or breeding.
    The grades for steer meat are:

    • Utility Grade – Steers that are about 3 years old.   This is good for raw dishes such as carpacio or steak tar tar, because eating raw fat is not something we do often in America.  Usually entirely grass fed.
    • Select – This is good meat, but it is fairly lean, so will not be as fall-apart tender as meat with marbling. 30 months old or less.  (about $5/lb)  Sear and keep center about medium.  Cut against grain for something like fajitas.
    • Choice – Bit more marbling.  A very good choice for home grilling.  (about $8/lb)  A top quality home steak.  Fed its final days on ground corn, so it can be easily digested.   This is the best cut for home-cooking.
    • Prime – Lots of marbling, lots of fat.  Represents only about 3% of the meat available for purchase.  (about $12/lb)  Seared over very high heat, leaving the center rare to medium rare.  Must be young (between 18 and 24 months)  Many restaurants get this grade.
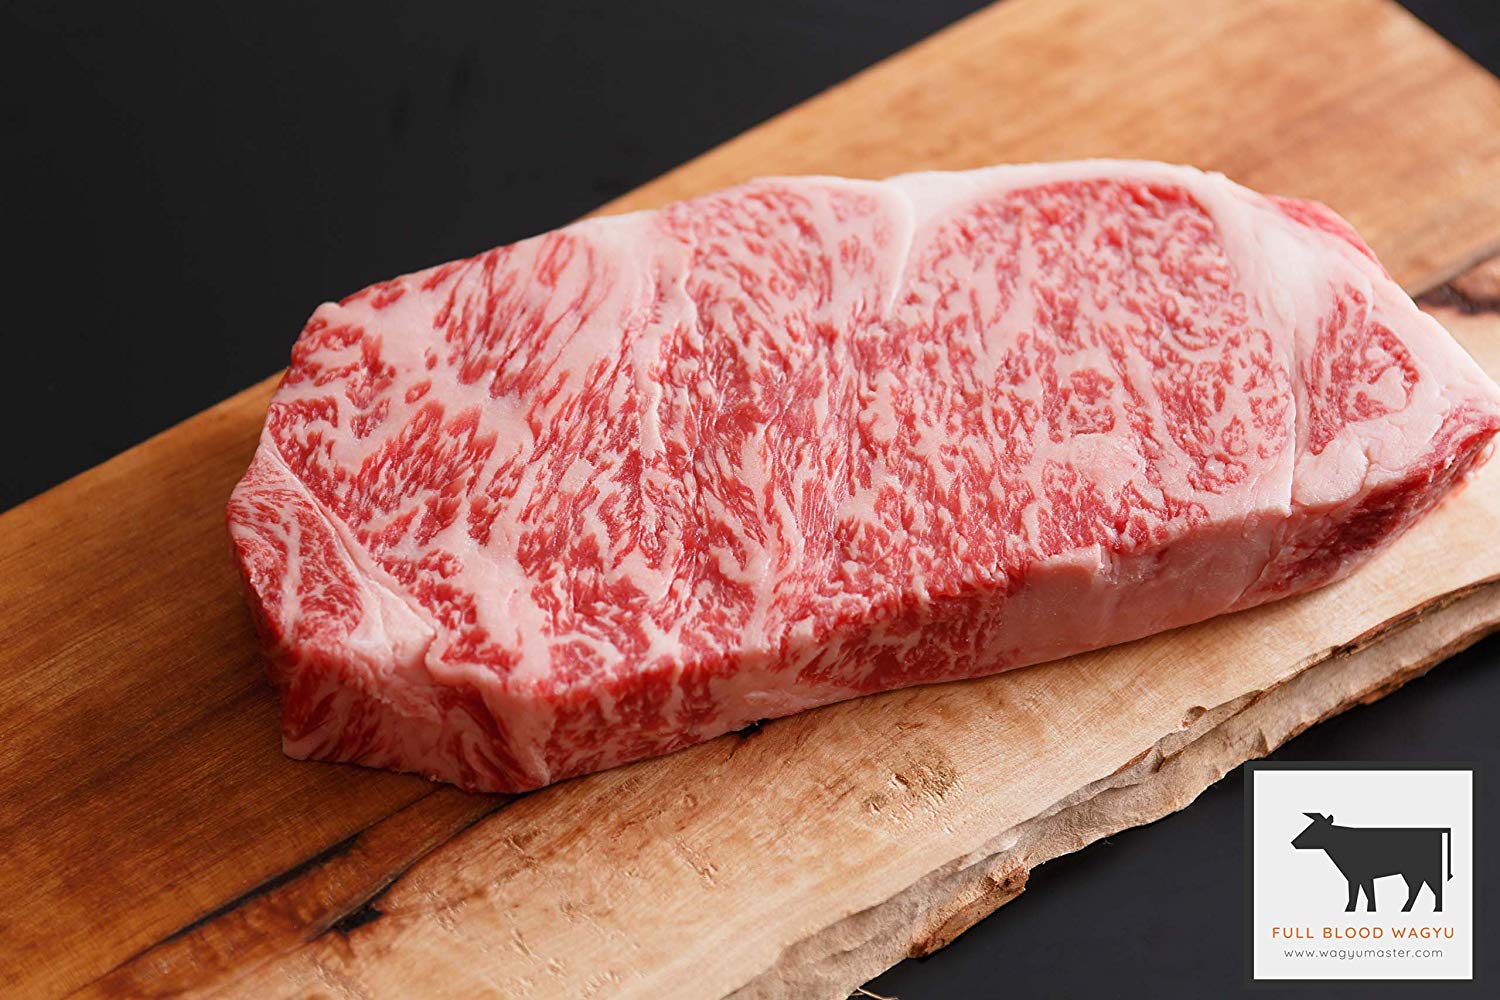
    • Wagyu or Kobe Beef – Even more marbling… almost too much for some people. (can be as high as $25/lb or more) Usually slice VERY thin and then seared briefly, not cooked as a steak.  Usually about 30 months of age.  Matsusaka is another high quality beef.
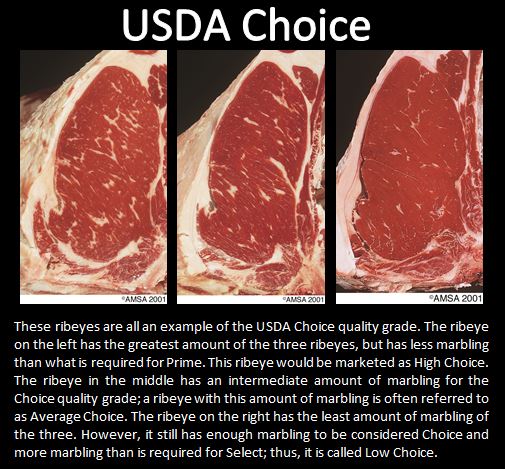
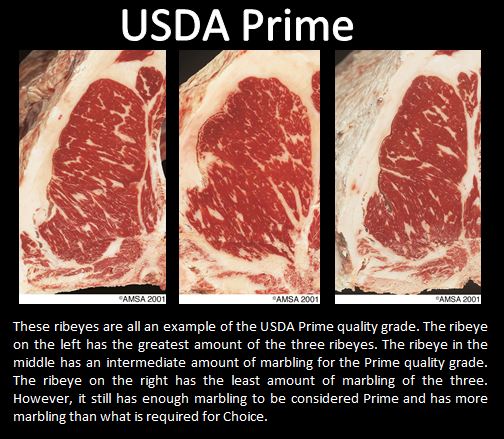
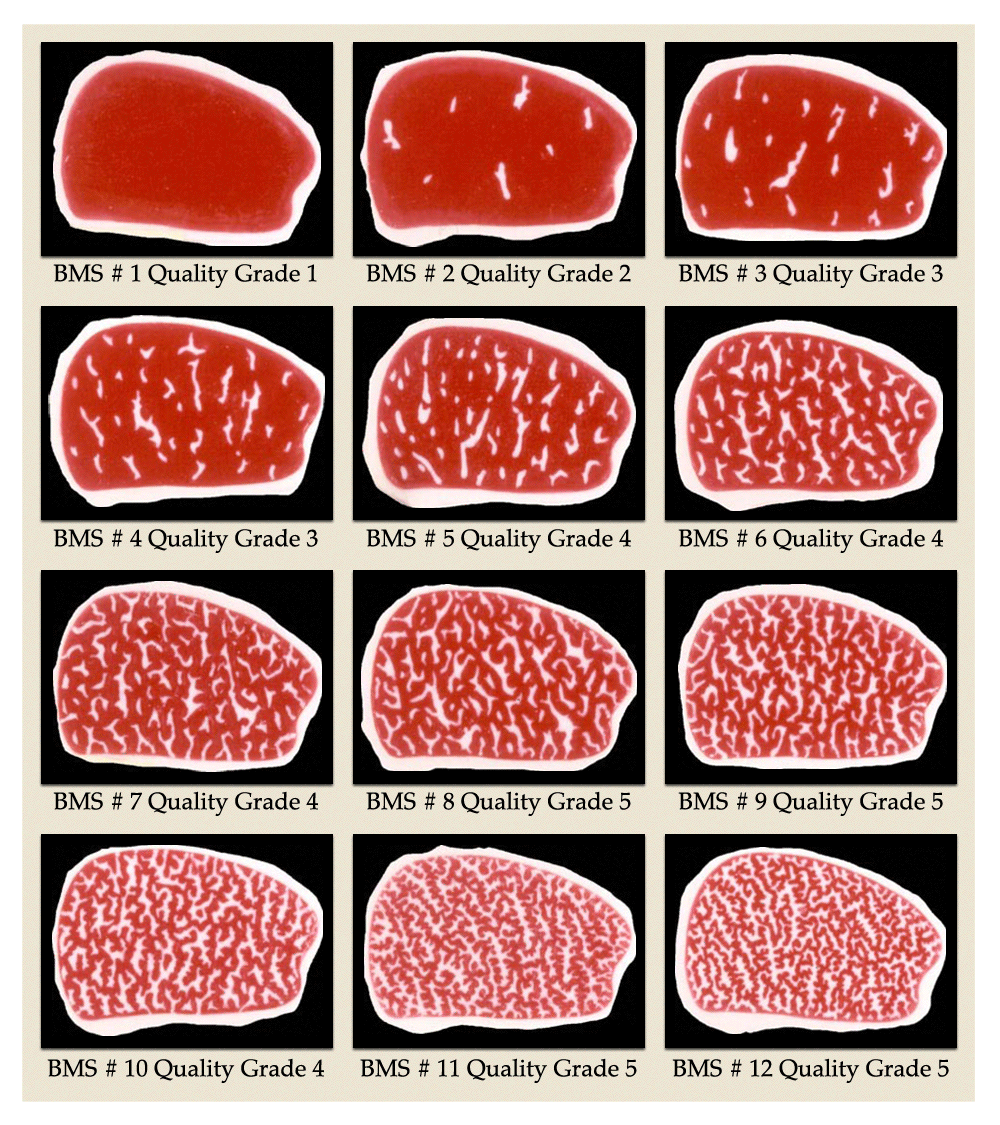
    • There are visual differences:  Check them out BY CLICKING HERE

CLICK ANY OF THE IMAGES BELOW

Wagyu

HERE IS A GOOD GRAPHIC.  While there is not much detail here, it does give a good representation of how the marbleing affects the grade of the meat.

Buying Fish

CLICK HERE FOR TIPS ON BUYING FRESH FISH

Meat Jokes

  • What do you call a cow on a hill?   Answer:  lean beef
  • What do you call a cow lying down?   Answer: ground beef
  • What do you call a cow with with twitch?  Answer: beef jerky
  • Why can’t a bankrupt rancher complain?  Answer:  he has no beef
  • What is a cow’s favorite musical note?  Answer: beef flat
  • Why don’t cows have any money?  Answer: the farmer has milked them dry,
    and they are udderly broke.
  • What happened to the lost beef shipment? Answer: nobody’s heard
  • Why did the boy give the cow a pogo stick?  Answer: he wanted a milk shake
  • Where do cows go for lunch?  Answer: the calf a teria
  • Why did the boy buy a brown cow?  Answer: he wanted chocolate milk
  • Why do milking stools only have three legs?  Answer: the cow has the udder
  • Where do steers take their cows on dates?  Answer: the moo-vies
  • Why do cows wear bells?  Answer: because their horns don’t work
  • What does the invisible man drink?  Answer: evaporated milk
  • And then there was the lady riding the train through Vermont when she noticed some cows.
    “What a cute bunch of cows!” she remarked.
    “Not a bunch, herd”, her friend replied.
    “Heard of what?”
    “Herd of cows.”
    “Of course I’ve heard of cows.”
    “No, a cow herd.”
    “What do I care what a cow heard. I have no secrets to keep from a cow!”

Cooking Meat – Tips and Tricks

  • During pan roasting process, baste with marinate
  • Rest on a rack for about 10 minutes after cooking to avoid loss of juice
  • Cut against grain – ALWAYS
  • Porterhouse is the tenderloin on one side, and a sirloin on the other side

Nieman Ranch Meats

  • Neiman Ranch has a reputation for quality meats.  They are based out of Colorado.
  • Within Phoenix, the Corporate offices are at Sterling Food Service at 920 Grand Avenue, Phoenix, AZ, 85007 – Ph: (602) 252-7345
  • To find a store near you, USE THE STORE LOCATOR
    • Near Grandpa’s Place, you can go to Sprouts Farmers Market at 8375 W Thunderbird Rd or 5130 W Peoria Ave.

Tips: Guacamole – COLLECTION

Grandpa’s Guacamole

Grandpa’s Guac

Other Guacamole Recipes

Quick Guacamole

Quick Guacamole

Avocado – Tips and Tricks

Tips: Avocado

Canyon Ranch Copy Cat Guacamole

Canyon Ranch Guacamole – Copy Cat

Chipotle’s House Spicy Guacamole – Copy Cat

Chipotle’s House Spicy Guacamole – Copy Cat

Guacamole Deviled Eggs

Guacamole Deviled Eggs

Avocado Salsa

Avocado Mousse

Avocado Salsa

Take Guacamole (above) and blend with a bit of tomato water and heavy cream


Chunky and Creamy Guac

  1. Use a fresh avocado, remove from skin and mash in a bowl
  2. Add 1 TBL lime juice immediately
  3. Minced red onion, minced garlic, chopped cilantro, Choloula (to taste), 2 jalapenos (seeds and veins removed)
  4. Mix well
  5. Put into a bowl and then cover TIGHTLY with plastic.  Press onto the guac
  6. Serve with fresh chips

Tips: Grilling Burgers (Beef)

Grades for Marbling
Grades for Marbling – click to enlarge

See also Tips: Steaks and Cow Parts

Buying your Hamburger

  • 80/20 lean has the best fat to meat ratio for grilling
  • What does 80/20 or 85/15 mean?  If ground beef has 20 percent fat and 80 percent lean beef, it is good for grilling, but not necessarily good for you. To be called “lean,” ground beef, it must have a lean point of 92% lean (or higher) and only 8% fat . “Extra lean” ground beef must have a lean point of 96% lean or higher. 
  • Another good meat option is 1/2 LB ground chuck mixed with 1/2 LB ground brisket
  • MARBLING EQUALS FLAVOR
    – SELECT is right around BMS Grade 3
    – CHOICE is right around Grade 4
    – PRIME is right around Grade 5
  • Select a piece of chuck with lots of marbling and have your butcher grind it (yes, there are people behind those doors — just ring the bell).
  • Ask for a “coarse” grind.
  • You can also grind the meat yourself with a meat grinder or chop in the food processor (cut into 1- to 1½-inch cubes first).
    An advantage to this is that there are fewer worries about contamination and you can safely cook your burgers medium-rare, if that’s how you like them.  A chef’s favorite that I see on TV a lot is 1/3 chuck, 1/3 shoulder and 1/3 short ribs.
  • Try different combinations of meat.  Almost any kind of ground meat can be used to make burgers, or mix together different ones. I’ve heard of mixing pork with beef, chicken with lamb, or even buffalo with beef. For flavor, try mixing some fresh sausage in with another type of meat.
  • A good combination is half short ribs, half brisket with an extra handful of fat thrown in.

Prepping your Meat for Cooking

  • When making your patties, don’t handle the meat too much.  It will become mealy.  The heat from your hands begins to melt the fat and makes the patty too dense. Move it lightly from hand to hand and loosely make a patty no thicker than one inch, or you will have to cook it too long).
  • When adding other ingredients to ground meat, use a spoon or spatula to avoid heating the meat with your hands
  • Make an indentation in the center of the meat.  Have you noticed that your burgers tend to form rounded tops when cooking, causing the condiments to slide off? If you push down slightly in the center, creating a round area about ¼ inch lower than the surrounding meat, your finished burger will come out flat.
  • Many people just want great beef, straight up with salt and pepper. But it’s also fun to add flavors, and if you are using leaner meats, or leaner cuts of beef, you can add moisture at the same time. Finely minced vegetables such as onion, mushrooms, or mild chilies are especially good for this.
  • Worcestershire sauce and soy sauce are common liquids to add to burgers.About 2 tsp per pound of meat is good.
  • You can also take a lean cut of meat and add some olive oil for good fat, or butter for flavorful bad fat; although this will cook faster than meats that are naturally fattier like 80/20 hamburger
  • If using lean meat, add moisture or fat to your meat.

Cooking your Meat

  • Start charcoal in center in a pyramid, then move to one side
    • Direct Heat:  Things that cook quickly or to get a sear (steak, chicken skin)
    • Indirect Heat: Finish cooking.  Also use for flare ups
    • Spread out coals for thin hamburgers, zucchini, asparagus, hot dogs, skewered seasoned shallots
  • Press down gently, but firmly, at the very beginning to get a good sear on the meat.  After that, don’t press down on the burgers when cooking.  This compresses the meat, making it denser, and also squeezes the juices out of the meat.
  • Salt and pepper are a must, but consider garlic powder or onion powder.  I personally recommend Grandpa’s Thunder Powder.
  • Once your burger is on the heat, don’t move it until it naturally releases.  Once it does, flip it.  Flip it twice more so that both sides get two cookings each.
  • A thermometer is a must-have.  I have a page of Kitchen Gadgets with a link to Thermoworks.  I recommend both an infrared (or IR) thermometer and an instant read ThermaPen.  Cook your meats at least to 145º internal temperature, unless you have ground the meat yourself.
HTML Snippets Powered By : XYZScripts.com